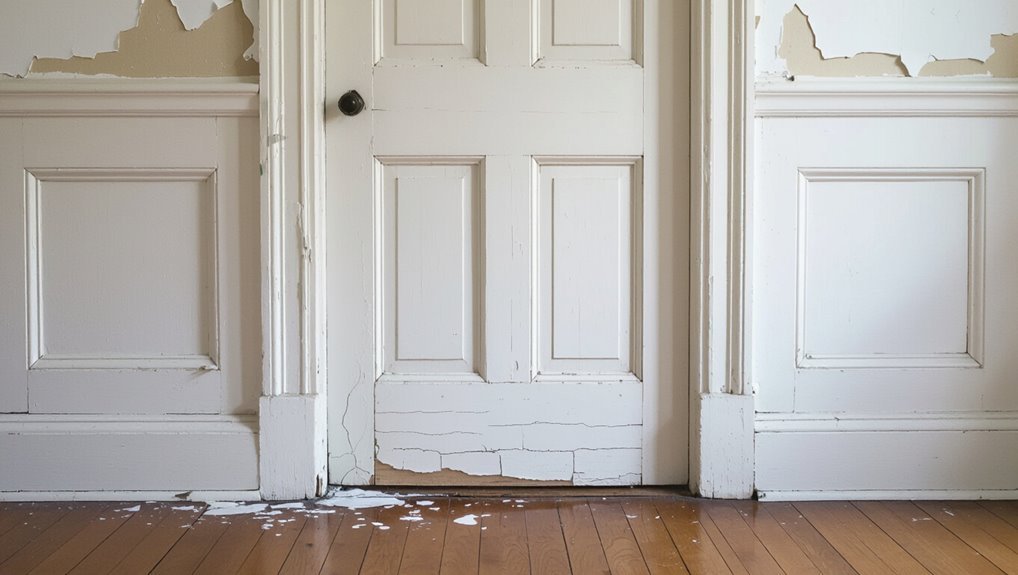
Why Is the Paint Peeling Off My Interior Doors? Common Causes
You’re seeing peeling because the finish couldn’t stick—usually from poor prep, moisture, incompatible layers, or constant contact. You may have painted over glossy or dirty surfaces without scuffing and priming, let humidity or condensation soften the film, or used mismatched primer and topcoat so new paint won’t bond. Repeated rubbing by hands or knobs also wears finishes thin. Fixes range from spot sanding and priming to addressing moisture sources, and the guide below explains how.
Quick Answer: Why Interior Door Paint Peels
Most often, paint peels on interior doors because the surface wasn’t properly prepared or moisture has compromised the bond.
You’ll also see peeling when incompatible paint types are layered, when finishes aren’t suited to door materials, or when humidity fluctuates.
Poor adhesion, leftover contaminants, and undetected rot or swelling accelerate failure.
Inspect primers, substrate, and environmental conditions before repainting.
Quick Repair Steps for Peeling Door Paint
Now that you’ve identified why the paint failed, you can tackle repairs quickly and safely. Start by removing loose paint, sanding edges, cleaning with deglosser, and priming to restore paint adhesion. Use thin coats of compatible paint, drying fully between layers. For small areas, spot-prime; for larger damage, sand to feathered edges and repaint.
| Step | Tool | Goal |
|---|---|---|
| Remove | Scraper | Clean edges |
| Sand | Sandpaper | Feather edges |
| Prime | Primer | Improve adhesion |
Cosmetic vs. Structural Peeling: How to Tell
You can usually spot surface-level paint flaws like bubbling, cracking, or small flakes that only affect the finish.
If the wood feels soft, warped, or shows gaps at joints, that points to underlying structural damage.
Start by gently scraping a small area and pressing around the peel to see whether it’s just paint or a deeper problem.
Surface-Level Paint Flaws
While peeling paint on an interior door can look alarming, you can usually tell quickly whether it’s a superficial cosmetic issue or a deeper structural problem by how the paint fails and what lies beneath it.
If you see flaking, cracking, or small surface imperfections without soft wood or gaps, poor paint adhesion or improper prep is likely—clean, sand, prime, and repaint to fix it.
Underlying Structural Damage
If the peeling goes beyond loose flakes and the wood feels soft, swollen, or has visible gaps, it’s a sign of underlying structural damage rather than a cosmetic issue.
You should inspect for rot, insect damage, or moisture intrusion that compromise structural integrity.
Address underlying issues promptly—replace or repair affected sections and fix moisture sources—to prevent further decay and recurring peeling.
How to Inspect and Document Peeling
Want to know exactly what’s going on with the door’s finish? Use systematic inspection techniques: note peeling patterns, edge vs. center lifts, blistering, and flaking.
Photograph each area, date images, and mark locations on a simple sketch. Record substrate type, previous coatings, and recent impacts or repairs.
Keep notes concise and consistent for repair planning or professional assessment.
High Indoor Humidity: Why Paint Lifts
When indoor humidity stays high, you’ll notice condensation forming on cool door surfaces and painted edges.
That trapped moisture breaks the bond between the paint and the wood, causing lifting and blistering.
Poor ventilation makes the problem worse by keeping damp air in contact with the door longer.
Moisture Condensation Issues
Because warm indoor air holds more moisture, high humidity often leads to condensation on cooler door surfaces. That trapped water undermines paint adhesion.
You’ll notice moisture sources, condensation effects, and varying humidity levels damage finishes depending on door materials and environmental factors.
Use sealing techniques, ventilation solutions, and appropriate surface treatments to stop peeling.
Poor Ventilation Effects
High indoor humidity from poor ventilation compounds condensation problems and makes paint lift more quickly, especially on doors in bathrooms, kitchens, or tightly sealed rooms.
You should upgrade ventilation systems and boost air circulation to stabilize indoor air and aid humidity control.
Effective moisture management and airflow improvement are part of climate adaptation that protect surfaces and extend paint longevity on interior doors.
Condensation on Doors and Paint Failure
If your home traps moisture, condensation on interior doors can quickly undermine paint adhesion and lead to bubbling, flaking, or peeling.
You’ll notice damp spots that weaken finish layers; condensation effects accelerate failure when paint can’t bond.
Take action before damage spreads:
- Check humidity and ventilation.
- Wipe and dry affected surfaces promptly.
- Repaint with moisture-tolerant primer and paint.
Moisture From Bathrooms and Kitchens
When steam from showers and boiling pots repeatedly hits interior doors, the moisture soaks into paint and causes it to swell, blister, or peel. You’ll often see damage first on doors nearest bathrooms and kitchens.
Check moisture sources like leaking vents, showers without fans, and cooking steam.
Monitor and reduce humidity levels with ventilation or dehumidifiers to prevent further paint failure.
Hollow-Core Doors and Humidity Sensitivity
Because hollow-core doors are mostly thin veneers over an empty or honeycombed interior, they absorb and release moisture more quickly than solid wood.
Hollow-core doors, with thin veneers over hollow interiors, absorb and release moisture faster than solid wood.
As a result, you’ll see paint bubble, crack, or peel as the door swells and shrinks with humidity changes.
You should note hollow core considerations and humidity effects:
- Frustration — flaking looks neglected.
- Expense — repeated repainting drains funds.
- Anxiety — constant touch-ups wear you down.
Door Warping and Finish Cracks
Though thin veneers and uneven moisture exposure make doors prone to warping, you’ll usually notice finish cracks first as paint stretches and splits along bowed panels or edges. You should inspect warped areas promptly, perform door maintenance to prevent worsening, and plan finish restoration when cracks appear.
| Sign | Action |
|---|---|
| Bowing | Sand and plane |
| Cracks | Refinish and seal |
| Loose veneer | Reglue and clamp |
Temperature Swings and Thermal Movement
If your home experiences wide temperature swings, the door’s wood and paint will expand and contract at different rates, causing paint to craze, flake, or pull away at joints and edges.
You’ll notice gaps and peeling from thermal expansion during temperature extremes.
You might feel frustrated, worried, or resigned as damage spreads:
- Frustration
- Worry
- Resignation
Poor Ventilation and Finish Breakdown
Wide temperature swings can worsen poor airflow issues, since trapped moisture and pollutants have more time to attack finishes when air doesn’t circulate.
You’ll notice blistering, soft spots, or discoloration as finishes break down. Improve ventilation with fans, vents, or dehumidifiers and follow routine finish maintenance to extend life.
Address humidity and air movement early to prevent peeling and costly refinishes.
Poor Surface Prep Before Painting
Preparation matters. If you skip surface cleaning or ignore adhesion testing, paint won’t bond and lifting starts. You feel frustrated—fix it by proper prep:
- Clean thoroughly to remove grease and dust.
- Use a primer suited to the door’s material.
- Perform adhesion testing before full coats.
Do these steps and you’ll prevent premature peeling and save time.
Improper Sanding That Reduces Adhesion
If you sand with the wrong grit sandpaper, the new paint won’t grip properly.
You also need to scuff the whole surface evenly — missed spots create weak adhesion points.
And don’t forget to remove all dust, because leftover particles will prevent a strong bond.
Wrong Grit Sandpaper
When you sand with the wrong grit, you can either leave a surface too smooth for paint to grip or scar it so deeply the finish won’t sit evenly.
You must learn Sanding techniques and proper Grit selection to guarantee Surface preparation that respects Adhesion principles for Paint application and Finish durability.
- Frustration
- Regret
- Resolve
Incomplete Surface Scuffing
Scuffing is the invisible step most people skip, but incomplete surface scuffing leaves glossy or contaminated areas that paint won’t bond to. You need light abrasive scuffing to promote surface adhesion; incomplete sanding causes flaking. Check sheen, sand edges, and use primer where needed.
| Step | Action | Result |
|---|---|---|
| 1 | Inspect | Find gloss |
| 2 | Sand | Matte finish |
| 3 | Prime | Bonding |
| 4 | Paint | Durable |
| 5 | Cure | Set |
Dust Left Behind
Although you may think sanding is enough, leaving fine dust on the door will prevent primer and paint from properly bonding.
You’ll see dust accumulation cause peeling later, so use effective cleaning techniques before priming.
Follow these steps to avoid regret:
- Wipe with a tack cloth.
- Vacuum crevices thoroughly.
- Finish with a damp microfiber wipe and dry completely.
Painting Glossy Surfaces Without Deglossing
If you skip deglossing and try to paint directly over a shiny door, the new finish often won’t stick because glossy surfaces repel paint; you’ll end up with peeling, blistering, or uneven coverage. You should use proper deglossing techniques to overcome glossy surface challenges and guarantee adhesion.
| Issue | Fix |
|---|---|
| Slick finish | Abrade |
| Poor adhesion | Clean |
| Blisters | Prime |
| Uneven sheen | Sand |
Using the Wrong Brush or Roller
When you grab the wrong brush or roller, the paint won’t lay down smoothly and you’ll see streaks, lint, or visible brush marks that lead to premature peeling.
Choose correct brush types and proper roller selection to improve adhesion and finish. Feel frustrated? Act now:
- Match brush to paint
- Pick nap for surface
- Avoid cheap, shedding tools
Contaminated Brushes, Rollers, and Tools
If you use dirty brushes or rollers, old paint and dust can get mixed into fresh coats and weaken adhesion.
Contaminated tools can leave residues—like oils or solvent traces—that cause peeling later.
Clean, well-maintained brushes and rollers help guarantee a smooth, durable finish.
Dirty Brushes And Rollers
Skip cleaning your tools and you’ll pay for it in flaking paint.
Dirty brushes and rollers transfer dust, old paint bits, and grit that prevent adhesion. You need proper brush maintenance and roller cleaning to avoid streaks and lifts.
Consider these consequences:
- Frustration — projects ruined.
- Time lost — scraping and redoing.
- Cost — wasted paint and supplies.
Contaminated Tool Residue
Three main culprits—dried paint, solvent buildup, and trapped grime—cling to contaminated brushes, rollers, and tools and sabotage new coats before they cure.
If you skip proper tool cleaning, microscopic debris and old finish transfer to the wet film, weakening paint adhesion and causing blisters or flaking.
Clean tools thoroughly between coats, store them correctly, and replace worn rollers to prevent failure.
Oil Contamination From Hands, Grease, or Cleaners
When you touch a freshly painted door with oily hands or clean it with greasy solutions, those residues prevent paint from properly adhering and can lead to lifting or peeling.
You’ll notice oil residue or slick spots that stop bond. Act quickly:
- Panic briefly—it’s upsetting.
- Clean gently with recommended cleaners.
- Repaint after proper degreasing and drying.
Chemical Reactions From Cleaning Products
If cleaning products contain harsh solvents, acids, or alkalis, they’ll react with the paint film and break down its binder, causing blistering, softening, or peeling.
You mightn’t notice chemical reactions until spots lift; repeated cleaning product interactions accelerate failure.
Use mild, pH-neutral cleaners, test a hidden area first, and wipe gently to prevent further breakdown of the paint surface.
Solvent/Coat Incompatibility: How to Spot It
Because different paints and solvents don’t always play well together, you’ll often notice telltale signs before a full failure occurs: soft, gummy spots, irregular gloss where a repair or topcoat was applied, or thin, crinkled areas that lift easily with a fingernail.
Check for solvent compatibility and failing paint adhesion with these urgent cues:
- Sticky, tacky patches.
- Patchy sheen and blotches.
- Flaky edges that pull away.
Rushing Recoat Times and Trapped Solvents
Although you might be keen to finish the job, slapping on a new coat before the previous one has fully cured traps solvents and moisture between layers, causing bubbling, blushing, or soft spots that later peel.
If you rush recoats, solvent trapping prevents proper adhesion and cure. Wait recommended dry times, check tackiness, and guarantee ventilation so each layer bonds and hardens correctly.
Overly Thick Paint: Sagging and Poor Cure
If you load the brush or roller with too much paint you’ll see visible sagging streaks run down the door before it dries.
Those thick layers also trap solvents and prevent the coating from fully curing, leaving a soft, tacky film.
Addressing application thickness helps prevent both sagging and incomplete paint cure.
Visible Sagging Streaks
1 common cause of visible sagging streaks on interior doors is applying paint too thickly. You’ll see visible sagging and streak patterns as gravity pulls wet paint, ruining smooth finishes.
Don’t panic—fix it by removing drips and re-sanding. Take these steps to restore the door and prevent repeats:
- Thin coats
- Shorter brush strokes
- Proper drying time
Incomplete Paint Cure
When you apply paint too thickly, the surface may dry while the underlying layers stay soft, causing a tacky finish, wrinkling, or later cracking as those trapped solvents escape—this is incomplete curing. You should thin coats, allow proper drying time, and control humidity effects to improve paint curing and prevent sagging or peeling.
| Problem | Fix |
|---|---|
| Tacky finish | Thin coats |
| Wrinkles | Longer dry time |
| Cracks | Lower humidity |
Using Low‑Quality Paints and Weak Binders
Although cheap paints can save you money up front, they often lack the strong binders that keep pigments and pigments’ particles bonded to the door surface.
So they’re more likely to crack, flake, or peel over time. You’ll notice low quality paints and weak binders fail sooner.
Consider how this makes you feel:
- Frustrated
- Embarrassed
- Regretful
Old Brittle Paint Layers and Age‑Related Failure
Cheap paint failures aren’t the only reason doors peel; paint itself ages and becomes brittle over years of temperature swings, sunlight, and repeated use.
You’ll notice cracks, flaking, and loss of adhesion as brittle paint loses flexibility. These age-related issues let moisture and movement undermine layers, so the finish detaches in patches.
Regular inspection helps you catch deterioration before large-scale peeling.
Painting Over Failing Paint Layers: Why It Peels
If you slap new paint over loose or flaking layers, you’ll almost always see the fresh coat peel away because it can’t bond to unstable material beneath.
You need proper surface preparation, humidity control, and attention to paint compatibility; otherwise moisture barriers fail, heat exposure worsens adhesion, and finish durability suffers.
- Frustration
- Waste
- Resolve — choose paint quality and prep.
Lead‑Based and Alkyd Layers and Flaking Risks
When you’re repainting older doors, check whether earlier coatings contain lead or are alkyd (oil) finishes, because both change how new paint will stick and age.
If you disturb lead paint, follow regulations; alkyd layers can resist water‑based topcoats, increasing flaking risks and poor paint adhesion.
Proper surface preparation and addressing moisture issues minimize failure and make new finishes last.
Hidden Wood Defects and Tannin Bleed‑Through
Because wood can hide cracks, knots, resin pockets, or insect galleries beneath a smooth finish, these defects often show up only after paint starts to fail.
They can cause localized peeling, bubbling, or dark stains. You’ll spot tannin bleed through or raised areas from hidden defects that ruin appearance.
Feel upset? Consider these reactions:
- Frustration
- Worry
- Resolve
Failure to Prime Bare or Repaired Wood
Skip the primer and you’ll see paint fail at the seams: bare or patched wood soaks up paint unevenly, causing thin, brittle coatings that peel or flake soon after drying.
You should always prime repaired areas and exposed bare wood so topcoat adheres. Choose appropriate primer types for adhesion and sealing, and sand between coats for a uniform surface that resists peeling.
Best Primers for Stains, Tannins, and Bare Wood
If you want paint to stay put over stains, tannin-rich woods, or bare patches, pick a primer formulated to block bleed-through and seal porous surfaces.
Shellac- and oil-based primers excel at arresting tannins, while high-quality acrylic latex primers work well on most bare or lightly stained woods and offer easier cleanup.
- Choose stain blocking primer types.
- Prioritize adhesion promotion and wood sealing.
- Consider moisture barrier, paint compatibility, color matching, finishing techniques, product longevity.
Choosing Compatible Topcoats for Durability
After sealing stains and tannin bleed with the right primer, pick a topcoat that works with that primer and matches the wear your door will see. You should choose compatible topcoats for adhesion and easy maintenance; expect durable finishes in high‑traffic areas. Compare options quickly:
| Area | Recommended | Durability |
|---|---|---|
| Hallway | Semi‑gloss | High |
| Bedroom | Satin | Moderate |
When to Use Oil‑Based Versus Water‑Based Finishes
When you need a finish that resists wear and levels smoothly, choose oil‑based; when you want fast drying, easy cleanup, and lower VOCs, pick water‑based.
You’ll weigh oil based benefits against water based advantages. Decide by use:
- High‑traffic rooms — durability.
- Quick projects — convenience.
- Environmental concerns — lower emissions.
MDF and Engineered Doors: Adhesion Tips
Moving from finish choice to substrate prep, MDF and engineered doors need different handling than solid wood because their surfaces and edges absorb and bond differently.
You should sand lightly, clean thoroughly, seal cut edges, and use a high‑adhesion primer formulated for MDF characteristics.
For Engineered door maintenance, avoid excess moisture, touch up exposed edges promptly, and follow manufacturer prep recommendations to prevent peeling.
Hollow‑Core Versus Solid‑Core: Repair Differences
When you compare hollow‑core and solid‑core doors, you’ll need different surface prep because hollow cores often have thinner veneers and more gaps to seal.
You can usually do structural repairs on solid doors with wood filler or clamps, while hollow doors may require patch kits or replacing the core section.
Your paint and finish choices should reflect that—use flexible primers and paints on hollow doors and heavier topcoats on solid wood for durability.
Surface Preparation Differences
Door construction affects how you prep and repair peeling paint: hollow‑core doors have thin veneers over a honeycomb or cardboard interior, so you’ll need lighter sanding, seam sealing, and careful filling to avoid breaking through.
In contrast, solid‑core doors tolerate more aggressive sanding and stronger fillers. Use surface preparation techniques and adhesion improvement methods to match the door type.
- Protect
- Proceed gently
- Finish confidently
Structural Repair Options
Now that you’ve matched your prep techniques to the door type, you’ll also need different structural repairs for hollow‑core and solid‑core doors. You’ll assess structural integrity, patch cavities or reinforce frames, and choose long term solutions: replace hollow panels or repair solid stiles. Visualize options:
| Hollow‑core | Solid‑core |
|---|---|
| Patch/insert | Plane/replace |
| Frame reinforce | Epoxy/stabilize |
Paint And Finish Choices
Finish choice matters: you’ll pick coatings and application methods based on whether the door’s hollow‑core or solid‑core, because each substrate accepts paint and finishes differently and that affects durability and appearance.
You should consider finish selection and paint durability when repairing.
- Hollow‑core: light prep, flexible primers.
- Solid‑core: deeper sanding, robust topcoats.
- Match finish to use and feel.
Edge Cuts and End‑Grain: How to Seal Properly
When you trim or rout a door, the exposed end grain soaks up paint and moisture faster than the surrounding faces, causing flaking and uneven coverage if you don’t seal it properly.
You should apply a dedicated end grain treatment or sanding sealer, then prime and paint.
For durable results, focus on edge sealing cuts, dry thoroughly, and sand between coats for a smooth, sealed finish.
Adhesion Versus Cohesion Failure: What Each Looks Like
If paint is peeling on your door, figuring out whether it’s an adhesion or cohesion failure tells you what to fix:
You’ll spot adhesion issues where paint lifts from the surface; cohesion problems show flaking within the paint film.
Check these signs and act promptly to avoid spread:
- Surface lifting — adhesion
- Blistered layers — cohesion
- Edge cracking — mixed failure
Prep Checklist Before Repainting Peeling Doors
Start with five clear steps to make repainting easier and longer-lasting: clear the work area and remove hardware, assess and document the types of peeling (adhesion vs. cohesion), strip or sand loose paint down to a stable edge, clean the surface of dust and grease, and choose compatible primers and paints for the door material.
Use prep techniques, tool recommendations, surface treatments, paint selection, humidity management, repair strategies, and maintenance practices.
Correct Sanding, Deglossing, and Cleaning Steps
Before you repaint, you’ll want to sand properly to feather edges and remove loose paint without gouging the door.
Then use a deglosser or fine sanding and wipe everything down with a suitable cleaner so new paint can bond.
Follow these steps methodically and you’ll cut down on future peeling.
Proper Sanding Technique
Sanding prepares the door’s surface so new paint will stick instead of peeling, and you’ll want to do it methodically: remove loose paint with a medium-grit (80–120) sandpaper, smooth the area with a finer grit (150–220), degloss any remaining sheen with a scuff pad or fine sandpaper, then clean all dust and residues with a vacuum and tack cloth before priming.
- You’ll feel relief.
- You’ll gain confidence.
- You’ll see adhesion improvement through proper sanding.
Deglossing And Cleaning
Once you’ve smoothed the surface, deglossing and cleaning make the difference between paint that sticks and paint that peels: you’ll use deglossing techniques like liquid sanders or mild abrasives to dull glossy finishes, then wipe thoroughly.
Choose proper cleaning solutions—TSP alternatives or mild detergent—rinse and dry completely.
Prime if needed, and you’ll guarantee strong adhesion and longer-lasting results.
Proper Drying and Recoat Timing to Avoid Failures
If you paint or recoat before the previous layer has cured, the new film won’t bond properly and you’re risking peeling, bubbling, or tacky spots.
Wait per manufacturer times, control proper ventilation and monitor environmental factors.
Adjust paint thickness and confirm surface conditions before recoating.
- Patience prevents heartbreak.
- Rush invites failure.
- Drying earns durable results.
Tools and Materials List for Door Repainting
Before you start repainting, make a concise list of the required tools, paints, and materials so you won’t interrupt the job.
You’ll need basics like sandpaper, a scraper, a good brush or roller, primer, and a durable interior paint formulated for trim.
Also include drop cloths, painter’s tape, a respirator or mask, and cleaning supplies to guarantee proper adhesion and a lasting finish.
Required Tools
You’ll need a compact set of tools and materials to get a door repainting job done cleanly and efficiently: gather repair tools, sanding methods gear, cleaning solutions, and primer selection guidance tied to door materials and paint types.
Consider humidity control and weather influences for application techniques and maintenance strategies.
- Brushes, rollers, scraper
- Sandpaper, sander
- Tack cloth, cleaner
Paints And Materials
When repainting an interior door, choose paints and materials that match the door’s surface and the room’s wear level so your finish holds up and looks professional.
Pick paint types (acrylic latex for most doors, enamel for high-traffic) and primer suited to substrate.
Include sandpaper, tack cloth, quality brush or roller, drop cloths, and follow adhesion techniques: clean, degloss, prime, and sand between coats.
Cost‑Effective Products That Still Last
A handful of smart choices lets you buy paints and finishes that stand up to door wear without draining your budget.
You’ll want durable finishes and affordable options—look for semi-gloss acrylics, stain-blocking primers, and clear polyurethane topcoats.
Choose products rated for trim.
Pick paints and finishes specifically labeled for trim—made to handle wear and look crisp over time
Feel confident choosing:
- Budget-friendly semi-gloss acrylic
- Stain-blocking primer
- Water-based polyurethane topcoat
These last.
Quick Patch Repairs for Small Peeled Areas
Start by cleaning the area and sanding the edges until the surface is smooth and free of loose paint.
Choose a patch material that matches the door—wood filler for small gouges or spackling for shallow chips—and apply it evenly.
Once dry, sand lightly and prime before repainting for a seamless finish.
Clean And Sand Surface
Tackle small peeled areas by first cleaning and sanding the surface to guarantee new paint adheres properly.
You’ll want precise surface cleaning and gentle sanding techniques so repairs don’t stand out.
Follow steps to feel confident:
- Wipe with degreaser, dry thoroughly.
- Sand feathered edges with fine grit.
- Remove dust, inspect for smoothness before repainting.
Use Appropriate Patch
Once the surface is clean and sanded, pick a patching product that matches the size and depth of the peeled area so repairs stay invisible.
You’ll apply a small filler or wood putty, smooth it flush, and sand lightly.
Use proper patching techniques to prevent shrinkage, prime the spot, and repaint to restore paint adhesion and blend the repair with the door’s finish.
Repainting Technique for Smooth, Durable Finish
When you’re ready to repaint an interior door for a smooth, durable finish, begin by removing or masking hardware and cleaning the surface thoroughly so paint adheres properly; scuff-sand glossy areas, fill any gouges with wood filler, and wipe away dust before priming.
Use proper repainting techniques to improve paint durability and follow this emotional checklist:
- Restore confidence.
- Enjoy calm satisfaction.
- Love the renewed door.
Preventing Repeat Peeling After Repairs
After you’ve prepped, filled, and primed the door for a smooth finish, take steps that stop peeling from coming back: pay attention to proper adhesion, control moisture and temperature, and choose compatible paints and primers.
You should schedule preventive maintenance, inspect edges and hardware, gently clean surfaces, and avoid harsh chemicals.
Maintain consistent humidity control and room temperature so the finish bonds and lasts.
Moisture Control Fixes to Stop Future Peeling
Because paint fails where moisture’s allowed to sit, you’ll need to tackle both sources and pathways of dampness to prevent future peeling.
Install moisture barriers in crawlspaces and behind trim, use humidity monitors to track indoor levels, and fix leaks promptly.
- Seal gaps fast
- Improve ventilation now
- Address plumbing leaks immediately
Maintenance Tips to Extend Painted Door Life
1 practical habit will make a big difference: inspect and clean your painted doors regularly.
Wipe dust and grime with mild detergent, dry thoroughly, and fix chips or scratches promptly.
Use felt pads on hardware, control indoor humidity, and avoid harsh cleaners.
These door maintenance steps prevent moisture traps, reduce wear, and promote paint longevity so your finish lasts longer.
Effects of Direct Sunlight on Interior Paint
If your door gets direct sun, you’ll notice colors fade and shift over time, making finishes look uneven.
The heat can soften and weaken the paint film, which speeds cracking and peeling.
UV exposure also causes a chalky surface residue that prevents new paint from adhering well unless you strip or thoroughly clean it.
Fading And Discoloration
While sunlight can brighten a room, prolonged exposure will slowly fade and discolor interior paint, especially on doors facing south or west.
You’ll notice uneven tones and chalky patches; act with fading solutions and discoloration remedies before damage spreads.
- Regret — you wished you’d protected it sooner.
- Resolve — you can restore appearance.
- Relief — proper fixes stop further fading.
Heat-Induced Film Breakdown
Because direct sunlight doesn’t just fade color, it also heats the paint film and makes it brittle. You’ll see cracking, crazing, or flaking where doors get prolonged sun exposure.
You’ll notice accelerated film degradation from repeated heat exposure, especially on top rails and panels.
To prevent peeling, reduce direct sun, improve ventilation, or choose heat-resistant coatings designed to withstand thermal cycling.
UV-Related Surface Chalkiness
Direct sunlight can break down paint binders at the surface, leaving a powdery, chalky residue you’ll notice when you run your hand over a door.
UV exposure causes surface degradation that shortens paint longevity and harms finish durability.
Consider:
- Frustration at faded panels.
- Worry over weakened protective coatings.
- Urgency to choose resilient paint formulations and suitable door materials to limit light reflection and damage.
Mechanical Wear: Knobs, Hands, and Contact Points
When you open and close doors every day, repeated contact from knobs, hands, and elbows gradually wears the paint at those touch points; oils, dirt, and friction break down the finish and cause it to thin, crack, and eventually peel.
You’ll notice wear patterns where knob impact and hand contact concentrate; frequent handling creates friction points.
Reduce door usage, clean touch points, and choose coatings with higher paint durability.
Troubleshooting Repeat Peeling After Repairs
If paint keeps peeling after you’ve fixed it, check whether the surface was cleaned and sanded properly before repainting.
Also consider moisture or high humidity that can lift new paint, and whether the new coat is compatible with the existing layers.
Addressing these three issues usually stops repeat peeling.
Surface Preparation Issues
A common reason repaired paint peels again is that the surface wasn’t prepped properly—old paint, grease, or glossy finishes can prevent new coatings from bonding.
You’ll notice surface imperfections and adhesion challenges if you skip sanding or cleaning.
Do this instead:
- Strip loose paint and clean thoroughly.
- Sand glossy areas and fill gouges.
- Prime with a bonding primer before repainting.
Moisture Or Humidity
Excess moisture or high humidity can undermine even well-repaired paint by softening the film and breaking the bond to the door’s substrate. You should identify moisture sources, monitor humidity levels, and dry the area before repainting to prevent repeat peeling.
| Source | Risk | Fix |
|---|---|---|
| Bathroom | High | Ventilate |
| Basement | Medium | Dehumidify |
Incompatible Paint Layers
Moisture isn’t the only reason paint flakes off after a repair; incompatible paint layers can cause peeling even when the surface is dry.
You’ll see adhesion failure when layer interaction and paint chemistry clash.
Check surface compatibility, paint types, application techniques, and environmental factors to prevent repeat problems.
- Anger: wasted effort
- Frustration: recurring repairs
- Relief: correct matching
When to Replace the Door and When to Call a Pro
If the paint on your interior door keeps peeling despite touch-ups, you’ll need to decide whether the door itself is failing or if the problem calls for a pro’s expertise.
Inspect for rot, warping, or extensive damage; minor issues mean sanding and repainting. For structural problems, explore door replacement options.
When humidity, hidden damage, or poor adhesion persist, get a professional inspection to avoid repeat failures.
Frequently Asked Questions
Can Peeling Be Caused by Pets Rubbing or Scratching Doors?
Yes — pets rubbing or scratching can cause peeling: you’ll see finish wear from pet behavior, moisture, and oils. You should address door maintenance by trimming nails, cleaning surfaces, and applying tougher paint or protective coatings.
Do VOCS From Furniture or Cleaners Affect Interior Door Paint?
Yes — VOCs sources like cleaners and furniture finishes can soften paint, cause discoloration, and weaken adhesion; you’ll notice sticky spots, bubbling, or flaking, so avoid harsh solvents, ventilate, and use low‑VOC products.
Can Humidity Sensors or Smart Vents Prevent Repeat Peeling?
Yes — they can help. You’ll use humidity control to keep moisture stable and smart vents to improve air circulation, reducing repeating peeling; combine sensors, ventilation, and proper paint prep to get the best, lasting results.
Will Repainting Trim and Door Together Prevent Mismatched Wear?
Yes — but only if you do it right. Repainting trim and door together improves paint durability and gives a uniform finish; you’ll avoid mismatched wear by prepping, using compatible coatings, and keeping up with regular door maintenance.
How Do Paints With Antimicrobial Additives Perform on High-Touch Doors?
They perform reasonably well: you’ll get some antimicrobial effectiveness reducing surface microbes, and they can maintain paint adhesion if applied to clean, cured surfaces; still, durability varies by formula, surface prep, and wear frequency, so test first.
Conclusion
Peeling paint on your interior doors is usually a warning light, not just an eyesore — it tells you moisture, sun, or friction is undermining the finish. You can patch small spots, sand and prime properly, but if peeling keeps coming back like bad news, the substrate or humidity problem could be the real villain. Treat the cause, not just the symptom, or you’ll be chasing flakes like leaves in a windstorm.