How to Fix Crack Paint: Quick Repair Solutions
You can fix cracked paint fast by diagnosing the crack, prepping the surface, and using the right filler and primer. Start by cleaning and sanding loose paint, then use a flexible spackling or filler for hairline or small cracks and a patch or substrate repair for larger splits. Sand smooth, prime with a compatible primer, then repaint in thin coats. Take safety precautions and match materials; continue for step‑by‑step techniques and troubleshooting tips.
What This Guide Fixes : Quick Overview
This guide shows you how to identify and repair common causes of cracked paint—surface shrinkage, poor adhesion, moisture damage, and structural movement—and tells you which fixes work for each problem.
You’ll learn quick diagnostics, targeted repairs, and crack prevention steps.
You’ll get practical painting techniques, recommended materials, and when to sand, prime, or replace substrates so repairs last.
Quick Answer: How to Fix Cracked Paint Fast
Start by evaluating the damage quickly to see if the cracks are surface-level or indicate deeper issues.
If they’re minor, you can patch small cracks with filler, sand smooth, and repaint; for larger or spreading cracks you’ll need to remove loose paint and address the substrate first.
With the right prep and a few tools, you can have the area patched and repainted fast.
Assess Damage Quickly
Because time matters with cracked paint, check the damage as soon as you notice it: inspect surrounding areas, note crack length, depth, and whether substrate is exposed.
Perform a damage assessment and quick evaluation to determine urgency. Photograph the area, check for moisture or flaking, and decide if immediate stabilization is needed.
Record findings to guide your repair steps efficiently.
Patch And Repaint
Prep the surface, fill the cracks, and repaint so the repair blends in and lasts.
Sand around damaged areas, remove dust, and use appropriate patch techniques—thin filler for hairlines, joint compound for larger gaps.
Prime patched spots, match paint selection to finish and sheen, then apply thin coats.
Feather edges to blend and cure fully before light use.
Repair vs. Repaint: When to Choose Each
If the cracks are shallow and isolated, you can usually repair them with filler and a touch-up coat.
If paint is flaking across large areas or the surface is compromised, you’ll need to repaint.
I’ll explain how to assess the damage and pick the right approach.
When Repair Is Enough
When the cracked paint is limited to a few small areas and the underlying surface is sound, you can usually repair rather than repaint the whole wall; repairing saves time and money while restoring a clean appearance.
You’ll use targeted repair techniques: scrape, fill, sand, prime, and touch up. These focused fixes preserve paint longevity and let you avoid unnecessary full-room work.
When Repaint Is Needed
Small, isolated cracks are easy to fix, but you’ll want to contemplate repainting when damage is widespread, the old finish is failing across large areas, or patching would leave obvious mismatches.
Consider these factors to decide between repair and repaint:
- Age vs. paint lifespan.
- Repair frequency history.
- Color or sheen inconsistency.
- Cost and time trade-offs.
Common Causes of Paint Cracking You Should Know
Because paint responds to both the surface and the environment, cracks usually trace back to a few predictable causes you can address.
You’ll check paint quality and paint type, guarantee proper surface preparation for good paint adhesion, and use correct application techniques.
Also control moisture and watch temperature effects—environmental factors like humidity and heat often cause failure if you don’t manage them.
Diagnose the Crack: How to Identify the Type You Have
Start by tracing the crack pattern—hairline, alligatoring, or long splits—to see what you’re dealing with.
Note whether the cracks follow joints, panels, or isolated spots to help determine the underlying cause. That pattern plus the location will tell you if the issue’s from substrate movement, poor adhesion, or environmental stress.
Locate Crack Pattern
How do you tell whether a crack is hairline, alligatoring, or a single edge split? You’ll inspect crack patterns, mapping size, shape, and spread.
Use close lighting and a magnifier for identifying cracks.
Steps:
- Note width.
- Check networked vs single lines.
- Look for raised edges.
- Assess surrounding paint adhesion.
Determine Underlying Cause
Diagnosis matters: to fix a paint crack you’ll need to identify what caused it — age, moisture, substrate movement, incompatible coatings, or application errors — because each cause calls for a different repair.
You’ll perform crack analysis by inspecting pattern, depth, and surrounding conditions.
Match repair method to cause to restore finish and guarantee paint longevity; address moisture or movement issues first.
Test the Paint and Substrate Before You Start
Before you scrape or sand, test the paint and substrate so you know what you’re dealing with and can choose the right repair method.
You’ll perform paint testing and substrate analysis to confirm adhesion, layers, and contaminants. Follow these steps:
- Clean area
- Tape and lift test
- Solvent swab
- Probe substrate integrity
Use results to pick proper prep and fixes.
Tools and Materials for Cracked‑Paint Repairs
Gathering the right tools and materials will make cracked-paint repairs faster and more durable. You’ll need sandpaper, scrapers, brushes, cleaner, primer, and matching paint.
Choose tools that suit surface size and texture, and make careful material selection to match substrate and finish. Prepare disposable gloves and drop cloths.
Follow safe repair techniques, work methodically, and keep supplies organized for efficient results.
Essential Fillers and Compounds for Cracked Paint
You’ll want a few reliable fillers and compounds on hand to rebuild cracked paint and restore a smooth surface.
Choose based on substrate and damage; learn filler types and prioritize compound selection for adhesion and sanding.
Consider:
- Lightweight spackling for small hairline cracks
- Polyester filler for deeper gouges
- Acrylic-based compound for flexible surfaces
- Epoxy filler for structural repairs
Safety Tips Before You Start Repairing Paint
Before you start repairing cracked paint, put on gloves, a respirator or mask, and eye protection to keep dust and fumes off you.
Open windows and use fans so the room stays well-ventilated while you sand or strip old paint.
Lay drop cloths and tape off nearby surfaces to protect furniture, floors, and trim.
Wear Proper Protective Gear
1 essential rule: wear the right protective gear every time you work on cracked paint.
You’ll follow safety precautions and use protective gloves, safety goggles, dust masks or paint respirators, work boots and protective clothing for skin protection and eye protection.
Avoid inhaling dust; use ventilation fans nearby.
- Protective gloves
- Safety goggles
- Dust masks/respirators
- Protective clothing
Ensure Room Ventilation
Because paint dust and fumes can build up quickly, make sure the work area has steady airflow before you start repairs. You’ll open windows, run fans, and consider a respirator to get ventilation benefits and improve air circulation while you sand or scrape.
| Action | Purpose | Tip |
|---|---|---|
| Open windows | Fresh air | Cross-ventilate |
| Use fan | Move air | Point outward |
| Wear respirator | Filter fumes | Check fit |
| Take breaks | Reduce exposure | Step outside |
Protect Surrounding Surfaces
With fresh air moving, you’ll want to shield floors, furniture, and fixtures from dust, chips, and stray paint.
Use clear surface protection strategies and heed surrounding area precautions before you start.
- Lay drop cloths tightly.
- Tape edges and vents.
- Remove or cover furniture.
- Seal nearby electronics and plants.
Preparing the Workspace for a Clean Repair
Anyone tackling cracked paint should start by clearing and protecting the work area: remove furniture and fixtures, lay down drop cloths, and tape off adjacent surfaces so dust and debris stay contained.
You’ll organize tools, label containers, and set up a trash bin to improve workspace organization and repair efficiency.
Keep lighting bright, ventilation active, and a damp cloth nearby for quick cleanups.
How to Fix Hairline Cracks on Interior Walls
Hairline cracks are common and usually cosmetic, but you should repair them promptly to prevent moisture and dirt from widening the gap.
You’ll assess hairline crack causes, choose appropriate interior wall treatments, and work cleanly.
Steps:
- Clean and sand.
- Apply flexible filler.
- Smooth and prime.
- Repaint to match existing finish.
Repairing Spiderweb and Fine Shrinkage Cracks
Though they look delicate, spiderweb and fine shrinkage cracks demand careful handling because they can spread and ruin a smooth finish. You’ll clean, widen slightly, fill with flexible filler, sand smooth, and repaint with matching sheen. Monitor for movement to catch recurrence early.
| Step | Action |
|---|---|
| 1 | Clean |
| 2 | Fill |
| 3 | Sand |
| 4 | Prime |
| 5 | Paint |
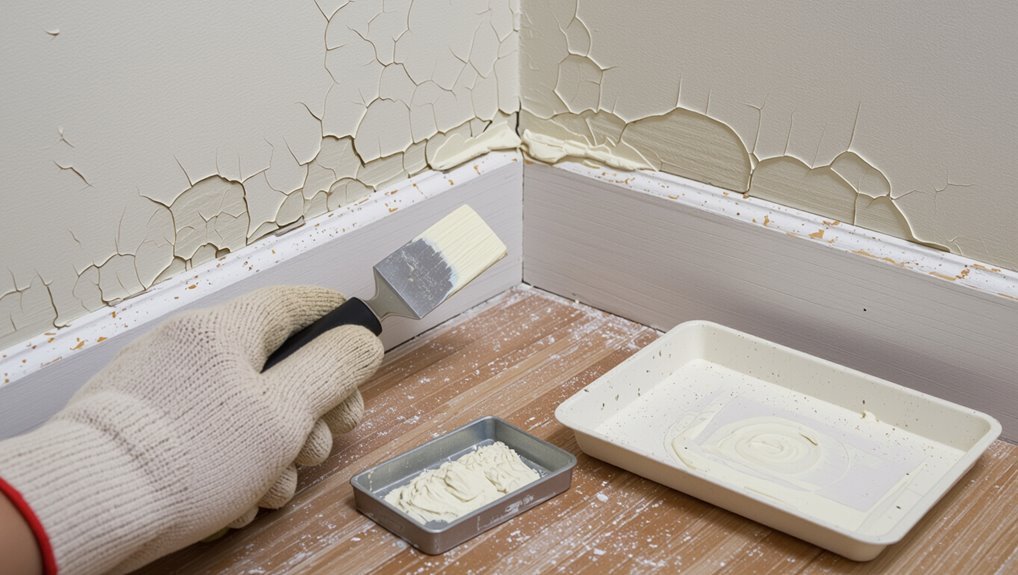
How to Remove Loose, Flaking Paint Safely
Start by loosening and removing any paint that’s already flaking so you’re working from a solid surface; use a putty knife, stiff brush, or scraper and take care not to gouge the substrate.
Loosen and remove flaking paint first—use a putty knife, stiff brush, or scraper without gouging the surface
Follow paint removal methods and safe scraping techniques:
- Wear PPE.
- Test for lead.
- Work gently with hand tools.
- Clean and vacuum debris.
Patch Peeling Paint on Wood Trim
Start by checking how far the peeling goes so you know whether you can spot-repair or need to refinish the whole trim.
Sand or scrape loose paint, clean the surface, and fill any gouges so the patch will sit flush.
Prime the repaired areas before repainting to guarantee adhesion and a uniform finish.
Assess Damage Extent
How bad is the peeling on your wood trim, and where’s it concentrated? You should perform a quick damage assessment to decide which repair techniques suit the patching.
Inspect surfaces, note loose flakes, and test adhesion. Then prioritize fixes:
- Small chips
- Large blisters
- Exposed bare wood
- Continuous peeling
This directs targeted, efficient repair choices.
Prep And Prime Trim
With your damage assessment done, move on to prepping and priming the trim so new paint will stick and look smooth.
Sand loose edges, scrape peeling paint, and clean dust and grease.
Fill gaps with wood filler, sand flush, and wipe clean.
For reliable adhesion, follow trim preparation steps and perform a proper primer application, letting it dry fully before topcoating.
Fixing Crackled (Alligator) Paint on Furniture
Crackle (or alligator) paint looks like a sign of age, but you can repair it without stripping everything down; first assess whether the finish is surface-level crazing or deep, flaking paint that needs removal.
Crackle (alligator) paint signals age but can often be repaired—first determine if it’s surface crazing or deep flaking.
You’ll choose restoration or sand-and-recoat for furniture refinishing to restore paint adhesion.
Steps:
- Clean
- Sand
- Prime
- Repaint
Addressing Paint Cracks Caused by Moisture
If moisture’s to blame for hairline or peeling cracks in your paint, tackle both the visible damage and the underlying dampness before repainting.
Dry the area, fix leaks or ventilation, and remove loose flakes.
Sand and clean to restore paint adhesion, then use a moisture-resistant primer and appropriate paint.
Monitor humidity to prevent future moisture damage and cracking.
Repairing Paint Cracks on Drywall Seams
Drywall seams often crack as houses settle or when tape and joint compound weren’t applied correctly, but you can fix them cleanly without redoing entire walls.
You’ll inspect drywall crack patterns, remove loose tape, and use proper seam repair techniques.
Steps:
- Score and clean crack.
- Remove damaged tape.
- Apply joint compound and embed new tape.
- Sand, prime, paint to finish.
How to Fix Cracks Over Plaster or Lath Walls
Plaster and lath behave differently than taped drywall, so you’ll need a different approach when cracks appear over lath or older plaster.
First, identify plaster types and lath methods used; hollow spots, detached keying, or horsehair indicate different fixes.
Remove loose material, secure lath or add backing, apply appropriate bonding primer and patch with compatible plaster compound, sand, prime, and repaint.
Dealing With Paint Cracks From Structural Movement
When your house shifts and paint starts to crack, don’t treat the surface symptoms alone—you need to assess the underlying movement to prevent recurrent damage.
When your home shifts and paint cracks, look beyond the surface—investigate movement to stop recurring damage.
You should check foundations and framing to protect structural integrity and improve paint longevity.
Steps:
- Inspect for gaps or sagging
- Monitor crack progression
- Address moisture sources
- Consult a structural pro before repainting
Fixing Hairline Ceiling Cracks Without Redoing Plaster
After you’ve ruled out structural movement, you can often repair thin ceiling cracks without stripping or redoing the plaster.
Clean the crack, widen slightly with a utility knife, then apply flexible acrylic caulk or joint compound. Sand smooth, prime, and repaint.
Investigate hairline crack causes like humidity or settling to prevent recurrence. Maintain stable humidity and inspect regularly for ceiling crack prevention.
How to Prepare Metal Surfaces With Cracked Paint
1 step you should take before repainting metal with cracked paint is to remove loose coating and assess rust—do this outdoors or in a well-ventilated area while wearing gloves and eye protection.
You’ll follow metal surface preparation and paint adhesion techniques to guarantee coating longevity:
- Strip loose paint
- Degrease surface
- Sand to feather edges
- Apply rust primer and compatible topcoat
Repair Exterior Siding Cracks
Cracked exterior siding lets moisture and pests into your walls, so you should repair damage promptly to prevent bigger problems.
Inspect siding materials to match repair patches or replace boards, clean and dry the area, and use appropriate filler or replacement pieces.
Sand, prime, and repaint to blend.
Regular maintenance and proper installation help with crack prevention and prolong siding life.
Seal and Caulk Gaps That Cause Paint Cracks
Once the siding is repaired, you’ll want to stop gaps and joints from reopening or letting moisture through—these openings are often where paint first starts to crack and peel.
Use gap sealing and proven caulking techniques to prevent recurrence.
Steps:
- Clean joints.
- Choose exterior-grade caulk.
- Apply smooth bead.
- Tool and cure before priming and repainting.
Sanding Strategies for Cracked‑Paint Repairs
Before you sand, assess the surface damage to determine whether you’re dealing with loose flakes, hairline cracks, or deeper substrate issues.
Pick a grit sequence that starts coarse enough to remove defects and progresses finer to prepare a smooth base for primer.
As you sand, feather the edges of remaining paint so changes are smooth and won’t telegraph through the new finish.
Assess Surface Damage
When you’re evaluating how deep the paint failure goes, look for loose flakes, bubbling, and visible substrate—these tell you whether light sanding or full paint removal is needed.
Use surface evaluation and damage classification to plan steps. Assess:
- Flake extent
- Substrate exposure
- Adhesion loss
- Corrosion or rot
Decide repair scope and prep accordingly.
Choose Grit Sequence
Think about grit sequence as a roadmap for sanding: you’ll start with a coarser paper to remove loose paint and feather edges, then step down through finer grits to smooth changes and prepare the surface for primer or finish.
Choose grit types based on damage severity, begin around 80–120 for heavy removal, progress through 180–220, and apply consistent sanding techniques to avoid gouges.
Feather Edges Smoothly
Although sanding can feel tedious, smooth feathered edges are the key to a seamless repair.
So work deliberately from the intact paint toward the damaged area to blend shifts. You’ll use feathering techniques and careful blending methods.
Follow these steps:
- Start with 180 grit.
- Move to 220 grit.
- Finish with 320 grit.
- Lightly scuff before priming.
Choosing the Right Primer for Repaired Areas
Because repaired spots often absorb paint differently than the surrounding surface, you’ll want a primer that evens out porosity and promotes adhesion.
Choose primer types based on substrate—stain-blocking for patches, bonding primers for glossy areas, or latex for drywall.
Follow proper primer application: thin, even coats, dry times between layers, and light sanding for a smooth base before repainting.
Best Paint Types for Preventing Future Cracks
Now that repaired spots are primed and smooth, the paint you choose will determine how well those fixes hold up over time.
Pick paints with flexible finishes and good moisture resistance to prevent re-cracking.
Consider:
- Acrylic latex for general interior durability.
- Elastomeric for exterior gaps.
- High-quality enamel for trim.
- Mold-resistant blends for humid rooms.
How to Feather Edges for Seamless Blending
Start by sanding the cracked area smooth so your patch sits flush with the surrounding surface.
Then apply thin, even paint layers and let each one dry before adding the next to avoid ridges.
Finish by blending the wet edges with a feathering brush, working light strokes outward for an invisible blend.
Sanding The Crack Smoothly
Grab a sanding block and medium-grit sandpaper and work the crack’s edges until the old paint and filler taper smoothly into the surrounding surface.
You’ll use proper sanding techniques and thorough surface preparation.
Follow steps:
- Sand along the crack’s length.
- Feather edges outward.
- Clean dust with a tack cloth.
- Inspect for uniform smoothness before priming.
Apply Thin Paint Layers
With the surface smoothed and dust removed, you’ll apply thin paint layers to feather the repaired area into the surrounding finish. Use light strokes, let each coat dry, and check paint adhesion after proper surface preparation to prevent lifting.
| Calm | Confidence |
|---|---|
| Careful | Rewarding |
| Patient | Satisfying |
| Precise | Restored |
Blend With Feathering Brush
Once you’ve built up thin, dry coats, use a feathering brush to soften the paint’s edge and blend the repair into the surrounding finish.
You’ll follow simple feathering techniques and blending tips to hide shifts.
- Light pressure
- Short, outward strokes
- Cross-hatch sparingly
- Check in varied light
Work quickly before paint skins over for seamless results.
Tips for Matching Paint Color After Repairs
Although getting an exact match can feel tricky, you can achieve seamless paint repairs by taking a few careful steps: compare paint swatches under natural light, bring a chip to the hardware store for professional color matching, test small patches on inconspicuous areas, and let primer dry before final checks.
Keep notes of brand, finish, and formula for future touch-ups.
Painting Techniques to Hide Repaired Cracks
When you repaint a repaired crack, use feathering to blend the new paint into the old so the edge disappears.
Match the original texture by mimicking the brush or roller strokes the surrounding area has.
With careful blending and consistent stroke patterns, the repair will be hard to spot.
Blend With Feathering
If you want the repair to disappear into the surrounding paint, feathering is the technique you’ll use: lightly taper new paint out from the patched area so the edges vanish against the original finish.
Use these steps to apply feathering techniques and blending paint:
- Thin paint slightly.
- Load brush sparingly.
- Stroke outward gently.
- Blend until seamless.
Texture Matching Strokes
Feathering helps the repair vanish, but you’ll also need to match the surface texture so light reads the patched area the same as the rest of the wall.
You’ll test strokes on scrap, mimic existing peaks and valleys, and use a consistent stroke technique. Work quickly while compound is tacky, adjust pressure for texture consistency, and blend edges until the repair visually disappears.
When to Use Flexible Fillers vs. Rigid Spackles
Because paint and substrate move differently, you’ll want to choose a filler based on where the crack is and how much shifting happens.
You should pick flexible fillers for joints and hairline cracks; use rigid spackles for stable surfaces and deep chips.
Consider:
- Location
- Movement level
- Paint compatibility
- Drying time and sanding needs
How to Use Epoxy or Wood Filler on Deep Cracks
First, you’ll assess the crack depth to decide whether epoxy or wood filler is right for the job.
Then you’ll pick a filler formulated for structural repair or surface leveling, apply it per the product instructions, and let it cure fully.
Finally, you’ll sand smooth and finish with primer and paint for a seamless repair.
Assess Crack Depth
Wondering whether a crack needs epoxy or wood filler? You’ll do a quick crack analysis to gauge depth, width, and substrate.
Follow this checklist:
- Probe depth with a pick.
- Measure width visually or with calipers.
- Note substrate firmness.
- Test for voids.
These repair techniques help decide if layered filling or structural bonding is required before surface work.
Choose Appropriate Filler
Now that you’ve assessed depth and substrate, pick a filler that matches the crack’s structural needs and the final finish.
For deep structural gaps, use epoxy; for simple wood voids, choose wood filler.
Consider filler types for adhesion and cure time, then follow proper application techniques: clean the area, apply in layers if needed, compact to eliminate air, and allow full cure before proceeding.
Sand And Finish
Prepare to sand and finish once your epoxy or wood filler has fully cured; this step transforms a rough repair into a seamless surface.
You’ll use proper sanding techniques, test grit progression, and select finish options that match the surrounding paint.
Steps:
- Start with coarse grit.
- Progress to fine grit.
- Feather edges to blend.
- Clean dust before priming and painting.
Quick Fixes for Rentals and Staging
If you’re renting or staging a place and spot cracked or peeling paint, you can fix it quickly so the space looks cared-for without a major overhaul.
Use lightweight spackle, a putty knife, and quick-dry primer to smooth spots, then touch up with matching paint.
Combine repairs with rental decor and staging techniques—cover small flaws with art, throw pillows, or furniture placement for immediate impact.
Budget‑Friendly Repair Options That Last
You can fix cracked paint without spending much by choosing low‑cost materials like spackle, primer, and quality latex paint.
Use durable DIY techniques—proper surface prep, thin layered repairs, and sanding between coats—to make repairs last.
With the right steps and products, you’ll save money and avoid repeat touchups.
Low-Cost Material Choices
While keeping costs down, pick materials that actually hold up—cheap fixes that fail are false economies.
You want budget materials that deliver; choose primers, fillers, and paints rated for cracking. These cost effective solutions save time and repeat work.
- Acrylic filler
- Flexible primer
- Contract-grade paint
- Quality sanding pads
Durable DIY Techniques
Having picked materials that actually hold up, now apply techniques that make repairs last without blowing your budget. You’ll use durable fillers and flexible compounds, prioritize surface preparation and moisture barriers, and optimize paint adhesion and texture matching. Use cost effective solutions, plan seasonal adjustments, and follow curing times for lasting results.
| Step | Focus |
|---|---|
| 1 | Prep |
| 2 | Fill |
| 3 | Seal |
| 4 | Paint |
Professional Repair vs. DIY: When to Call a Pro
When crack paint affects only a small, accessible area and you’re comfortable with basic prep work, a DIY fix can save time and money; however, call a pro if the damage is widespread, structural, or involves lead paint, moisture, or historic surfaces that need preservation.
For small, accessible cracks a DIY fix works; hire a pro for widespread, structural, lead, moisture, or historic concerns.
You should weigh professional assessment, cost considerations, repair techniques, and long term solutions:
- Scope
- Safety
- Warranty
- Materials
How to Prevent Cracks After Repainting
To prevent new cracks after repainting, you’ll want to start with proper surface preparation—clean, sand, and prime so the paint bonds well.
Choose flexible paint formulas or additives that move with the substrate to resist stress and temperature changes.
Combining good prep with the right product will keep your finish intact longer.
Proper Surface Preparation
Start by stripping loose or flaking paint down to a firm edge and cleaning the surface thoroughly; if you skip this, new coats won’t bond and cracks will reappear.
You’ll use surface cleaning techniques, patch imperfections, and follow primer application tips.
Then:
- Sand edges smooth
- Remove dust
- Fill gaps
- Apply an appropriate primer before repainting
Use Flexible Paint Formulas
Although flexible paint might cost a bit more, choosing formulas with elasticity is the single best way you can prevent new cracks after repainting.
You’ll buy flexible paint designed to move with substrates, reducing stress at joints and hairline fractures.
Consider formula benefits like UV resistance, adhesion, and elongation percentages; match product specs to your surface and follow manufacturer prep for lasting results.
Seasonal and Humidity Considerations for Paint
When you’re fixing cracked paint, consider the season and humidity because they directly affect drying time and adhesion; high humidity slows curing and can trap moisture under new coats, while very low humidity can cause paint to dry too fast and crack again.
- Watch temperature effects and humidity levels.
- Adjust for seasonal changes and weather conditions.
- Promote paint adhesion and surface tension balance.
- Boost paint durability, moisture resistance, and seasonal maintenance.
Maintenance Checklist to Avoid Recurring Cracking
After controlling temperature and humidity, you’ll want a simple, repeatable maintenance checklist to keep cracks from coming back.
You’ll schedule surface inspections, note humidity effects, and track environmental factors.
Prioritize moisture control and structural integrity checks, choose proper paint selection for paint durability, perform seasonal maintenance, apply preventive measures, and do regular touch ups to extend life and prevent recurrence.
Common Mistakes That Make Cracks Come Back
If you want repairs to last, don’t skip proper surface prep — dirt and loose paint will make new coatings fail.
Using the wrong primer or paint and slapping on coats that are too thick are other common mistakes that cause cracks to return.
Fix these issues up front and your patchwork will hold.
Skipping Surface Preparation
Although you might be enthusiastic to slap on a fresh coat, skipping surface preparation guarantees those cracks will come back — and faster.
You need proper surface cleaning to remove dust, oil, and loose flakes so paint adhesion holds. Do this:
- Remove loose paint
- Clean with detergent
- Sand rough edges
- Prime porous areas
Skip none; cracks will reappear.
Using Wrong Materials
When you grab the wrong paint or additives, you’re setting yourself up for cracks to reappear no matter how well you prepped the surface.
Don’t mix incompatible products: poor material compatibility between primers, fillers, and topcoats weakens bonds.
You should match formulations (latex vs. oil), check manufacturer’s specs, and use recommended fillers.
Correct product choice prevents recurring cracking and wasted effort.
Applying Thick Coats
Choosing compatible products won’t fix cracks caused by laying paint on too thick. You need correct application techniques and patience to prevent failure.
Avoid heavy buildup and follow these steps:
- Sand thinly between coats.
- Thin paint per label.
- Apply multiple light coats.
- Allow full drying time.
If you rush or use thick coats, cracks will reappear.
How to Hide Minor Cracks Temporarily
If you need a quick, temporary fix, you can mask minor paint cracks with a few simple tricks that won’t require sanding or repainting.
Use thin clear caulk or paintable filler sparingly, wipe smooth, then touch up with matching paint or tinted marker.
These temporary solutions serve cosmetic fixes until you can perform proper repair, and they blend well for short-term concealment.
How Long Should Repaired Paint Take to Cure?
Those quick cosmetic fixes will hold up only for a short while, so you’ll want to know how long the repaired paint needs to cure before normal use.
Typical cure time ranges 24–72 hours, but drying factors matter. Consider:
Typical cure time is 24–72 hours, but drying conditions vary—temperature, humidity, paint type, and layer thickness matter.
- Temperature
- Humidity
- Paint type
- Layer thickness
Wait full cure time before heavy use to avoid damage and guarantee durable results.
Pro‑Recommended Tools for Cracked‑Paint Repair
Tools matter — and using the right ones makes cracked‑paint repair faster and longer lasting.
You’ll want quality pro tools: flexible scrapers, fine‑grit sandpaper, a precision putty knife, angled brushes, and a dual‑action sander for larger areas.
Keep a heat gun and small compressor handy for quick fixes and faster adhesion.
Choose durable, ergonomic gear to speed work and improve results.
Eco‑Friendly Materials for Paint Crack Repair
Having the right tools makes the job smoother, but choosing eco‑friendly materials keeps your repair safe for people and the planet.
Right tools make repairs easier; choosing eco-friendly materials keeps work safer for people and the planet.
You’ll prefer low‑VOC fillers and eco friendly paint; pick sustainable materials to reduce fumes and waste.
Consider:
- Low‑VOC primer
- Natural fiber sandpaper
- Water‑based filler
- Recyclable packaging supplies
These choices protect health and the environment.
Cost Estimate Guide for Common Repair Types
1. You’ll get a quick cost breakdown for common fixes: touch‑ups, filler and sanding, spot priming, and full repaint.
Estimate repair pricing per area—small chips ($10–$50), medium cracks ($50–$150), large repairs or texture matching ($150–$400).
Include materials and minimal labor; add contingencies for prep or color matching.
Use this to plan budget and compare quotes.
Step‑By‑Step Repair Workflow
Now that you’ve budgeted for the likely repairs, let’s walk through the hands‑on workflow you’ll follow to fix cracked paint.
You’ll select appropriate repair techniques and match paint types, then proceed methodically:
- Clean and sand damaged area.
- Apply filler and sand smooth.
- Prime compatible with paint types.
- Paint in thin coats, feather edges.
Follow drying times and inspect between steps.
Troubleshooting: Repairs That Still Show After Painting
If your repaired patch still stands out after painting, don’t panic—you can usually diagnose and fix the cause with a few targeted checks.
Inspect lighting, texture, and substrate; different crack types need specific sanding, fill, or bonding.
Match skim thickness, primer choice, and paint sheen.
Reapply the appropriate repair methods—feathered sanding, correct filler, bonding primer—and repaint for a seamless finish.
How to Document Repairs for Landlords or Buyers
When you’re documenting repairs for a landlord or buyer, be precise and thorough: take dated photos before, during, and after the work. Note materials used and quantities, list who performed the repair, and keep receipts and warranties together.
Use clear repair documentation and tenant communication; include maintenance records, visual evidence, repair logs, detailed reports, cost breakdowns, photo documentation, communication templates, and meet landlord expectations.
- Photos
- Receipts
- Logs
- Reports
When to Schedule a Full Repaint
Because paint hides wear until it doesn’t, schedule a full repaint once patching and spot repairs start to look piecemeal, color fading is obvious, or the surface has widespread cracking, peeling, or staining that cleaning won’t fix.
Consider repaint frequency based on traffic, moisture, and substrate condition, and choose color choices that simplify touchups, improve light, and mask imperfections so upkeep is easier.
Frequently Asked Questions
Can Cracked Paint Indicate Underlying Mold or Hidden Rot?
Yes — cracked paint can signal hidden rot or mold; you’ll inspect for moisture, use mold identification by checking odors, discoloration, and soft wood, and take rot prevention steps like fixing leaks and improving ventilation.
Will Repairs Affect Home Insurance or Warranty Coverage?
Yes — repairs can affect insurance claims and warranty limitations; you’ll want to document work, use approved contractors, and avoid DIY that voids warranties, because insurers or manufacturers may deny coverage if procedures or reporting aren’t followed.
Can I Use Heat Guns to Remove Cracked Paint Safely?
Yes — you can use heat guns to remove cracked paint safely, but you’ll follow heat gun safety protocols, wear protection, work low heat, test a small area, and combine proper paint removal techniques to avoid scorching or fumes.
How Do Temperature Extremes Impact Newly Repaired Paint?
Temperature extremes can warp and stress fresh coatings, so you’ll see compromised paint adhesion and possible cracking when temperature fluctuations occur during cure. You should avoid rapid swings and let paint fully dry at stable temps.
Are There Long‑Term Health Risks From Flaking Lead‑Based Paint?
Yes — you’re facing lingering risks: chronic lead exposure can quietly harm development and organs. Get paint testing, follow renovation safety and health guidelines, and don’t DIY major removals to protect yourself and loved ones.
Conclusion
So you fixed the crack and proudly stepped back—only to spot a tiny flaw you missed. Ironically, that’s normal: repairs are honest, not perfect, and they prove you tried. If it’s small, touch it up; if it bugs you or a buyer, repaint. Keep photos and receipts to avoid disputes. You’ve learned the signs, the quick fixes, and when to call pros—congratulations, your wall will live another day.