Can You Paint Over Stained Wood Without Sanding? Full Guide
Yes — you can paint over stained wood without sanding if you prep it right: clean off dirt and grease, degloss the finish with a chemical deglosser or light scuff, and use a high‑quality stain‑blocking primer (shellac, oil, or bonding primer) before painting. Test a small area first to check adhesion and stain bleed‑through. Use thin coats of paint and proper tools to avoid brush marks. Keep expectations realistic for durability, and read on for detailed steps and tips.
Can You Paint Over Stained Wood Without Sanding?
If you want to skip sanding, you can—but only with the right prep and products.
You’ll assess stain types (oil, water, gel) because some bleed through paint. Clean thoroughly, degloss or etch glossy finishes, and apply a high-quality bonding primer to maximize paint adhesion.
Test a small area first; when primer sticks and stains don’t seep, you can paint confidently without sanding.
Quick Checklist: Sand or Skip?
When deciding whether to sand or skip, follow a short checklist that lets you quickly determine the safest route: identify the stain type, check for gloss or sealers, test for bleed-through with a primer, and weigh surface damage—deep scratches or peeling finish mean you should sand, while intact, low-gloss surfaces with successful primer tests can usually skip it.
| Condition | Action |
|---|---|
| Glossy/sealed | Sand or strip |
| Deep damage | Sand |
| Intact/low-gloss | Skip, use proper primer (primer selection) |
| Light wear | Try sanding alternatives first |
Test the Stain for Paint Adhesion (3-Step Method)
Curious whether that stain will hold paint? Follow a 3-step adhesion testing method:
1) Apply a small painted patch using your chosen primer and paint;
2) let it fully cure per product directions;
3) perform a tape-pull and scratch check.
Evaluate stain compatibility by observing lifting, peeling, or bleed-through.
If it passes, you’ve confirmed reliable adhesion; if not, consider prep options.
Clean Stained Wood Before Painting: Step-by-Step
Before you paint, clean the stained wood thoroughly to remove dirt, grease, and wax that can prevent primer and paint from sticking.
Start by vacuuming or brushing dust, then wipe with a mild detergent solution. Rinse, dry, and remove oily spots with mineral spirits.
Follow with a tack cloth. These cleaning techniques are essential for proper wood preparation and reliable paint adhesion.
How to De‑Gloss Stained Wood (Chemical and Scuffing Methods)
After you’ve cleaned and degreased the stained wood, you’ll need to remove the glossy finish so primer and paint will stick.
Use de glossing techniques like scuff sanding with fine‑grit paper or abrasive pads to dull sheen.
For stubborn finishes, apply chemical removers following label instructions, then neutralize and wipe dry.
Finish by dusting and applying bonding primer before painting.
When You Must Sand Stained Wood First
When the stained wood has deep scratches, uneven stain penetration, or multiple finish layers that won’t respond to de‑glossing, you’ll need to sand first to create a smooth, uniform surface and guarantee primer and paint adhere properly.
You should sand to remove old finishes, level gouges, or eliminate incompatible stain types. Choose appropriate sanding techniques and grits, then clean dust thoroughly before priming and painting.
When Skipping Sanding Is Realistic and Reliable
If the stained wood is smooth, the finish is well-adhered, and the stain isn’t bleeding through, you can often skip sanding and still get a durable paint job.
You’ll rely on proper wood preparation: clean, degloss, and repair surface flaws. Use sanding alternatives like liquid deglossers or adhesion-promoting cleaners.
Test a small area first to confirm adhesion and long-term performance before proceeding.
Best Primers for Painting Over Stained Wood
Picking the right primer makes the difference between paint that peels and paint that lasts, so choose one designed for stained wood and spill-prone tannins.
You’ll want primers labeled for stain-blocking and adhesion; look for the best bonding options and compare primer types like latex-based and shellac-modified waterborne formulas.
Match primer to finish and follow manufacturer cure times for durable results.
Oil, Shellac, or Bonding Primer: Which to Use?
Curious which primer will give you the best bond and stain-blocking power? You’ll pick based on surface and odor tolerance: oil finishes seal tannins well but need longer cure; shellac alternatives offer fast stain blocking with lower smell; modern bonding agents (specialty primer types) chemically grip glossy or slick stain.
Choose oil for durability, shellac alternatives for speed, bonding agents for adhesion to difficult surfaces.
Spot‑Treat Tannin Bleed and Contamination
If you spot dark, oily-looking tannin stains, don’t ignore them—you’ll need to treat those areas before painting.
Clean the contaminated spots with a wood cleaner or a mild bleach solution, then let them fully dry.
Finally, seal the stains with a quality stain-blocking primer to prevent bleed-through under your paint.
Identify Tannin Stains
Wondering whether those rust-colored spots are tannin bleed or something else? You’ll use tannin identification cues: location, color, and water reaction to confirm. For stain removal planning, test a hidden area first, note absorption, and choose a blocker or cleaner.
| Cue | Test | Action |
|---|---|---|
| Color | Water spot | Clean/test |
| Location | Grain lines | Isolate |
| Reaction | Bleeds | Seal |
Clean Contaminated Areas
Start by isolating the stained spots so you can treat them without spreading tannin or other contaminants. You’ll work on small areas with the right cleaners, blotters, and brushes rather than soaking the whole surface.
Use targeted cleaning techniques—oxalic acid for tannin, mild degreaser for oils—testing inconspicuously.
Identify contamination sources (water, oils, mold) and repeat spot treatments until stains lift, blotting dry between attempts.
Seal With Stain Blocker
Once your spot cleaning has lifted visible tannin and contaminants, seal those areas immediately with a dedicated stain-blocking primer to stop any remaining tannins or oils from reappearing through the paint.
You’ll appreciate stain blocker benefits like adhesion and bleed resistance.
Apply thin, even coats; follow manufacturer drying times.
Correct application techniques include feathering edges and testing a small area before full coverage.
Repair Dents, Gouges, and Old Finishes Before Painting
Before you paint, you’ll want to fill dents and gouges with a wood filler or epoxy so the surface is smooth and paint sticks evenly.
You should also remove any old finishes—sanding or stripping—to guarantee good adhesion and prevent peeling.
Taking these steps now saves you from flaking and uneven color later.
Fill Dents And Gouges
Patch dents and gouges so your paint lays down smoothly and holds up over time.
You’ll use simple repair techniques: clean the area, apply lightweight dent fillers or wood filler, and press firmly to fill voids.
Let fully dry, then scrape or sand level.
Prime patched spots to seal filler before painting so finish adheres evenly and dents don’t reappear.
Remove Old Finishes
Strip away old varnish, stain, or paint so your new finish bonds properly and looks even.
Use solvent or chemical strippers depending on wood finish types, then scrape gently.
Repair dents and gouges with wood filler.
Sand smooth only where needed.
- Test stain removal techniques.
- Choose stripper by finish.
- Fill imperfections.
- Clean before priming.
Best Paints for Stained Wood (Interior & Exterior)
Choosing the right paint makes the difference between a long-lasting finish and peeling disappointment, so you’ll want products formulated for adhesion and flexibility over stained wood.
For interiors, use high-quality acrylic latex or hybrid enamel; for exteriors, pick exterior-grade acrylic or elastomeric coatings.
Consider stain-blocking primers and follow wood preparation steps for best adhesion.
Match sheen to use and durability needs.
How Many Primer and Paint Coats You Need
You’ll usually need one to two coats of primer on stained wood to block tannins and guarantee adhesion.
Plan on two thin coats of paint for even coverage, adding a third only for deep stains or color changes.
Let each coat fully dry according to the product instructions before applying the next.
Primer Coat Count
How many primer coats you need depends on the wood’s stain intensity and the primer’s stain-blocking strength, so plan for at least one coat of a high-quality, oil- or shellac-based stain-blocking primer.
Be ready to apply a second if any bleed-through appears after it dries. Consider primer coverage and primer types carefully.
- Test small area
- Apply first coat
- Inspect after dry
- Add second if needed
Paint Coat Number
Plan for at least one good primer coat and two paint coats for most stained wood jobs, but be ready to adjust based on the stain’s bleed-through, the primer’s coverage, and the paint’s opacity.
You’ll watch primer application quality to block stains and promote paint adhesion. Add a third paint coat if color looks uneven or bleed persists; thin, even coats give the best durable finish.
Drying Between Coats
After you’ve laid down primer and the first paint coat, let each layer dry fully before adding the next to prevent trapping moisture and to guarantee proper adhesion.
Follow manufacturer drying times and respect recoat intervals. Typical approach:
- Primer: 1–2 coats, wait per label.
- Paint: 2 coats minimum.
- Light additional coats for coverage.
- Final cure: avoid heavy use until fully cured.
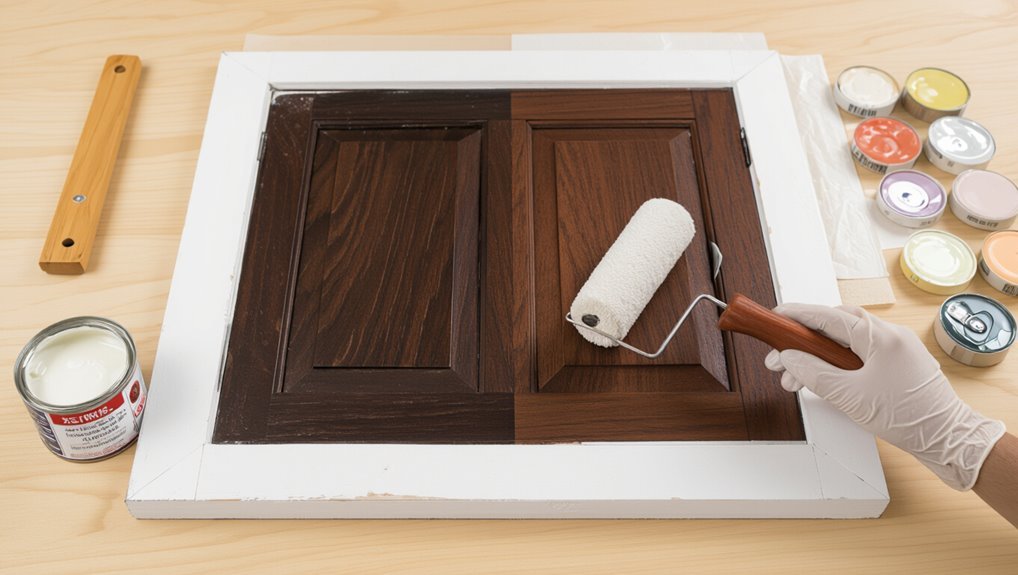
Painting Flat Panels and Doors: Technique Guide
Painting flat panels and doors starts with proper prep and the right tools so you get a smooth, durable finish instead of brush marks or peeling paint.
You’ll focus on panel preparation: clean, degloss, and prime. Use thin coats, a high-density foam roller for flats, and a good angled brush for edges.
Apply consistent painting techniques and allow full dry time between coats.
Trim and Moulding: Brushing and Back‑Brushing Tips
When you paint trim and moulding, brushing and back‑brushing are the tricks that give you a smooth, even coat without drips or visible strokes.
Start with a high‑quality angled brush, load it sparingly, and cut into corners with steady, confident strokes. You’ll protect trim aesthetics and achieve consistent moulding finishes by following:
Start with a quality angled brush, load it sparingly, and cut corners with steady, confident strokes for flawless trim.
- Brush toward corners.
- Back‑brush wet edges.
- Thin coats.
- Light sanding between coats.
Spraying vs. Brushing vs. Rolling on Stained Surfaces
Before you pick a sprayer, brush, or roller, you’ll want to prep and clean the stained surface thoroughly so paint adheres.
Check finish compatibility—some stains and sealers need sanding or a primer before any application method.
Then choose the technique that fits the piece: spraying for smooth, even coverage, brushing for control in corners, and rolling for flat, larger areas.
Prep And Clean
Start by stripping dust, grease, and any loose finish so the new coating can adhere properly; you’ll want a surface that’s clean, dry, and smooth.
Focus on wood preparation and proven cleaning techniques before choosing spray, brush, or roller.
Steps:
- Vacuum and tack cloth.
- Degrease with mild solvent.
- Rinse and dry fully.
- Inspect for residues and repeat if needed.
Finish Compatibility
Now that the surface is clean and dry, pick a finish method that matches the stain type, wood species, and the look you want. Choose finish types based on sheen, adhesion, and durability; consider whether prior stain removal was complete. Compare methods:
| Method | Best for |
|---|---|
| Spraying | Smooth, thin coats |
| Brushing | Small fixes, control |
| Rolling | Large flat areas |
| Wipe-on | Thin, penetrating coats |
Application Technique
Choose the right application method to control finish appearance and adhesion on stained wood:
spraying gives the smoothest, thinnest coats and excels for furniture or cabinet faces;
brushing offers precise control for trim, edges, and spot repairs;
and rolling speeds coverage on large, flat panels but can leave slight texture.
- Prep and clean
- Test adhesion
- Use proper brush application
- Employ rolling technique carefully
Drying Times and Recoat Windows to Avoid Failure
Because coatings cure at different rates, you’ve got to respect manufacturers’ drying and recoat windows to prevent adhesion problems and finish defects.
Check label-specified drying times for temperature and humidity conditions, and wait the minimum recoat window to avoid lifting or wrinkling.
If conditions slow cure, extend wait times. Rushing coats invites failure; patience guarantees durable, smooth results.
Avoiding Lap Marks, Brush Strokes, and Sags
Start by preparing the surface so it’s clean, sanded, and dust-free to help paint lay down evenly.
Keep your paint at the right consistency—thin slightly if it drags, but don’t over-thin—and work in manageable sections.
Use proper brushing and rolling techniques (light, even strokes and a “wet edge”) to prevent lap marks, visible brush strokes, and sags.
Proper Surface Prep
Proper surface prep makes the difference between a professional-looking finish and visible flaws like lap marks, brush strokes, and sags.
You’ll use surface preparation techniques and effective cleaning methods to guarantee adhesion and smoothness. Follow these steps:
- Degrease and clean thoroughly.
- Fill dents and sand smooth.
- Remove dust with tack cloth.
- Apply a compatible primer and let it cure.
Correct Paint Consistency
With the surface cleaned, filled, and primed, attention turns to paint consistency—your best defense against lap marks, visible brush strokes, and sagging runs.
You’ll adjust paint thickness to suit the surface and tool, thinning slightly if it drags or thickening if it leaves texture.
Do quick consistency testing on scrap wood, note drying time, and tweak until coverage is even and sag-free.
Brushing And Rolling Technique
Work in long, continuous strokes and keep a wet edge to prevent lap marks; that means you should overlap each pass slightly before the paint skins over and maintain a consistent amount of paint on your brush or roller.
Use proper brushing techniques and rolling techniques to avoid brush strokes and sags.
- Load evenly
- Feather edges
- Roll light passes
- Inspect for drips
Fixing Blistering, Peeling, and Adhesion Problems
If old finish is blistering, peeling, or failing to stick, you’ll need to remove the loose material and address the cause before repainting.
Identify blistering causes like moisture or heat, then use peeling solutions: scrape, strip, or chemically soften. Clean and dry thoroughly.
Apply adhesion techniques—deglosser, primer, or bonding primer—and follow repair methods for gaps and damaged grain before painting for lasting results.
Exterior Stained Wood: No‑Sand Options and Risks
Once you’ve fixed peeling, blistering, and adhesion problems on interior surfaces, you’ll face different constraints on exterior stained wood—weather exposure, UV, and existing stain chemistry change how well no‑sand methods work.
You’ll weigh stain absorption and weather resistance when choosing sealers or bonding primers.
Consider:
- Clean thoroughly
- Use a bonding primer
- Test adhesion
- Expect shorter lifespan
Staining vs. Painting: When Paint Reduces Maintenance
Although staining preserves wood grain and lets the material breathe, painting can cut long‑term maintenance when you need stronger UV and moisture protection.
You’ll sacrifice some stain longevity and natural texture, but gain paint durability that resists fading, peeling, and water intrusion.
For high‑exposure areas, choose quality primers and topcoats so you reduce rework and extend interval between refinishes.
Cost and Time: Sanding vs. Skip‑and‑Prime Comparison
You’ll usually face a trade‑off between upfront labor and long‑term expense when deciding to sand down stained wood or skip straight to priming: sanding raises initial time and labor costs but can mean fewer prime/topcoat layers and longer-lasting adhesion, while skipping and priming saves time now but may require more frequent touch‑ups or full refinishes.
- Sanding: higher labor, better cost benefits long term.
- Skip: immediate time efficiency, lower upfront cost.
- Hybrid: spot‑sand high‑wear areas.
- Estimate materials vs. maintenance when choosing.
Health & Dust Tradeoffs: PPE, Air Control, and VOCs
How will you protect yourself and your home from the hazards of sanding and painting? Wear appropriate PPE requirements, use containment and air filtration, and choose low‑VOC options to limit health impacts. Control dust with vacuum attachments and negative pressure rooms; ventilate during painting for VOC reduction.
| Item | Purpose | Action |
|---|---|---|
| Mask | Dust | N95/respirator |
| Filter | Air | HEPA |
| Paint | VOCs | Low‑VOC |
| Room | Contain | Seal |
| Vacuum | Cleanup | HEPA |
Reducing VOCs and Strong Paint Odors
After you’ve controlled dust and set up containment, the next step is cutting indoor air pollution from paints and finishes.
Use low VOC paints and odor free options when possible.
Choose low‑VOC, odor‑free paints whenever possible to minimize indoor air pollution and improve home air quality.
Steps to reduce VOCs and odors:
- Ventilate strongly with fans and open windows.
- Use activated carbon or HEPA air purifiers.
- Store cans sealed outdoors.
- Paint during warm, dry conditions to speed curing.
Tools and Products to De‑Gloss, Prime, and Paint
1 essential set of tools will make de-glossing, priming, and painting stained wood faster and cleaner: a sanding block or orbital sander with 120–220 grit, tack cloths, a de-glosser or liquid sandpaper, a stain-blocking primer suited to tannin-rich woods, angled brushes and foam rollers for smooth coverage, and quality painter’s tape and drop cloths to protect surrounding surfaces.
Use de-glossing techniques, test primer selection, and work in thin, even coats.
When to Call a Pro Instead of DIYing
If the wood has structural damage or large areas of rot, you should call a pro—those issues need repairs beyond simple sanding and paint.
Extensive water staining that suggests leaks or mold also warrants professional assessment to fix the source and prevent recurrence.
And if you don’t have the time, tools, or skills to get a lasting result, hiring a pro will save you headaches and money in the long run.
Complex Structural Damage
When you spot deep cracks, bowed joists, sagging beams, or any damage that compromises the frame of your home, don’t treat it like a routine paint job—you need a pro.
You should prioritize structural integrity and request a formal damage assessment.
Consider hiring an expert for:
- Load-bearing repairs
- Foundation issues
- Rot removal
- Code compliance and permits
Extensive Water Staining
Structural problems often come with water issues, and extensive staining on wood is a strong signal you shouldn’t handle alone.
If you spot widespread discoloration, soft spots, or mold from water damage, call a pro. They’ll assess structural integrity, address moisture sources, and perform proper stain removal or replacement.
DIY risks hidden rot and recurring stains, so hire an expert for safety and lasting results.
Time Or Skill Constraints
You’ll want to call a pro if you don’t have the time, tools, or experience to prep and paint stained wood correctly.
You should honestly assess your skill assessment and time management before starting; pros save headaches when projects get complex.
Consider calling help if:
- You lack proper tools.
- You doubt technique.
- Deadlines are tight.
- Finish quality matters.
Before‑and‑After Case Studies and Realistic Expectations
Before you commit to painting stained wood, look at real before-and-after examples to set realistic expectations; these case studies show how substrate condition, prep work, and paint type determine the final look.
Review case study examples of cabinets, trim, and furniture so you’ll know likely outcomes. Expect variations in coverage, texture, and durability based on prep and paint quality.
Frequently Asked Questions
Will Painted Stained Wood Accept Wallpaper Afterward?
Yes — you can apply wallpaper over painted stained wood if you guarantee wallpaper adhesion by using a compatible primer and choosing paint compatibility that’s matte or not too glossy; proper preparation and seam sealing will improve long-term results.
Can I Use Chalk Paint Over Stained Wood Without Priming?
“A stitch in time saves nine.” Yes, you can often use chalk paint over stained wood without priming, but chalk paint advantages shine when you follow surface preparation tips—clean, degloss, and fix flaws for better adhesion and durability.
Does Painting Stained Wood Affect Indoor Humidity or Wood Movement?
Yes — painting stained wood can slightly limit surface moisture exchange, so it may reduce visible wood expansion but won’t stop core movement; you’ll still need good humidity control to prevent warping, cracking, or finish failure.
How Do Pets or Kids Affect Painted Stained Wood Durability?
About 60% of wear comes from claws and toys, so your painted stained wood will suffer: pet behavior and rough play increase durability concerns. You’ll need maintenance tips, scuff-resistant finishes, and kid safety measures to protect surfaces.
Can I Varnish Over Paint Applied to Stained Wood Later?
Yes — you can varnish over paint applied to stained wood later if you guarantee varnish compatibility and confirm strong paint adhesion; you’ll clean, lightly scuff, and use a compatible clear coat to avoid lifting or clouding the finish.
Conclusion
You can turn glossy, stubborn stained wood into a fresh painted surface without full sanding—sometimes. Picture the glossy sheen beside a chalky, primer-coated edge: the old finish resists, the new paint clings. Test first, clean thoroughly, de‑gloss or scuff, use a bonding primer, and lower VOC options to keep fumes down. When surfaces still reject paint or the job’s large, call a pro. The contrast—stain’s shine against painted matte—shows when skipping sanding works and when it doesn’t.