Can You Skim Over Painted Walls? What You Need to Know
Yes—you can skim over painted walls in many cases, as long as the existing paint is well bonded, loose paint is removed, and glossy areas are sanded for better adhesion. Clean the surface, repair cracks, and use a bonding primer or appropriate joint compound for thin coats, allowing proper drying and light sanding between layers. Avoid skimming over soft, bubbling, or multiple failing layers—those should be stripped. Keep going to learn how to decide and prepare.
Can You Skim Over Painted Walls?
Can you skim over painted walls? You can, but you’ll assess adhesion first.
Use proper skim coat techniques: clean, sand, and apply a bonding primer when paint is glossy or flaking.
Address painted wall challenges like texture, contamination, and moisture before skimming.
If surfaces are sound and prepared, you’ll get a smooth finish; otherwise, stripping or repair may be necessary.
Quick Decision Flow: Skim or Strip First?
When you’re deciding whether to skim or strip first, follow a quick decision flow that checks adhesion, surface condition, and texture so you pick the safest, most efficient option.
Test adhesion, remove loose paint, and assess damage.
If paint bonds and surface is sound, use skim coat techniques with proper wall preparation.
If paint flakes or hides damage, strip and repair before skimming.
When Skimming Over Paint Is a Good Idea
If your adhesion tests showed the paint is firmly bonded and the surface only has minor imperfections, skimming over paint can save time and money.
You should choose appropriate skimming techniques, confirm paint compatibility with joint compound, and prep by cleaning and sanding glossy spots.
Skimming’s efficient when surfaces are stable, defects are shallow, and you want a smooth finish without full removal.
When You Should Strip Paint Down to Drywall
If the paint is hiding structural damage or soft spots, you should strip it back to the drywall so you can assess and repair the substrate.
Likewise, when there are many old coats built up and the surface is uneven or prone to cracking, removing them down to the drywall gives you a clean, stable base.
Skipping this step can leave problems concealed and cause the skim coat to fail.
When Paint Hides Damage
Though a fresh coat can mask flaws, paint often conceals underlying damage that needs addressing before you skim coat or repaint.
You should perform a damage assessment—look for soft spots, bubbling, mold, or delamination.
If substrate integrity or paint durability is compromised, strip to drywall, repair or replace damaged sections, then prime.
Skimming over hidden damage risks failure.
When Multiple Coats Exist
When walls have accumulated several layers of paint, you’ll often see hidden issues like poor adhesion, cracking, or an uneven surface that make skimming ineffective; strip down to drywall when coats are thick enough to obscure the substrate, bond poorly, or create noticeable build-up at corners and trim that sanding can’t level.
You should remove multiple layers if adhesion issues persist, revealing a sound surface before refinishing.
How Paint Type Affects Skim Coat Adhesion
If your wall has oil-based paint, you’ll need to roughen or strip it because skim coat compounds don’t bond well to slick, glossy oils.
With latex or acrylic finishes, you can usually get good adhesion after scuff-sanding and cleaning the surface.
I’ll explain specific prep steps for each paint type so you know when skim coating is realistic.
Oil-Based Paint Surfaces
Because oil-based paints create a hard, slick surface, they can seriously reduce skim coat adhesion unless you take steps to prepare them properly.
You’ll weigh oil based advantages—durability and smooth finish—against oil based challenges like poor bond and moisture resistance.
Sanding, scuffing primer, or using a bonding agent lets you overcome adhesion issues so your skim coat adheres reliably.
Latex And Acrylic Paint
Although latex and acrylic paints are more porous and generally friendlier to skim coats than oil-based finishes, they still require proper prep to guarantee a strong bond.
You’ll need to clean, scuff, and prime where needed. Consider these factors:
- latex paint benefits for adhesion
- acrylic paint durability under moisture
- surface cleanliness
- scuffing or sanding
- proper primer selection
Why Glossy Paint Blocks Skim Coats : What to Do
When you try to skim coat over glossy paint, the new compound won’t bond properly because the shiny surface repels the skim, causing peeling or cracking.
You should sand or degloss the glossy paint, clean the surface, then apply a bonding primer before you skim coat.
If sanding isn’t possible, use a chemical deglosser and follow with primer to guarantee adhesion.
Can You Skim Over Oil-Based Paint?
The same prep steps that work for glossy latex also apply when you’re dealing with oil-based paint, but oil formulas demand more care because they’re less porous and hold onto their finish.
You can skim coat over oil paint if you:
- scuff and sand thoroughly
- clean with solvent
- use a suitable bonding primer
- apply a thin skim coat
- cure fully before painting
How Old or Failing Paint Stops Skim Coats (Inspection Checklist)
Because old or failing paint can delaminate, you need to inspect surfaces carefully before you mix any joint compound—peeling, bubbling, alligatoring, excessive chalking, or obvious moisture damage mean a skim coat won’t adhere reliably without addressing the underlying failure. Use this checklist and proper preparation techniques to respect paint lifespan and avoid rework.
| Issue | Severity | Action |
|---|---|---|
| Peeling | High | Remove |
| Blistering | High | Investigate |
| Chalky | Medium | Clean |
| Stains | Medium | Seal |
How to Test Paint Adhesion Before Skimming?
Before you skim, you’ll want to check how well the existing paint is sticking.
Use an adhesion tape test by pressing strong tape to the surface and pulling it off to see if flakes come away.
Also try a small water droplet check—if water beads and lifts paint, you’ll need to strip or sand first.
Adhesion Tape Test
If you’re unsure whether the existing paint will hold under a skim coat, perform a simple adhesion tape test to check bond strength quickly and reliably.
You’ll use adhesion testing as part of surface preparation to decide if skimming’s safe.
Steps:
- Clean a small area
- Apply strong tape
- Press firmly
- Remove sharply
- Inspect for flakes
Water Droplet Check
When you need a quick, noninvasive check of paint adhesion, try the water droplet test: place a few drops of water on a cleaned patch of wall, wait a minute, then wipe them away—if the paint softens, wrinkles, or peels, it’s a sign the coating won’t bond well to a skim coat.
You’ll spot prior water damage, swollen areas, or inconsistent surface texture before you skim.
What Surface Preparation Is Required for Painted Walls?
To get a smooth, long-lasting skim coat over painted walls, you need to remove loose paint, clean the surface, and fix any damage so the new compound adheres properly.
Assess surface types and paint conditions, then follow steps:
- Scrape loose or flaking paint
- Wash dirt and grease
- Repair cracks and holes
- Prime bare spots
- Make certain wall is dry and dust-free
How to Degloss and Sand Painted Surfaces Correctly
Start by evaluating the paint’s sheen and adhesion so you know whether you need to degloss, sand, or both. Glossy, hard finishes usually require a deglosser or light sanding to give new compound and primer something to bite into, while poorly bonded paint must be removed.
Use deglossing techniques like liquid abraders, then follow sanding methods—fine-grit for feathering, coarser for leveling. Clean dust thoroughly.
When to Use a Primer-Sealer Before Skimming?
Once you’ve determined sheen and adhesion, decide whether a primer-sealer is needed before skimming based on surface porosity, staining, and the type of existing paint.
A sealed, moderately glossy surface may take compound directly, but porous drywall, patched areas, or stains benefit from a bonding primer to prevent flash, absorbency differences, and poor adhesion.
- Assess surface conditions
- Note stains and repairs
- Consider primer types
- Test adhesion
- Spot-seal problem areas
Which Primers Bond Best to Painted Walls?
If your walls are covered in oil-based paints or a shiny finish, you’ll need a primer that actually sticks instead of sliding off.
Choose a high-adhesion or bonding primer formulated for glossy surfaces to create a reliable base for skimcoat.
Test a small area first to confirm the primer bonds well before you skim the whole wall.
Oil-Based Paints
Because oil-based paints create a hard, glossy surface that resists moisture and adhesion, you’ll need a primer formulated to bond to alkyd finishes when repainting, such as an oil-based bonding primer or a high-quality acrylic latex primer labeled for adhesion to glossy surfaces.
- oil paint requires thorough surface preparation
- sand glossy areas to avoid adhesion issues
- note longer drying times for oil primers
- follow specific application techniques for even bonding
- choose finish options compatible with the primer
High-Adhesion Primers
Picking the right high-adhesion primer makes repainting easier and prevents peeling, especially on glossy, hard-to-bond surfaces.
You’ll want products formulated for strong grip; the high adhesion benefits include improved topcoat durability and fewer prep steps.
Consider primer options like bonding acrylics and shellacs that adhere well to various paints.
Apply per instructions, sanding lightly where recommended for best results.
Bonding-To Glossy Surfaces
After you’ve chosen a strong high-adhesion primer, you’ll want to match the right type to glossy surfaces to guarantee a lasting bond.
You’ll focus on bonding techniques and thorough surface preparation. Choose primers formulated for slick finishes and follow steps:
- Deglossing liquid or light sanding
- High-adhesion or bonding primer
- Oil-based or shellac primer option
- Clean, dry surface
- Test small area first
What Joint Compound or Skim Coat Should You Choose?
When you’re choosing a joint compound or skim coat, match the product to the job: lightweight all-purpose compounds work well for thin skim coats and easy sanding.
Setting-type compounds (powders) give faster curing and greater crack resistance for thicker fills.
Gypsum-based or polymer-modified skim coats offer better bonding over glossy paint or difficult substrates.
Choose joint compound types based on surface, use proper skim coat techniques, and test a small area first.
Dry vs. Pre-Mixed Compound: Pros and Cons
You’ll notice dry compound lasts much longer on the shelf and lets you mix only what you need.
Pre-mixed mud saves time and is convenient, but it can be pricier and has a shorter usable life once opened.
Consider that mixing dry powder gives you more control over consistency and working time compared with ready-mixed options.
Dry Compound Longer Shelf-Life
Because dry joint compound is sold as a powder you mix as needed, it naturally lasts much longer on the shelf than pre-mixed tubs—so you can buy in bulk, store unopened bags for months or even years, and avoid wasted product when your projects stall.
You’ll appreciate dry compound benefits and shelf life considerations:
- Buy larger quantities
- Store unopened bags
- Mix only what’s needed
- Reduce waste
- Save money
Pre-Mixed Convenience Tradeoffs
Although dry compound gives you long shelf life and cost savings, pre-mixed mud wins on convenience—it’s ready to use straight from the tub, cleans up easily, and cuts your prep time.
You’ll appreciate pre-mixed benefits like instant use and less waste, but weigh pre-mixed drawbacks: higher cost, limited shelf life once opened, and fewer texture options for specialty finishes.
Mixing Control And Consistency
If you liked the convenience of pre-mixed mud, you’ll still want to think about how much control you need over the actual mix.
You’ll weigh mixing techniques and consistency importance: dry mixes let you adjust water for thickness; pre-mixed saves time.
Consider:
- Adjustable viscosity
- Working time control
- Reduced waste
- Predictable texture
- Storage and shelf life
Tools You Need for a Professional Skim Coat
To get a professional skim coat, you’ll need the right tools—tapelines, hawk and trowel, a wide drywall knife, a mud pan, sanding tools, and quality joint compound—so you can work efficiently and achieve a smooth, even finish.
You’ll also want mixing buckets, a drill mixer, assorted trowels/knives, fine sandpaper, and breathable dust control.
Use proper skim coating techniques and follow surface preparation tips.
Step-by-Step: Prepping Painted Walls for a Skim Coat
Now that you’ve gathered the right tools, prepare the painted surface so your skim coat will bond and lay flat.
Do a thorough wall assessment, then follow paint preparation steps to guarantee adhesion:
- Clean grease and dust
- Sand glossy spots
- Patch holes and cracks
- Prime bare or repaired areas
- Reinspect for loose paint
Proceed only when the surface is sound and dry.
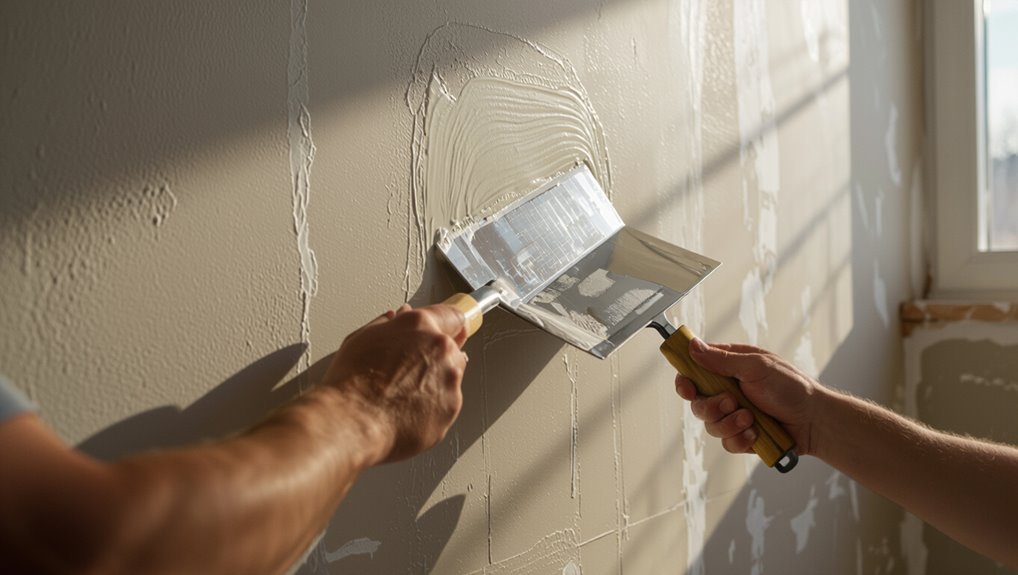
Step-by-Step: Applying the Skim Coat Over Paint
Once the wall’s clean, sanded, and primed, mix your joint compound to a creamy, lump-free consistency and load it onto a wide taping knife or hawk.
Apply thin, even coats using smooth skimming techniques, working top to bottom.
Feather edges, check for surface compatibility, and let each coat dry fully before light sanding.
Clean tools and inspect for uniformity.
How Many Skim Coat Layers Will You Need?
How many skim coat layers you’ll need depends on the wall’s condition and the finish you want:
You’ll choose layers based on damage, desired smoothness, and the skimming techniques you use, combined with proper surface preparation.
- Hairline cracks: 1 layer
- Minor dents: 1–2 layers
- Deep gouges: 2–3 layers
- Old textured paint: 2–3 layers
- Flawless finish: multiple thin layers
How Long to Let Skim Coats Dry and When to Sand
Drying times for skim coats usually range from a few hours to 24 hours per layer depending on thickness and room conditions, so plan accordingly.
You’ll also need to factor in the type of paint underneath—latex dries faster than oil-based and can affect curing time.
Wait until the skim coat is fully hard and no longer tacky before sanding, and use light test-sanding in an inconspicuous spot to confirm.
Drying Time Estimates
You’ll usually need to wait between 24 and 48 hours for a skim coat to cure enough for light sanding, though thinner applications or warm, dry conditions can shorten that to 12–24 hours.
Thicker or poorly ventilated layers can take several days.
Consider these factors:
- drying conditions: humidity, airflow
- temperature effects on cure
- coat thickness
- ventilation speed
- touch test timing
Paint Type Considerations
Because different paints cure and bond differently, you’ll need to adjust your skim-coat drying and sanding schedule based on the type of paint already on the wall.
Consider paint types, surface textures, adhesion issues, preparation methods and repair techniques before choosing compound choices and application styles.
Account for environmental factors that affect drying times and use inspection methods to confirm readiness without rushing the process.
Sanding Timing Tips
Anyone working with skim coats should let each layer cure fully before sanding to avoid gouging or reactivating the compound.
Typical setting-type compounds can be sanded in as little as 20–60 minutes, while premixed all-purpose or lightweight joint compounds usually need 12–24 hours to dry under normal conditions.
You should:
- Check dryness by touch and firmness.
- Match sanding techniques to compound type.
- Use appropriate sanding tools and grit.
- Wait extra in high humidity.
- Lightly recoat if powdery before final sanding.
Sanding Techniques That Avoid Digging Into Skim Coats
When you’re sanding skim-coated walls, go slow and let the abrasive do the work so you don’t cut through the thin layer.
Use fine-grit sandpaper, a sanding block, and light, even pressure.
Employ circular strokes, check frequently, and vacuum dust as you go.
These sanding techniques guarantee proper surface preparation without damaging the skim coat, preserving adhesion and smoothness.
How to Repair Cracks or Delamination Before Skimming
Before you skim, check paint adhesion by tapping and scraping small areas to spot loose or flaking paint.
Repair any cracks with the right filler and joint compound, then sand smooth so the skim coat can bond.
Finally, clean and prime problem spots to guarantee the surface is properly prepared for skimming.
Assess Paint Adhesion
Curious if that flaky paint will hold up under a skim coat? You’ll need paint testing and clear adhesion methods before proceeding.
Check samples, scrape weak spots, and probe delamination. If paint fails, remove loose material and clean substrate.
- perform a tape pull test
- scrape small areas
- look for bubbling
- test edges
- note substrate type
Fix Cracks Properly
Start by removing any loose or flaking material around the crack so you’re working on a stable surface.
Identify crack types—hairline, structural, or delamination—then widen and clean gaps.
Use appropriate repair techniques: filler for hairline, flexible compound for movement cracks, and adhesive injection or patching for delamination.
Sand smooth, prime repaired areas, and guarantee stability before skimming to prevent future failures.
Prepare Surface Correctly
Prepare the surface by removing all loose paint, dust, and any unstable plaster around cracks or delaminated areas so your skimcoat will bond reliably.
You’ll do surface cleaning, check paint compatibility, and repair gaps before skimcoating. Follow these steps:
- Scrape loose material
- Vacuum and wipe down
- Apply primer suited to substrate
- Fill cracks with flexible filler
- Sand and recheck adhesion
Skimming Over Textured Painted Walls: Approach Options
If you’re dealing with textured painted walls and thinking about skimming, you’ve got a few solid options depending on the texture, budget, and how much time you want to spend.
You can sand or scrape heavy texture, apply a bond coat then a skim coat for smoother results, or use a thicker skim coat to level minor textured surfaces.
Choose based on effort and finish.
Skimming Over Previously Taped or Mudded Drywall Seams
Check the taped or mudded seams first to see if the tape is lifting or the mud is cracking.
If you find loose tape or chunks of compound, you’ll need to remove them and clean the joint before proceeding.
When you apply new joint compound, feather the edges well so the skim coat blends smoothly with the surrounding wall.
Assess Existing Seam Integrity
Before you skim over taped or mudded drywall seams, inspect how well those joints are holding up—look for cracks, hollows, loose tape, or areas where the mud has separated from the paper.
Perform a seam inspection and integrity evaluation to decide if skimming’s viable.
Check for:
- visible cracking
- soft spots
- tape bubbles
- mud separation
- uneven joint thickness
Remove Loose Tape/Mud
Start by cutting away any loose tape or crumbling mud so the skim coat will bond to solid drywall, not failing joint compound.
Use careful tape removal techniques—score edges, peel steadily, scrape residue.
Remove brittle mud down to sound paper or gypsum.
Clean dust, then inspect seams for adhesion before proceeding.
Note the previous mud application methods so you can adapt surface prep accordingly.
Feather New Joint Compound
When your seams are clean and sound, apply a thin, even skim of joint compound to feather the edges of old tape and mud into the surrounding drywall so the surface reads flat under paint; you’ll use proper feathering techniques and choose suitable joint compound types.
Follow this quick checklist:
- Sand seams lightly
- Use wide taping knife
- Apply thin coats
- Let dry fully
- Prime before paint
How Humidity and Temperature Affect Skim Coats
Although skim coats can seem simple, temperature and humidity play a major role in how they cure and adhere to painted walls. You’ll notice humidity impact slows drying and can cause bubbling; temperature influence speeds or stalls curing. Monitor conditions, adjust mix and drying time, and ventilate to guarantee proper adhesion.
| Condition | Effect | Action |
|---|---|---|
| High humidity | Slows drying | Ventilate |
| Low humidity | Quick dries | Slightly retard |
| Low temp | Hardens slowly | Warm room |
| High temp | Too fast | Cool down |
How to Blend Skimmed Areas With Surrounding Paint
If you want the skimmed patch to disappear into the rest of the wall, feather the edges and match texture and sheen before you paint; this prevents noticeable lines and uneven light reflection.
Use blending techniques and careful color matching, then finish seamlessly.
Blend edges with careful color matching and seamless finishing for an invisible repair.
Consider:
- Sand lightly to smooth
- Feather joint lines
- Match surface texture
- Check lighting from different angles
- Blend edges gradually
Finishing: Priming and Painting After Skimming
Before you paint, check that the skimmed surface and surrounding paint are firmly bonded so the new finish won’t peel.
Pick a primer suited to the wall—stain-blocking or adhesion-promoting options work best depending on the existing paint.
When you paint, use even coats, feather edges into the old paint, and allow proper dry times for a seamless result.
Assess Paint Adhesion
When you’ve skimmed a wall, the next step is checking how well existing paint will stick so your new finish lasts; start by looking for peeling, flaking, gloss differences, and soft or powdery spots that indicate poor adhesion.
You’ll assess paint types and surface textures, then act.
Check:
- Peel edges
- Powdery touch
- Adhesion tape test
- Texture inconsistencies
- Moisture stains
Choose Proper Primer
Now that you’ve checked adhesion and surface condition, pick a primer that matches the substrate and the problems you found.
Choose between bonding, oil-based, shellac, or high-build primers based on porosity, stains, and previous coatings.
Consider primer types and primer advantages—sealing, adhesion promotion, stain blocking, and uniform absorption—so your skimmed surface stays stable and ready for topcoat application.
Paint Application Tips
1 clear coat of primer and careful technique make the difference between a skimmed wall that looks professional and one that still shows flaws.
You should sand lightly, choose compatible paint finish types, and test wall texture options. Apply thin, even coats and allow full drying. Use quality rollers and brushes for uniform coverage.
- Sand smooth
- Prime thoroughly
- Thin coats
- Quality tools
- Inspect between coats
Common Problems When Skimming Over Paint : And Fixes
Although skimming over painted walls can save time, it often introduces issues you’ll want to anticipate.
Uneven paint texture hides poorly, causing visible ridges; sand or feather edges, then apply a bonding primer.
Trapped old gloss creates adhesion problems—degloss and clean.
Air bubbles and blistering signal trapped moisture; dry and patch before skim.
Match joint compounds to avoid cracking.
How to Avoid Peeling and Future Delamination
If you want your skim coat to stay put, prep is non‑negotiable: remove loose paint, degloss or sand glossy finishes, clean off grease and dust, and prime with a quality bonding primer suited to the substrate.
Do a thorough surface inspection, follow peeling prevention steps, and keep conditions ideal.
Tips:
- Check adhesion
- Remove contaminants
- Use bonding primer
- Control humidity
- Apply thin coats
Cost and Time: Skim Coat vs. Removing Paint
When weighing skim coating against stripping paint, you’ll find the choice comes down to upfront labor and materials versus long-term durability and finish quality.
Skim coating usually costs less and goes faster on moderately sound walls, while full paint removal raises both time and expense but can be necessary for heavily damaged or contaminated surfaces.
For your decision, use a cost comparison and realistic time estimation to plan budget and schedule.
When to Hire a Pro for Skimming Over Paint
Choosing between skim coating and full paint removal affects not just cost and schedule but also whether you should hire a pro for the job.
You should call a pro when you need reliable finish, complex repairs, or want professional recommendations.
Consider cost considerations versus DIY time.
Signs to hire:
- Large cracks or water damage
- Textured or lead paint
- High ceilings
- Tight deadlines
- Warranty needs
How to Check a Contractor’s Skim Work Before Hiring
Before you sign a contract, ask to see recent skim work in person or through detailed photos so you can judge texture consistency, joint invisibility, and overall smoothness.
Verify contractor qualifications, licenses, insurance, and references.
Check the contractor’s qualifications—confirm licenses, insurance, and solid references before hiring.
Ask about specific skim coat techniques used, materials, and drying times.
Inspect edges, corners, and repaired areas for feathering and uniformity.
Request touch-up guarantees in writing.
Safety and Cleanup When Working With Skim Coat (Joint Compound)
1 simple rule: protect your lungs and skin while you skim coat, because joint compound creates fine dust and can irritate sensitive skin.
You should follow safety precautions and effective cleanup methods:
- Wear N95 mask
- Use gloves and eye protection
- Wet-sanding to reduce dust
- Contain and vacuum with HEPA
- Dispose of waste per local rules
Clean promptly and ventilate well.
Products Checklist for Skimming Over Painted Walls
A short, focused checklist will save you time and prevent common problems when skimming over painted walls.
Gather joint compound (ready-mix or powder), quality hawk and finishing knives, sanding blocks, a primer-sealer, and adhesive promoter for slick paints.
Include cleaners, degreasers, and patching tape.
Review skimming techniques and surface preparation steps, plus PPE like masks and gloves, before you start.
Frequently Asked Questions
Can Skim Coating Affect Indoor Air Quality or Release VOCS?
Yes — skim coating can affect indoor air quality and release VOC emissions, especially from primers, joint compounds, or additives. You should choose low‑VOC products, guarantee ventilation, and wear a mask to limit exposure during application and drying.
Will Skim Coats Hide Mold or Mildew Issues on Painted Walls?
No — you won’t permanently hide mold or mildew with skim coats; they’ll temporarily cover stains but won’t fix spores. You should do mold treatment and a moisture assessment first, then repair and only then apply skim coat.
Can You Apply Wallpaper Over a Skim-Coated Painted Wall?
Yes—you can apply wallpaper over a skim-coated painted wall, but you’ll need proper wall preparation. You’ll sand, clean, prime, and guarantee the skim coat’s texture is consistent so wallpaper adhesion stays strong and long-lasting.
Do Building Codes or Insurance Affect Skim-Coating Historic Homes?
Absolutely — you’ll definitely need to check: historic preservation rules and building regulations often affect skim-coating in historic homes, and insurers may impose restrictions or require permits, so you’ll coordinate approvals to avoid costly violations.
Can Radiant Heating or Plaster Substrates Impact Skim Coat Adhesion?
Yes — radiant heating and plaster substrates can affect skim coat adhesion. You’ll use adhesion techniques and thorough substrate preparation, cleaning, scuffing, and priming to guarantee bond, and you’ll adjust materials for heat-related expansion.
Conclusion
Yes—you can skim over painted walls in many cases, and it’s often faster and cheaper than stripping. If the paint’s glossy, peeling, or oil-based, though, you’ll need to sand, degloss, or remove it first—otherwise the skim coat won’t stick. Don’t worry: a little prep (cleaning, sanding, primer) prevents wasted work and stress. If it still feels overwhelming, hire a pro—getting it done right will save you time, money, and sleepless nights.