How to Paint a Ceiling Properly Like a Professional Painter
You’ll get a professional ceiling by prepping thoroughly: clear the room, tape trim, prime stains, and set good lighting. Use a quality roller with an extension pole and a steady cutting brush for edges. Roll in consistent, overlapping strokes, maintain wet edges, and back-roll for a smooth finish; apply a second coat if needed. Control drips, keep ventilation, and inspect under bright light for touch-ups—follow these steps and you’ll learn the pro tricks that follow.
Quick Step-by-Step: Paint a Ceiling in a Day
Start by clearing the room and covering anything you can’t move—furniture, floors, and light fixtures—so you won’t waste time cleaning up.
Tape edges, prime stains, and cut in around trim.
Roll in consistent strokes, maintain wet edges, and apply a second coat if needed.
Choose ceiling color carefully to control lighting effects and guarantee even coverage for a neat finish.
What a Professional Ceiling Finish Looks Like
A professional ceiling finish looks smooth, even, and free of visible brush strokes or roller stipple, so when you step back the surface reads as one continuous plane; you’ll notice consistent sheen and no missed spots, drips, or lap marks that draw the eye.
You’ll evaluate ceiling textures and finish comparisons to confirm uniformity, subtle edge blending, and flawless color fidelity across the whole room.
Must-Have Tools: Rollers, Poles, Brushes, Gear
When you gear up for ceiling painting, pick rollers, extension poles, and brushes that match the job so you’ll work faster and get a smoother finish; choose roller types for texture and nap, match brush sizes to trim, and use sturdy extension poles.
Assemble painter gear like trays, drop cloths, and ladders. Keep a concise list of essential supplies for efficiency and safety.
Best Ceiling Paints and Finishes to Choose
Selecting the right ceiling paint and finish shapes both the look and durability of your job, so pick products designed for ceilings and the surface you’re covering.
Choose ceiling paint types like flat or low-sheen formulas that hide imperfections. For moisture-prone rooms use mildew-resistant variants.
Consider finish options: flat for hide, eggshell for slight washability, and semi-gloss sparingly for trims or damp areas.
When and Why to Prime a Ceiling
You should prime a ceiling whenever you’re covering stains, switching from oil to latex paint, or painting over a dark color.
Primer seals porous surfaces and improves paint adhesion so you get even coverage and fewer coats.
Using the right primer also blocks bleed-through and helps the topcoat last longer.
When To Prime
If your ceiling shows stains, bare drywall, or a drastic color change, prime it before painting to seal surfaces and guarantee even coverage.
You’ll prime when changing ceiling types, after surface preparation, or before bold color selection.
Consider priming benefits, application methods, finish durability, environmental factors, and cost considerations.
- stains
- new drywall
- dark-to-light color
- high-humidity rooms
- uneven texture
Why Primer Helps
Having decided when to prime, it helps to understand why a primer makes such a difference: it seals porous surfaces, hides stains, and creates a uniform base so paint adheres evenly and covers with fewer coats.
You’ll get primer benefits like improved ceiling adhesion, reduced tannin bleed, and truer topcoat color.
Primer also boosts durability, so your finish looks professional and lasts longer.
Priming Technique and Tips
Priming your ceiling creates an even, adhesive surface that helps paint hide previous stains and improves coverage, so start by sealing any water marks and sanding gloss finishes before you roll.
Choose primer types wisely and learn application methods to guarantee adhesion.
Tips:
- Use stain-blocking primer
- Thin for sprayer use
- Back-roll after spraying
- Tape edges tightly
- Dry fully between coats
Calculate Ceiling Paint and Material Quantities
Start by measuring the room’s length and width, then multiply those numbers to get the ceiling’s square footage so you can calculate how much paint and primer you’ll need.
Measure the ceiling—length × width—to find square footage and determine needed paint and primer.
Use a paint calculator to factor coats, ceiling texture, and waste.
Add primer, paint quantity, rollers, trays, tape, and drop cloths.
Round up slightly to avoid mid-job trips to the store.
Safety: Ladder Use, Ventilation, and Dust Control
Before you start painting, make sure you know ladder safety basics so you can work steadily and avoid falls.
Keep fresh air moving with proper airflow and fan placement to reduce fumes and speed drying.
Contain dust with drop cloths and masks so particles don’t spread or settle into wet paint.
Ladder Safety Basics
One simple rule: always inspect and position your ladder before climbing—check for damage, lock spreaders, place it on stable, level ground, and angle it about 75° so you can work without overreaching.
You’ll follow ladder inspection, choose ladder types and height, guarantee ladder stability, use ladder accessories, and prioritize ladder placement for ladder safety.
- Check hinges and feet
- Confirm rated load
- Use stabilizers
- Secure tools
- Avoid top rungs
Proper Airflow Ventilation
While you’re set up on the ladder, make sure fresh air is flowing through the room so fumes and dust don’t build up around your head; open windows or run an exhaust fan to push contaminants outside and, if possible, create a cross-breeze by using a second fan to draw air across the work area.
You’ll prioritize airflow importance and use simple ventilation techniques to keep breathing zones clear.
Dust Containment Techniques
Good ventilation keeps fumes moving, but you also need to stop dust from spreading while you scrape or sand the ceiling.
Use Dust control and Containment methods, plus Air filtration and Ventilation tips to protect health.
Apply Protective coverings and follow Cleanup strategies after work.
- Seal doorways
- Drop cloths
- Vacuum attachments
- HEPA filters
- Wet sanding
Prep the Room: Furniture, Floors, and Lighting
Start by clearing the ceiling area of furniture and fixtures so you have unobstructed access and won’t risk drips or dust settling on surfaces.
Move items out or to center, cover remaining pieces with furniture protection, and spread sturdy floor coverings.
Make lighting adjustments—use work lamps or reposition fixtures—and guarantee room accessibility for ladders and buckets so you can work safely and efficiently.
Fix Cracks, Stains, and Other Ceiling Imperfections
With the room prepped and protected, inspect the ceiling closely for hairline cracks, water stains, sagging texture, and nail pops so you know what repairs you’ll need.
Address issues:
- Patch and sand for crack repair and surface preparation
- Use stain removal primer for moisture control
- Match texture before painting techniques
- Consider color selection for lighting effects
- Plan ceiling maintenance for finish durability
Masking and Taping Trim, Fixtures, and Crown Molding
Before you begin rolling paint, protect trim, light fixtures, and crown molding by carefully masking and taping them so edges stay crisp and surfaces stay clean.
Use proper masking techniques: cut painter’s tape to length, press edges firmly, and overlap corners.
For tape application, run a putty knife along tape, remove bubbled sections, and replace with fresh tape for straight, paint-free lines.
Remove or Protect Light Fixtures and Vents Safely
Although you can often leave simple covers in place, it’s safer to remove or fully protect light fixtures and vents so paint doesn’t chip, stain, or get trapped in crevices.
You should follow safe fixture removal and vent protection steps, then cover or label parts.
- Turn power off
- Unscrew covers gently
- Tape wires and caps
- Bag fixtures and screws
- Mask surrounding ceiling
Cut In Cleanly: Edging Without Splatter
Now that fixtures and vents are out of the way or taped off, you can focus on clean edges.
Use a steady cutting technique with a sharp angled brush, paint less on the brush, and work in short strokes.
Hold the brush at a slight angle, feather the paint toward the center, and maintain edge precision to avoid splatter and minimize touchups later.
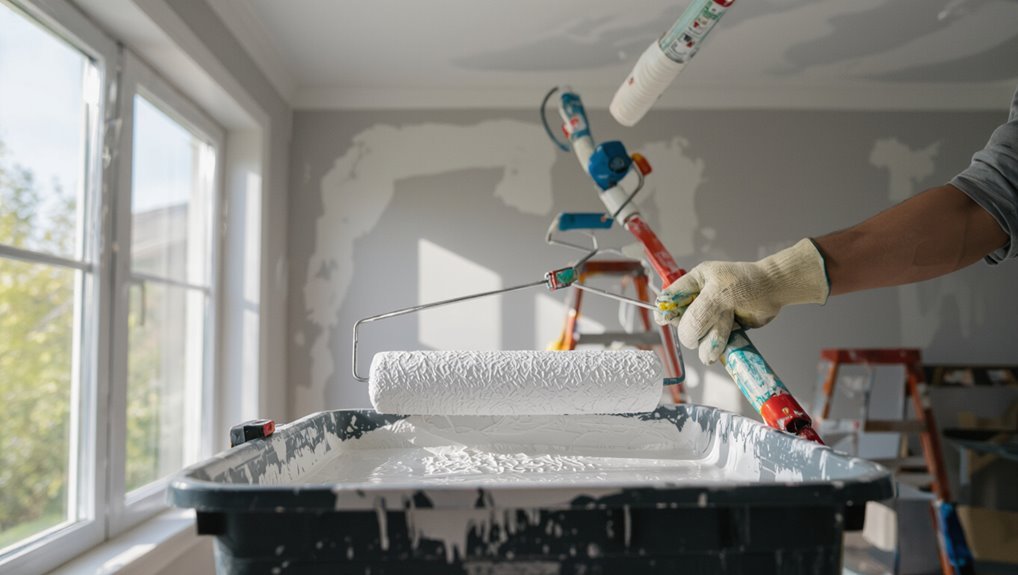
Load the Roller Like a Pro
Start by pouring paint into a clean tray until the well’s about half full. Then saturate the roller by rolling it back and forth through the paint and up the tray’s slope; you want the nap fully loaded but not dripping.
Use proper roller technique and check paint consistency.
Use proper roller technique and check paint consistency—load evenly, remove excess, and inspect for smooth, lump-free coverage.
- Load evenly
- Tap off excess
- Rotate the roller
- Refill sparingly
- Inspect for lumps
Rolling Technique for a Smooth Finish
Now that your roller’s loaded correctly, you’ll want to use even pressure and a steady rhythm to keep the paint consistent across the ceiling.
Overlap each stroke by about 3–4 inches so you don’t leave ridges or missed spots.
Keep your arm movement smooth and don’t stop mid-panel to maintain a seamless finish.
Proper Roller Loading
Load the roller evenly — not soaked, not skimpy — so it holds paint across the nap without dripping.
You’ll control roller technique and paint absorption to avoid splatter and uneven coverage. Check load, roll off excess, and maintain a damp-but-not-wet nap.
Use consistent pressure and reload before dry streaks appear.
- Dip halfway
- Roll in tray
- Remove drips
- Test on cardboard
- Maintain rhythm
Consistent Overlapping Strokes
Aim to keep each new pass overlapping the last by about one-third to one-half of the roller width so you blend edges and avoid lap marks.
You should maintain stroke consistency—same pressure, speed, and direction—using the overlapping technique to feather joins.
Work in manageable sections, reload before the roller dries, and lightly back-roll edges to guarantee an even, smooth ceiling finish without visible seams.
Avoid Lap Marks and Visible Seams
When you paint a ceiling, work wet-to-wet and keep a consistent roller pressure so your strokes blend before the paint dries; this prevents lap marks and visible seams by ensuring each pass overlaps into still-wet paint.
You’ll use lap mark prevention and seam blending techniques:
- Start with a loaded roller
- Maintain steady speed
- Overlap previous pass 50%
- Feather edges
- Monitor drying time
Control Drips and Splatter While You Work
Keep a light, even amount of paint on your roller and brush, and you’ll cut down on drips and splatter before they start.
Work in short, controlled strokes, reload less often, and tap excess paint back into the tray.
Use a good-quality roller cover and an angled brush for edges.
These habits improve drip control and splatter prevention while keeping cleanup minimal.
Painting Textured Ceilings vs. Smooth Ceilings
Although textured and smooth ceilings both need the same prep—cleaning, patching, and priming—you’ll use different tools and techniques: textured surfaces require thicker nap rollers or sprayers and lighter touch to avoid flattening the texture, while smooth ceilings take fine-nap rollers and careful feathering for an even finish.
- Use thicker nap for textured techniques
- Consider sprayer for deep texture
- Feather edges on smooth applications
- Match paint viscosity
- Inspect under different light
Popcorn Ceilings: Repair, Paint, or Remove?
Before you decide to paint or remove a popcorn ceiling, check whether it contains asbestos—if your home was built before the late 1970s, get a professional test.
If asbestos is present, you’ll need licensed removal rather than DIY work; if it’s clean, weigh the cost and mess of removal against repairs and repainting.
Consider repairs or skim-coating when the texture is sound, and choose removal only if you want a smooth, modern finish.
Assessing Asbestos Risk
Wondering whether that textured “popcorn” ceiling is safe to paint or repair? You should prioritize asbestos testing and follow strict health precautions before disturbing it.
If built before 1980, assume risk until proven otherwise. Consider these steps:
- Check construction date
- Hire licensed tester
- Avoid scraping
- Use protective gear
- Seal work area and ventilate
Removal Versus Repair
When deciding whether to leave, repair, paint, or remove a popcorn ceiling, weigh the condition, asbestos risk, budget, and your long-term goals. You’ll choose between removal methods or repair techniques: removal gives smooth modern finish but costs more; repair lets you spot-fix and paint sooner. Decide based on safety, time, and resale value.
| Option | Outcome |
|---|---|
| Leave | Quick, cheap |
| Repair | Targeted, fast |
| Paint | Cosmetic |
| Remove | Costly, smooth |
Drying Time, Recoats, and Final Timing Checklist
Because paint needs time to form a durable film, you’ll want to plan recoats and final checks around the manufacturer’s recommended drying times and the room’s temperature and humidity.
Use proper drying techniques and monitor drying conditions to set recoat timing and schedule final touch ups.
- Check label times
- Control ventilation
- Adjust for humidity
- Test tack-free state
- Inspect under good light
Troubleshooting: Streaks, Flash, and Patchiness
Even with proper drying and recoat timing, you may still run into streaks, flash, or patchy coverage that mar the final look. Diagnose streak causes: poor roller technique, uneven paint application, or bad surface preparation. Manage lighting effects and drying conditions for flash prevention. Use patchiness solutions: consistent application timing and color consistency.
| Fear | Fix |
|---|---|
| Panic | Breathe |
| Regret | Repair |
| Anger | Recoat |
| Hope | Finish |
Touch-Ups That Disappear: Blending Tips
When you touch up a ceiling, feather the edges of the new paint so it tapers into the old coat and leaves no hard lines.
Use the same sheen as the surrounding area—even a slight mismatch will show under light.
Work quickly while the paint’s wet and blend with light, overlapping strokes for an invisible finish.
Feathered Edge Technique
If you want touch-ups that vanish into the rest of the ceiling, master the feathered edge technique: lightly taper the paint at the repair’s perimeter so it blends seamlessly with the surrounding finish.
You’ll use feathered edges and precise blending techniques. Follow these steps:
- Thin application toward edges
- Light, overlapping strokes
- Use a dry brush to soften
- Match stroke direction
- Blend while paint’s wet
Match Sheen Carefully
After feathering the edges so the repair sits smoothly, make sure the paint’s sheen matches the surrounding ceiling — mismatched gloss is what usually gives touch-ups away.
Check the original finish types and test small areas under the same light.
Use the same sheen selection (flat, eggshell, or satin) and feather new paint into old, letting it cure before judging the blend.
Save Money Without Sacrificing a Pro Finish
Stretch your budget, not your patience: you can get a professional-looking ceiling without hiring pros by choosing the right materials, prepping efficiently, and using time-saving techniques that don’t cut corners.
Use cost effective techniques and DIY alternatives to save. Tips:
- Buy quality rollers, not the cheapest
- Patch and sand carefully
- Prime selectively
- Work in sections
- Keep steady lighting and clean tools
Eco-Friendly and Low‑VOC Ceiling Paint Options
Because you’re spending hours under that freshly painted ceiling, choosing low‑VOC or zero‑VOC paints matters for your health and indoor air quality as much as it does for the planet.
Pick eco friendly options with durable, washable formulas and good coverage to avoid extra coats.
You’ll enjoy low VOC benefits: reduced odors, quicker return to normal air quality, and safer rooms for kids and pets.
Final Inspection Checklist to Confirm a Pro Finish
Now that the paint’s dry, take a close look for any bumps, drips, or orange peel so the surface feels smooth to the touch.
Check all edges and corners for clean lines, missed spots, or paint build-up where walls meet the ceiling.
Fix any flaws with light sanding, touch-up strokes, or a steady edging brush before you call it finished.
Surface Smoothness Check
A smooth ceiling is the mark of a pro finish, so take a methodical walk-through to spot any flaws before you call the job done.
You’ll verify surface preparation and uniform ceiling texture, using consistent lighting and gentle touch. Check for blemishes, roller marks, thin spots, sagging paint, and texture inconsistencies.
- Roller lines
- Thin coverage
- Drips or sags
- Texture mismatch
- Repair seams
Edge And Corner Inspection
After you’ve confirmed the ceiling’s overall smoothness, turn your attention to edges and corners where flaws hide and touch-ups matter most.
Inspect bead lines, paint build-up, and any gaps from edge preparation. Run a bright light along the perimeter, feel for ridges, and tighten tape or feather paint as needed.
For corner detailing, use a small brush to correct overlap and guarantee crisp, seamless changes.
Frequently Asked Questions
Can I Paint a Ceiling in Cold or Humid Weather?
Yes, you can, but you shouldn’t in extreme conditions. You’ll follow ceiling preparation tips, monitor humidity effects, wait for temperatures above paint recommendations, use low-VOC paints and dehumidifiers, and avoid fast drying or poor adhesion issues.
How Long Should I Wait Before Reinstalling Light Fixtures?
You should wait until paint feels dry to the touch and meets the manufacturer’s recommended drying time—usually 24–48 hours—for light fixture safety; if humidity or temperature were high, extend drying time to 72 hours to be safe.
Will Ceiling Paint Prevent Mold in Bathrooms?
Like a shield against damp, ceiling paint won’t fully prevent mold; you should use mold resistant paint and guarantee strong bathroom ventilation. You can’t rely on paint alone, so control humidity and fix leaks promptly.
Can I Paint Over Wallpapered Ceilings Safely?
Yes — you can, but it depends on wallpaper types and ceiling preparation: you’ll need to secure loose seams, remove bubbling or vinyl if necessary, clean and prime properly, and use a suitable paint to guarantee adhesion and avoid peeling.
How Do I Paint Vaulted or Cathedral Ceilings Alone?
Start cautiously—you’re not safe if you rush: use roller technique with extension poles, scaffold or secure ladder safety, work from high to low, rest frequently, tape edges, and tackle sections methodically to avoid overreaching or drips.
Conclusion
You’ve now got the tools and rhythm to transform that overlooked overhead into a quietly impressive feature. Follow the steps, pick sensible products, and take your time with edges and blending; the payoff is a room that looks intentionally finished, not hastily patched. When you step back, you’ll notice the calm, balanced result—subtle evidence of care that quietly elevates the whole space without shouting about how it was done.