How to Paint a Metal Door That Is Peeling for a Fresh Finish
You can restore a peeling metal door by stripping loose paint, removing rust, and sanding smooth for good adhesion. Clean and degrease thoroughly, then apply a metal‑specific rust‑inhibiting primer to bare spots. Use two thin, even topcoats in your chosen sheen, allowing proper dry and cure times in moderate, low‑humidity conditions. Reinstall hardware and check seals for moisture prevention. Followed correctly, you’ll get a durable, fresh finish — keep going to learn detailed prep, products, and tips.
What a Peeling Metal Door Costs You Visually and Structurally
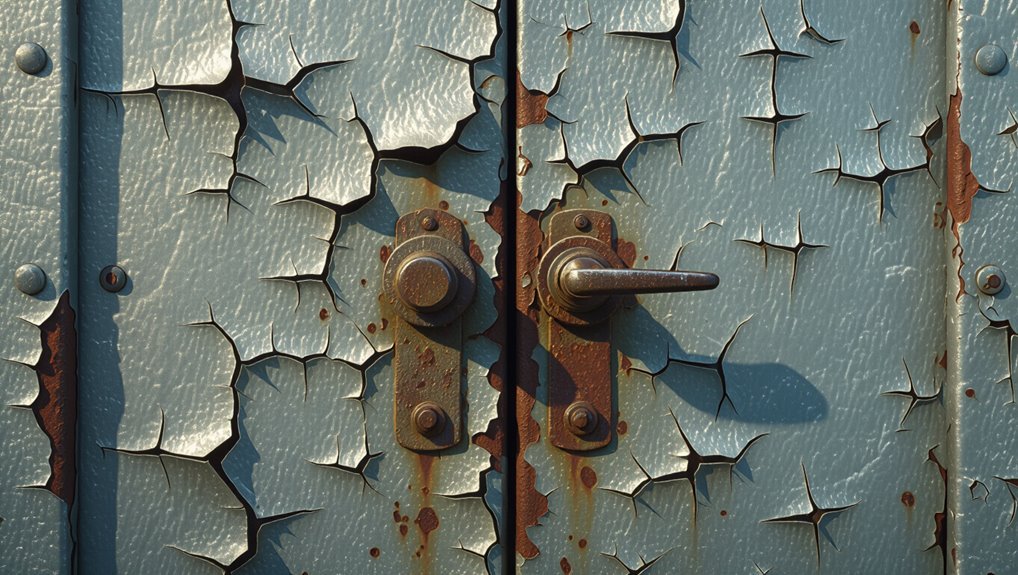
When paint peels from a metal door, it doesn’t just look neglected — it exposes the metal to moisture and oxygen, accelerating rust and weakening the door’s surface.
You’ll notice reduced visual impact and curb appeal, lowered aesthetic appeal, and compromised structural integrity.
Consider maintenance frequency to limit long term effects, weigh cost implications, and address safety concerns before damage worsens.
Repaint or Replace Your Metal Door: How to Decide
Wondering whether to repaint or replace your metal door? You’ll weigh condition, budget, and value.
Do a quick Cost Analysis: if rust, dents, or warped frame dominate, Door Replacement may be smarter.
Consider:
- Extent of damage versus repair effort
- Long-term savings and warranty differences
- Curb appeal and resale impact
Decide based on lifespan, not just immediate expense.
Quick Before‑You‑Start Checklist for Metal Door Repainting
Now that you’ve weighed repair versus replacement, get a short checklist together so the actual repainting goes smoothly and lasts. You’ll confirm safety, assess peeling issues, test adhesion, and plan for door aesthetics before starting. Use this quick guide:
| Check | Action |
|---|---|
| Surface | Inspect and mark peeled areas |
| Condition | Test rust, dents, and adhesion |
Tools and Materials You’ll Need for a Durable Metal‑Door Repaint
Before you start, gather the essential prep supplies—sandpaper, a wire brush, degreaser, tack cloths, and rust converter—to make sure the surface will hold paint.
Pick a high‑quality metal primer plus a durable exterior enamel or acrylic latex topcoat, and decide whether a satin or gloss finish suits the door.
You’ll also want brushes or a roller rated for metal, drop cloths, and gloves so the job goes smoothly and lasts.
Essential Prep Supplies
Checklist in hand, you’ll gather a few key tools and materials that make a metal‑door repaint durable and trouble‑free: drop cloths, a high‑quality degreaser, rust remover or converter, medium and fine grit sandpaper or sanding blocks, a wire brush, tack cloths, corrosion‑inhibiting primer rated for metal, exterior metal paint, appropriate brushes or a small roller, painter’s tape, and safety gear (gloves, goggles, and a respirator if you’re using solvents).
- prep techniques matter
- surface cleaning prevents failure
- proper safety saves time
Paints And Finishes
With the door cleaned, prepped, and primed, you’ll pick paints and finishes that bond to metal and stand up to weather.
Choose among metal paint options like alkyd, acrylic, or rust‑inhibiting enamel. Match topcoats for finish durability—satin hides imperfections, gloss resists scuffs.
Use a corrosion‑blocking primer, high‑quality brush or sprayer, and follow manufacturer cure times for a long‑lasting result.
Safety Gear and Ventilation Best Practices
1 key rule: protect your lungs, eyes, skin, and hearing while you paint a metal door.
Use safety measures and follow ventilation tips so fumes and dust won’t harm you. Wear proper gear, work with airflow, and limit exposure.
Use proper gear, ensure good airflow, and limit exposure so fumes and dust won’t harm you.
- NIOSH-rated respirator for solvents
- Safety goggles and gloves
- Cross-ventilation or exhaust fan
Inspecting Paint Failure: Peeling, Flaking, Bubbling
Start by looking closely at where paint is peeling, flaking, or bubbling so you can spot the pattern and extent of the failure.
Those patterns often point to causes like poor adhesion, moisture, or rust beneath the surface.
Once you’ve identified the pattern and likely cause, you can choose the right repair and prep steps.
Identifying Peel Patterns
Peel patterns tell you why paint failed and where to focus repairs, so learn to recognize the differences between peeling, flaking, and bubbling.
Use peel analysis to judge paint lifespan and decide if spot repairs or full stripping are needed.
Look for:
- Large sheets detaching from poor adhesion
- Fine flakes from brittle, aged coatings
- Blisters indicating trapped moisture beneath
Detecting Underlying Causes
Why is the paint failing here?
You’ll inspect edges, seams, and beneath trim to pinpoint peeling causes: moisture, rust, contamination, or incompatible previous coatings.
Test adhesion by scoring and tap tests, probe bubbles, and check for trapped solvent.
Document problem spots, remove loose material, and address the root (dehumidify, treat rust, or strip incompatible layers) before repainting to guarantee proper paint adhesion.
Checking the Metal: Dents, Holes, Rust, and Structural Damage
Before you prime or sand, carefully inspect the door for dents, holes, rust, and any structural damage so you know what repairs are needed.
Check metal condition with a thorough surface evaluation and rust assessment. Plan dent repair and hole filling to restore structural integrity.
- Note depth and spread
- Prioritize corrosion removal
- Match filler to metal type
When to Call a Pro for Structural or Safety Concerns
If you spot visible structural damage like bent frames, big gaps, or deep corrosion, you should call a pro—those issues can affect the door’s integrity.
Also get professional help if safety hardware (locks, deadbolts, closers) is compromised or won’t operate smoothly.
And if the door is near exposed wiring, heaters, or any fire risk, don’t try to fix it yourself.
Visible Structural Damage
Cracks, dents, warping, or areas where metal has been pushed out of alignment are signs you shouldn’t ignore—call a pro when damage affects the door’s frame, hinges, lockset, or any part that compromises security or safe operation.
You’ll want an expert to assess structural integrity and apply proper repair techniques.
- Hidden frame fractures
- Bent hinge mounts
- Misaligned locking components
Safety Hardware Compromised
When safety hardware like deadbolts, strike plates, or peepholes shows signs of damage or tampering, call a professional—these components control how the door locks, latches, and resists forced entry. A DIY fix can leave vulnerabilities.
You should stop painting and get an expert assessment if you have safety concerns or doubt hardware integrity. They’ll repair or replace parts to restore secure operation.
Electrics Or Fire Risk
Because paint work can expose wiring, heat sources, or hidden gaps that affect fire safety, stop and call a professional whenever you notice exposed electrical boxes, scorched or melting components, a persistent burning smell, or if the door sits near a heater or sealed-up vent that could trap heat.
An electrician or fire-safety tech will evaluate wiring, grounding, and clearances to prevent shocks and reduce fire risk.
- electrical safety checks
- clearance and ventilation
- addressing fire hazards
Best Primers and Paints for Exterior Metal Doors
Choosing the right primer and paint makes the difference between a door that resists weather and one that peels within a season, so you’ll want products formulated for exterior metal.
Look for the best exterior primers with rust inhibitors and excellent adhesion, then pair them with top metal paints rated for UV and moisture resistance.
Follow manufacturer cure times for a durable finish.
Oil‑Based vs. Water‑Based Paint for Metal: Pros and Cons
Deciding between oil‑based and water‑based paint for a metal door comes down to tradeoffs in durability, drying time, and cleanup, and knowing those differences helps you pick the right finish for your climate and maintenance preferences.
Deciding between oil- and water-based paint for metal doors means weighing durability, drying time, and cleanup tradeoffs.
Consider:
- Oil based advantages: superior finish durability and paint longevity, different application techniques, longer drying time, tougher cleanup process.
- Water based drawbacks include faster wear in harsh climates.
- Environmental impact favors water based.
Picking a Rust‑Inhibiting Primer for Steel Doors
Once you’ve picked between oil‑ and water‑based paints, you’ll want a rust‑inhibiting primer that matches both your door’s condition and the topcoat.
Choose between epoxy, zinc‑rich, or oil‑based primers depending on bare metal, light surface rust, or previously painted surfaces.
Prioritize rust prevention, adhesion, and compatibility.
Test a small area, follow dry times, and apply thin, even coats for best protection.
Choosing a Finish: Satin, Semi‑Gloss, or Gloss for Doors
Think about how much wear the door will get, since glossier finishes stand up to scuffs and cleaning better than satin.
You’ll also want to contemplate how much sheen and light reflection you want — high gloss highlights imperfections but creates a striking shine, while satin gives a softer look.
Finally, pick a finish that makes maintenance easy for you: glossier surfaces wipe clean faster, satin hides fingerprints a bit more.
Durability And Wear
Because your door gets the most contact and the most weather, choosing the right sheen matters: satin, semi‑gloss, and gloss each offer different levels of durability, scuff resistance, and ease of cleaning, so match the finish to how the door is used and where it’s located.
Consider durability factors and wear resistance:
- Satin hides minor flaws, resists light scuffs.
- Semi‑gloss balances toughness and subtle shine.
- Gloss offers highest wear resistance for heavy use.
Sheen And Light Reflection
Sheen affects how light plays off your door and how visible imperfections will be, so pick a finish that suits the room and the door’s use. You’ll choose among sheen options like satin, semi‑gloss, or gloss; consider desired light effects and traffic. Compare quickly:
| Finish | Best use |
|---|---|
| Satin | Low sheen, subtle |
| Semi‑gloss | Balanced reflection |
| Gloss | High reflection |
Maintenance And Cleaning
1 key consideration when choosing between satin, semi‑gloss, or gloss for a door is how easy the finish will be to clean and keep looking good; you’ll want a surface that stands up to fingerprints, scuffs, and routine washing without losing its appearance.
For metal door maintenance, pick a finish that tolerates common cleaning techniques:
- Gloss: best for frequent wiping
- Semi‑gloss: balanced durability and look
- Satin: hides flaws but needs gentler care
How Climate and Location Change Your Paint Choices
When you pick paint for a metal door, consider where the door lives and what weather it faces—sun, salt, humidity, and temperature swings all change how paint performs.
Account for climate effects: UV-resistant finishes for hot sun, corrosion-resistant or marine-grade coatings near coasts, and flexible formulas for freeze-thaw zones.
Use location considerations to choose primer, topcoat, and maintenance frequency.
Setting Up Your Workspace and Protecting Nearby Surfaces
Before you open a can, clear and protect the area so dust, drips, and overspray don’t ruin floors, hardware, or nearby trim.
Arrange tools for efficient workspace organization and plan surface protection:
- Lay drop cloths and tape edges securely
- Move or cover nearby furnishings and rugs
- Keep sandpaper, scraper, and primer within reach
Work tidy to reduce cleanup and mistakes.
Masking Glass, Weatherstripping, and Hardware Properly
Although metal doors look smooth, exposed glass, weatherstripping, and hardware are vulnerable to paint, so mask them carefully to get clean lines and avoid damage.
Use quality masking tape for crisp edges, apply glass protection film, and press tape edges firmly.
Remove or cover locks and hinges for hardware safety.
Learn simple weatherstripping techniques to avoid sealing paint into gaps and guarantee smooth repainting.
Removing Loose Paint From a Metal Door Safely
Before you start scraping, put on gloves, eye protection, and a dust mask so you won’t inhale particles or get chips in your eyes.
Use a putty knife or a metal scraper at a low angle to remove loose paint without gouging the door.
After scraping, wipe the surface with a degreaser or solvent and sand any rough spots so the primer and paint will stick.
Wear Protective Gear
When you’re scraping loose paint from a metal door, wear proper protective gear so dust and flakes don’t get in your eyes, lungs, or on your skin.
Use protective gloves, safety goggles, a respirator mask, a work apron, and non slip footwear.
Run ventilation fans and keep a first aid kit plus emergency contacts nearby.
- Protect your eyes and lungs.
- Prevent skin contamination.
- Prepare for accidents.
Use Proper Scraping Tools
Grab the right scraper and get a clean, solid surface to work from: use a sturdy metal or carbide scraper for thick, flaking paint and a plastic or putty knife for softer areas to avoid gouging the metal.
You’ll practice scraping techniques with steady, angled strokes, keeping blades sharp.
Prioritize proper tool selection for safe, efficient removal and to protect underlying metal.
Clean And Prep Surface
Start by removing dust, grease, and remaining loose paint so new finish will bond properly: wash the door with a degreasing detergent or trisodium phosphate (TSP) solution, rinse thoroughly, then dry; follow by scraping any remaining flaky paint with a metal or carbide scraper held at a low angle, using a plastic putty knife in soft spots to avoid gouging.
- Inspect for rust and adhesion
- Apply cleaning techniques consistently
- Perform a thorough surface evaluation
When and How to Use Chemical Paint Strippers
If the old paint’s thick, layered, or failing to sand smooth, chemical strippers can save you hours of labor—just know they’re powerful and demand careful use.
Choose stripping methods suited for metal—gel for verticals, poultice for crevices.
Work outdoors or ventilated, wear gloves, goggles, respirator.
Follow label instructions, neutralize residues, and dispose of waste per local regulations for chemical safety.
Sanding Techniques for Smooth Metal Surfaces
Before you prime, you’ll sand the door to remove any loose paint and rust so the surface will hold new paint.
Use coarse grit to strip flaky areas, then switch to finer grit to smooth scratches and feather edges.
Keep pressure even and check your progress often so you end up with a uniform, paint-ready finish.
Removing Loose Paint
Scrape and sand away any loose or flaking paint so the new finish will adhere evenly to the metal.
You’ll tackle peeling paint and prioritize efficient paint removal before priming. Use a scraper, sandpaper, and wire brush to reach crevices. Stop when edges are feathered and stable.
- Scraper: remove large flakes
- Sandpaper: smooth edges
- Wire brush: clean crevices
Achieving Smooth Finish
Now that loose paint is removed and edges are feathered, focus on sanding to create a smooth, uniform surface that helps primer and paint adhere.
Use 120–220 grit sandpaper, progressing finer for metal sheen. Sand with the grain, keep even pressure, and wipe dust with a tack cloth.
These smoothing techniques emphasize preparation importance, ensuring primer bonds and your finish lasts.
Removing Rust With Wire Brushes and Abrasives
Grab a stiff wire brush and start working through the flaky rust, then switch to finer abrasives to feather the edges and reach tight spots.
You’ll use wire brush techniques and select abrasive materials for control. Clean debris, inspect for remaining pits, and prep for primer.
- Remove loose scale
- Smooth sharp edges
- Clear crevices for adhesion
Treating Stubborn Rust With Converters and Inhibitors
If rusted areas are too deep or pitted for brushing alone, you’ll treat them with a rust converter or inhibitor to stop corrosion chemically and create a paint-ready surface.
You’ll apply per manufacturer directions, neutralize residue, and let curing complete.
These rust treatment methods pair with primers formulated for metal; using proven corrosion prevention techniques guarantees paint bonds and rust won’t return.
Cleaning the Door: Degreasers and Solvent Wipes
Start by removing grease, oil, and grime so paint will adhere evenly; use a citrus or water‑based degreaser for general cleaning and solvent wipes for stubborn residues like silicone or wax.
Remove grease and grime first; use citrus or water-based degreasers and solvent wipes for stubborn residues like silicone.
You’ll employ proper degreasing techniques and deliberate solvent selection to avoid damage.
- Test a small area first
- Wipe with lint‑free cloths
- Let surfaces fully dry before priming
Repairing Dents and Holes in Metal Doors
Once the door’s clean and dry, assess dents and holes to determine the right repair method.
You’ll use basic denting techniques—tap edges inward with a rubber mallet, push small dents out from the back when accessible, and sand lightly to feather edges.
For holes, select appropriate hole patching: metal backing or a welded plug for large gaps, temporary patch plates for small breaches.
Using Body Filler and Metal Putty Correctly
Before you apply filler, make sure the surface is clean, dry, and roughened so the material will bond. Sand the repair area to bare metal around the damaged spot and wipe away dust and grease.
Ensure the area is clean, dry, and roughened—sand to bare metal and remove all dust and grease before filling.
Use proper body filler techniques and metal putty application:
- Mix fillers per instructions.
- Apply thin layers, let cure.
- Sand progressively, feather edges for paint-ready surface.
Replacing or Prepping Hardware Before Painting
Before you paint, you should remove hardware carefully so screws and small parts don’t get lost or damaged.
Swap out any rusted locks, hinges, or screws to guarantee the finished job lasts.
If you’re keeping fixtures, tape or cover them thoroughly to protect finishes from paint.
Remove Hardware Carefully
Start by removing doorknobs, deadbolts, kick plates, and any decorative trim so you can paint cleanly and get professional-looking edges.
You’ll inspect hardware types and choose proper removal techniques to avoid damage. Keep parts labeled and protected; you can replace later if needed.
- Label screws and parts
- Store small pieces in a bag
- Note orientation for reassembly
Replace Rusted Components
If any screws, plates, or hinges show visible rust or pitting, replace or thoroughly prep them now so the finished paint won’t peel or stain the door. You’ll do rust removal with a wire brush, sandpaper, or rust converter; consider component replacement for badly pitted parts. Choose stainless or zinc-plated hardware to prevent recurrence.
| Action | Tool |
|---|---|
| Clean | Wire brush |
| Treat | Rust converter |
| Replace | New hardware |
Protect Fixtures During Paint
Get your fixtures ready for paint by either removing them or shielding them carefully so the finish stays clean and the hardware doesn’t get damaged.
You’ll choose fixture protection or use paint masking to avoid overspray. Consider these steps:
- Remove knobs and hinges for thorough painting.
- Wrap immovable hardware with tape and paper.
- Label and store parts to speed reassembly.
Choosing and Applying the Right Primer Coat for Metal
Because metal reacts differently than wood or drywall, you’ll need a primer that bonds to metal and prevents rust before you paint.
You’ll want to pick the right type based on the door’s metal and condition. Choose among oil-based, epoxy, or self-etching primer types.
Clean and de-rust, then follow recommended application techniques—brush for edges, roller for flats, spray for smooth coverage.
How Long to Wait Between Primer and Paint Coats
While you’ll often want to paint as soon as possible, waiting the right amount after primer guarantees better adhesion and a smoother finish.
Waiting the right amount after priming ensures better adhesion and a smoother, longer-lasting paint finish.
You should follow manufacturer dry times and consider temperature and humidity. Adjust the waiting period for coat thickness; thicker primer needs longer cure.
Quick checklist:
- Check label dry-to-recoat time
- Feel for tackiness before painting
- Longer wait in cool, humid conditions
Cutting In Around Edges and Panels Like a Pro
Before you start rolling, tape the edges and any recessed panels so you get clean lines and protect hardware.
Use a steady, angled brush to cut in around the frame, keeping light, controlled strokes toward the center of the door.
For panels, switch to a slightly stiffer brush and follow the grain or molding contours to lay paint smoothly without drips.
Prep Edges With Tape
Taping the edges makes the difference between a crisp, professional-looking finish and messy paint bleed—so take a few extra minutes to do it right.
You’ll focus on tape application and edge sealing: press tape firmly, overlap slightly at corners, and remove while paint’s tacky.
Follow this checklist:
- Clean, dry surface
- Smooth, continuous tape lines
- Pull tape back at 45° angle
Brush Technique For Panels
Start by loading your brush correctly—dip only the tip into the paint about a quarter-inch, then tap off excess on the can’s lip—so you have control when cutting in around panels and edges.
Hold the brush at a shallow brush angle, work from the center toward panel edges, use steady short strokes, and clean up drips immediately for crisp lines and a professional finish.
Roller, Brush, or Spray: Choose the Right Application
Wondering whether to roll, brush, or spray your metal door? You’ll choose based on finish, access, and paint types.
Match application methods to door condition:
- Roller: smooth, even coverage for flat areas, minimal texture.
- Brush: precise control for panels, edges, and detail.
- Spray: fastest, uniform coat for complex profiles; requires masking and practice.
How to Spray a Metal Door Without Runs or Orange Peel
If you opt for spraying to get a uniform, factory-like finish, you’ll want to control atomization, distance, and overlap to prevent runs and orange peel.
Use steady, even passes with correct nozzle size, thin coats, and proper pressure. Keep the gun 8–12 inches away, overlap 50%, and inspect between coats.
Proper spray technique guarantees consistent finish quality and minimizes rework.
Brush and Roller Techniques for Smooth, Even Coats
When you’re working with a brush or roller on a metal door, focus on thin, even passes and maintain a wet edge to avoid lap marks and brush strokes.
Use proper brush techniques and roller techniques to control texture, follow grain, and blend edges.
Tips:
- Load less paint for control
- Stroke with the grain
- Lightly roll out for uniformity
How Many Coats You Need and How to Layer Them
Start by evaluating the door’s surface—smooth, rusted, or previously painted—so you know how many coats you’ll need.
If the primer needs rejuvenating between layers, apply a thin bonding coat and let it dry before the next paint pass.
Keep the final coat thin and even to avoid runs and guarantee durable coverage.
Assess Surface Condition
Although a smooth, clean surface makes painting easier, you’ll need to assess dents, rust, old paint, and primer to decide how many coats to apply and in what order.
Do a surface assessment for peeling signs and adhesion. Then plan coats by severity:
- Minor wear: one topcoat
- Peeling/rust spots: spot treat, two coats
- Heavy damage: repair, three coats
Prime Between Coats
A single well-planned primer coat can make the difference between a durable finish and one that peels, so apply primer whenever you’re covering bare metal, bare wood patches, or areas where rust or old paint was removed.
Choose primer types suited to metal; use one coat, sand lightly, then a thin second primer spot-coat only where needed.
Mind coat thickness to avoid runs.
Final Coat Thickness
Once your primer’s smooth and dry, decide how many finish coats you’ll need based on the paint type and the door’s exposure; most enamel or acrylic metal paints cover in two thin coats, while high-gloss or darker colors may need three for uniform coverage.
Aim for final coat thickness that’s thin and even for durability and ideal layering.
- Apply thin, even coats
- Sand lightly between coats
- Let full cure before use
Drying Times and Ideal Curing Conditions
Because temperature, humidity, and paint type all affect how fast your metal door dries, you should plan for both tack-free time and full cure when scheduling use.
Check the paint label for drying times, allow longer in cool or humid conditions, and keep ventilation steady.
Ideal curing conditions are moderate heat, low humidity, and dust-free airflow to guarantee a durable finish.
Avoiding Painting Defects: Drips, Brush Marks, Fish Eyes
Three simple habits will prevent most painting defects when you work on a metal door: keep your tools and surface clean, use the right amount of paint, and control your stroke technique.
You’ll focus on surface preparation, drip prevention, proper application methods, and brush techniques to guarantee paint adhesion.
Finish inspection catches fish eyes early.
- Clean tool care
- Consistent strokes
- Thin, even coats
Fixing Mistakes Mid‑Project Without Starting Over
If you notice runs, uneven coverage, or stray drips while the paint’s still tacky, don’t panic—you can usually correct them without stripping the whole door.
Gently level runs with a clean brush, sand dried blemishes smooth, and feather in thin coats.
Practice mistake management by addressing flaws promptly, keeping project flexibility for touch‑ups, and letting each repair fully dry before recoating.
Reinstalling Hardware and Weatherstripping Correctly
When you reinstall the hardware, start by aligning the hinges and strike so the door closes smoothly and the painted edges don’t bind.
Fit the weatherstripping tightly and evenly to keep drafts and moisture out without compressing it too much.
Finally, reattach locks and handles, testing each to make sure the latch and deadbolt operate freely.
Align Hinges And Strike
Although the paint job is mostly finished, you’ll want to reinstall hinges, strike plates, and weatherstripping with care so the door closes smoothly and seals properly.
Check hinge alignment before tightening screws. Test the latch engagement with the strike plate. Adjust as needed for a snug, even fit.
- Align hinges precisely
- Verify strike plate contact
- Tighten progressively for balance
Install Weatherstripping Properly
Now reinstall the weatherstripping so the door seals tightly and the hardware operates smoothly; peel-and-stick or screw-on strips should sit flush against the door edge and frame without bunching or gaps.
Choose weatherstripping materials suited to your climate, clean surfaces, measure accurately, and follow installation techniques that guarantee even compression.
Test the seal by closing the door, adjusting strip position for consistent contact.
Reattach Locks And Handles
With the weatherstripping in place, you can reinstall the locks and handles so the door functions smoothly and seals evenly.
Use hardware reinstallation tips and lock alignment techniques to avoid binding. Check fit, tighten evenly, and test operation.
- Verify latch strike alignment
- Tighten fasteners incrementally
- Test keys and handle motion before finishing
Protecting Fresh Paint From Scuffs and Scratches
Because fresh paint is delicate for the first few days, you’ll want to minimize contact and shield high-traffic areas so scuffs and scratches don’t ruin your work. Use surface protection techniques like drop cloths, foam bumpers, and clear guards while maintaining paint durability with proper cure time. Protect handles and edges; check weekly for touch-ups.
| Item | Purpose | Duration |
|---|---|---|
| Drop cloths | Catch drips | Temporary |
| Foam bumpers | Prevent knocks | Weeks |
| Clear guards | Shield finish | Until cured |
Best Months and Timing to Paint an Exterior Metal Door
In spring and fall, when temperatures stay between about 50°F and 85°F and humidity is moderate, you’ll get the best adhesion and drying for exterior metal door paint.
Plan around weather windows for spring painting and fall preparations.
Consider timing for scuff resistance and curing:
- Paint after dew evaporates
- Avoid windy, dusty days
- Allow 24–48 hours between coats
Painting in Heat, Cold, or High Humidity
Spring and fall offer ideal windows for painting, but you’ll sometimes need to work in heat, cold, or high humidity—each poses specific challenges for adhesion, drying time, and finish.
Adjust timing and technique for weather conditions: paint earlier or later in the day in heat, avoid painting when frost’s possible, and account for humidity effects that extend drying times.
Mind temperature impact on cure and adhesion.
Long‑Term Maintenance to Keep the Finish Durable
When you want your door to look good for years, a simple routine of cleaning, inspection, and touch‑ups will do most of the work; perform these tasks every 3–6 months and after severe weather to catch problems early.
You’ll extend the finish with preventative measures and routine inspections:
Extend the finish with simple preventative care and regular inspections to catch issues early.
- Clean dirt and debris promptly.
- Check hinges, seals, and weatherstripping.
- Reapply sealant as needed.
Touch‑Up Techniques for Chips and Small Scratches
Routine checks will also reveal the small chips and scratches that, if ignored, invite rust and worsen over time.
You’ll clean the area, remove loose paint and rust, sand lightly, apply a rust inhibitor, then use appropriate primer before paint.
For quick chip repair, use a fine brush or paint pen and feather edges for a neat finish; let cures fully between coats.
Matching Color and Sheen for Seamless Touch‑Ups
How do you get a repair to disappear instead of stand out? You match color harmony and sheen balance by testing small swatches, feathering edges, and using matching sheen paint.
Check light angles, let samples dry, and compare. Apply touch‑ups sparingly for an even look.
- Test swatches
- Feather edges
- Match sheen
Disposing Paint Scrapings and Used Solvents Safely
If you’ve finished scraping paint or cleaning brushes, don’t just toss the waste in the trash or down the drain—those scrapings and solvents can harm people and the environment, so dispose of them properly by following local hazardous‑waste rules, separating solids from liquids, and using sealed, labeled containers for transport to a disposal facility. You’ll protect health and reduce environmental impact.
| Item | Prep | Drop‑off |
|---|---|---|
| Paint chips | Bag dry | HHW facility |
| Solvent | Evaporate? No | Store sealed |
| Rags | Air out, bag | Hazardous waste |
DIY Cost Breakdown vs. Hiring a Pro
Once you’ve handled waste responsibly, you’ll want to weigh the true costs of doing the door yourself versus hiring a pro.
Once waste is properly managed, weigh DIY savings against pro expertise, speed, and warranty before deciding.
You’ll enjoy DIY savings on materials and time flexibility, but hiring brings professional expertise and warranty peace of mind.
Compare expenses, skill, and risk:
- Materials, tools, and time investment
- Speed, finish quality, and warranty
- Hidden costs vs. liability
Troubleshooting: Answers to the Most Common Repaint Problems
You’ll want to start by prepping the surface correctly so paint can grip and look smooth.
If rust keeps coming back, you’ll need to remove it fully and use a rust-inhibiting primer to stop recurrence.
For adhesion problems, check for contaminants, scuff the finish, and use a compatible primer and paint.
Prep Surface Properly
1 clear prep step sets the stage for a long-lasting finish: clean, de-rust, and scuff the door so new paint can bond properly.
You’ll focus on surface cleaning to boost paint adhesion and avoid future peeling. Do these:
- Remove loose paint and grease
- Sand to dull glossy spots
- Wipe with solvent and dry thoroughly
Prevent Rust Recurrence
Now that the surface is clean, rust prevention becomes the priority to keep your new finish looking good and intact. You’ll control moisture management, apply a rust-inhibiting primer, seal edges, and maintain weatherstripping. Inspect regularly and touch up chips promptly.
| Action | Benefit |
|---|---|
| Primer | Blocks corrosion |
| Seal edges | Stops moisture |
| Weatherstrip | Reduces exposure |
| Inspect | Catch issues early |
| Touch-up | Prevents spread |
Fix Paint Adhesion
If paint’s peeling, flaking, or bubbling on your metal door, it’s usually because the surface wasn’t prepped, the wrong products were used, or moisture’s working from underneath—so you’ll need to diagnose the cause before reapplying.
Use proper surface preparation, sanding, and primers. Apply proven adhesion techniques and the right paint.
Steps:
- Remove loose paint and rust
- Clean and degrease
- Prime with metal-specific primer
Frequently Asked Questions
Can I Paint a Metal Door While It’s Still Installed on Hinges?
Yes, you can paint a metal door while it’s on hinges, but you’ll need thorough door preparation to avoid drips and overspray; use spray painting outdoors or with drop cloths, mask hardware, and work in even, controlled passes.
Will a Painted Metal Door Affect My Home’s Energy Efficiency?
Like a warm coat for a shivering traveler, your painted metal door can help—yes, it brings energy efficiency benefits and insulation improvement, reducing drafts and heat loss, so you’ll save on bills and stay more comfortable.
How Do I Prevent Paint From Bonding to Door Weatherstripping?
You prevent paint bonding by doing weatherstripping removal before painting, masking remaining strips with tape, and applying primer only to metal; this reduces paint adhesion to seals, and you’ll avoid messy, permanent coating on weatherstripping.
Can I Change the Door Color Drastically Without Stripping All Old Paint?
Boldly, brightly: yes — you can change colors drastically without stripping everything. You’ll choose color selection carefully, sand and prime spottily, and use high-quality primer and paint for paint durability, so finish lasts and looks lively.
Is It Safe to Paint a Fire-Rated Metal Door Myself?
You can, but you shouldn’t assume it’s safe: you’ll need to check fire door regulations, follow DIY painting tips precisely, avoid altering seals or hardware, and consider a professional if the rating could be compromised.
Conclusion
You’ve done the sensible thing by choosing refresh over replacement — your door wasn’t beyond help, just a bit tired. With careful prep, the right tools, and rust‑stopping paint, you’ll gently disguise years of weathering and restore a confident, well‑kept look. Treat this as a graceful makeover, not a dramatic overhaul: small, thoughtful fixes give lasting results and keep your entryway looking politely proud for seasons to come.