How to Fix Orange Peel on Spray Paint Like a Pro
You can fix orange peel by wet‑sanding and polishing small areas or by repainting when texture is deep. Start by cleaning and testing adhesion, then wet‑sand with progressively finer waterproof grits (around 800→2000+), rinse and inspect, then compound and polish to restore gloss. Adjust spray technique, pressure, and thinning for future coats to prevent recurrence. Use safety gear and test spots first; keep going and you’ll find step‑by‑step tips and when to call a pro.
Quick Answer Can You Fix Orange Peel on Spray Paint?
Yes — you can often fix orange peel by wet-sanding the texture and polishing or by applying a light clear-coat and smoothing it out.
Try repair when the finish is sound and the texture is minor; opt to repaint if the coverage is thin, the color’s uneven, or the surface has runs or contamination.
Start with small test spots so you don’t make things worse.
Direct short solution summary
If the orange peel is mild, you can usually fix it yourself by wet-sanding and polishing; deeper texture may need repainting or blocking with primer first.
To quickly address it, sand with fine grit, clean, compound, and polish for smooth results.
For persistent texture, recoat correctly—proper surface prep, thin even coats, correct distance and temperature—to prevent recurrence of how to fix orange peel spray paint.
When to attempt repair vs. repainting
Wondering whether to repair or repaint?
You should repair small, shallow orange peel on durable, well-adhered coatings—wet-sand, polish, and blend.
Repaint when texture is deep, widespread, or the old paint flakes, discolors, or has adhesion problems.
Consider color-match difficulty and time: repairs save time on minor flaws; repainting gives a flawless, long-term solution for significant defects.
What Is Orange Peel and Why It Happens
Orange peel is the bumpy, textured finish you see when spray paint doesn’t level smoothly, and you’ll notice it by its tiny dimples and lack of gloss.
It happens when application technique, spray equipment, environmental conditions, or the paint and surface itself prevent the coating from flowing out properly.
Unlike runs, dust nibs, or sags, orange peel is a uniform texture problem rather than isolated drips, particles, or vertical deformation.
Definition and visual characteristics
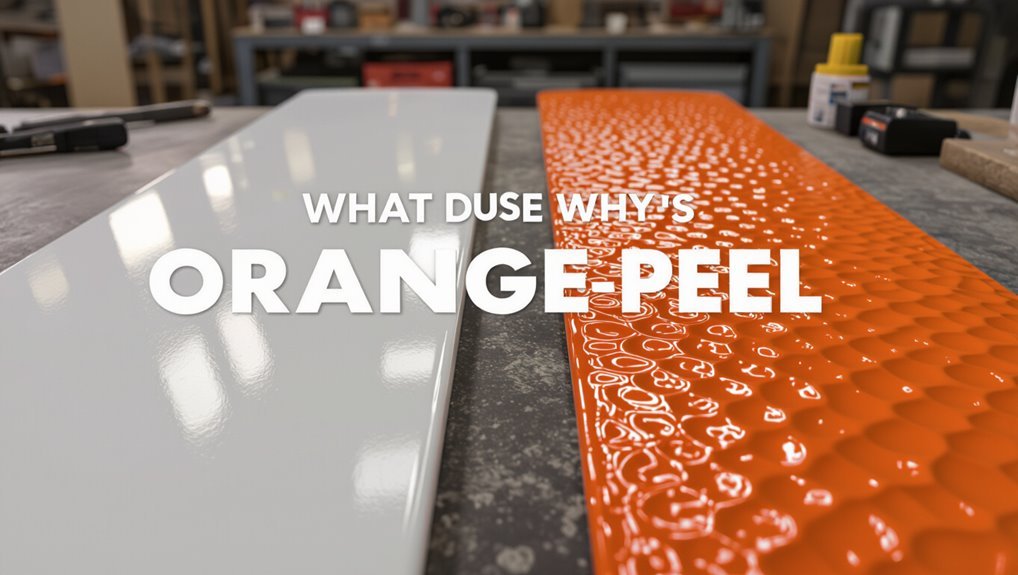
When paint doesn’t level out as it dries, it can leave a bumpy, dimpled texture known as orange peel that looks like the skin of a citrus fruit.
You’ll see uneven light reflection, tiny hills and valleys, and a matte or semi-gloss finish that reads rough.
It’s visible at close range and under oblique lighting, disrupting smooth, continuous coverage.
Causes: application, equipment, environment, and material factors
Because spray finish depends on a delicate balance of factors, orange peel usually comes from something going wrong during application, with the equipment, in the environment, or in the materials you’re using.
You can spot causes quickly:
- Incorrect spray technique or distance
- Poorly adjusted or dirty equipment
- Wrong temperature, humidity, or improper paint thinning
How orange peel differs from other paint defects (runs, dust nibs, sagging)
Now that you know what usually causes orange peel, it helps to see how it looks and behaves differently from other common defects so you can diagnose and fix it faster. You’ll spot orange peel as textured dimples, not sagging drips or sharp runs, and unlike dust nibs it’s widespread. Use this quick comparison:
| Defect | Characteristic |
|---|---|
| Orange peel | Pebbly texture |
| Runs | Vertical streaks |
| Dust nibs | Tiny bumps |
| Sagging | Thick droops |
Tools, Materials, and Safety Checklist
Before you start fixing orange peel, make sure you’ve got the required tools and materials—sandpaper, polishing compounds, microfiber cloths, and a quality spray can or touch-up gun.
Consider optional professional tools like a dual-action sander or paint booth if the job’s large or you want showroom results.
And don’t forget proper safety gear and ventilation—respirator, gloves, eye protection, and good airflow are essential.
Required tools and materials
Tools and materials make the job predictable and safe, so gather them before you spray or sand. You’ll need basic gear to prep, fix texture, and protect yourself.
Have quality supplies on hand and inspect them first.
- Respirator, gloves, and eye protection
- Sandpaper (400–2000 grit), sanding block, tack cloth
- Primer, matching spray paint, clear coat
Optional professional tools and when to use them
If you’re tackling stubborn orange peel or prepping large panels, consider stepping up to professional gear that speeds the job and improves results:
use an HVLP spray gun for smoother recoat, a dual-action air sander for consistent leveling, a paint thickness gauge to avoid sanding through, a polishing machine for faster compounding, and a dustless wet sanding system when working indoors or on large surfaces.
Safety gear and ventilation best practices
When you move from pro equipment to hands-on work, don’t skimp on personal protection and proper airflow — they keep you safe and improve finish quality.
You should wear PPE, control dust, and ventilate effectively. Follow this checklist:
- Respirator (organic vapor with particulate cartridges) and nitrile gloves
- Hood or goggles and disposable coveralls
- Exhaust fan, fresh-air intake, and portable air scrubber
Preparation Assessing the Surface Before Repair
Before you start sanding, check the paint thickness and adhesion so you know whether the finish can be smoothed or needs spot repair.
Clean the area thoroughly—degrease and remove wax or polish—to guarantee contaminants won’t cause more texture problems.
Finally, mask and protect surrounding panels and trim to keep overspray and sanding dust off nearby surfaces.
Inspecting paint thickness and adhesion
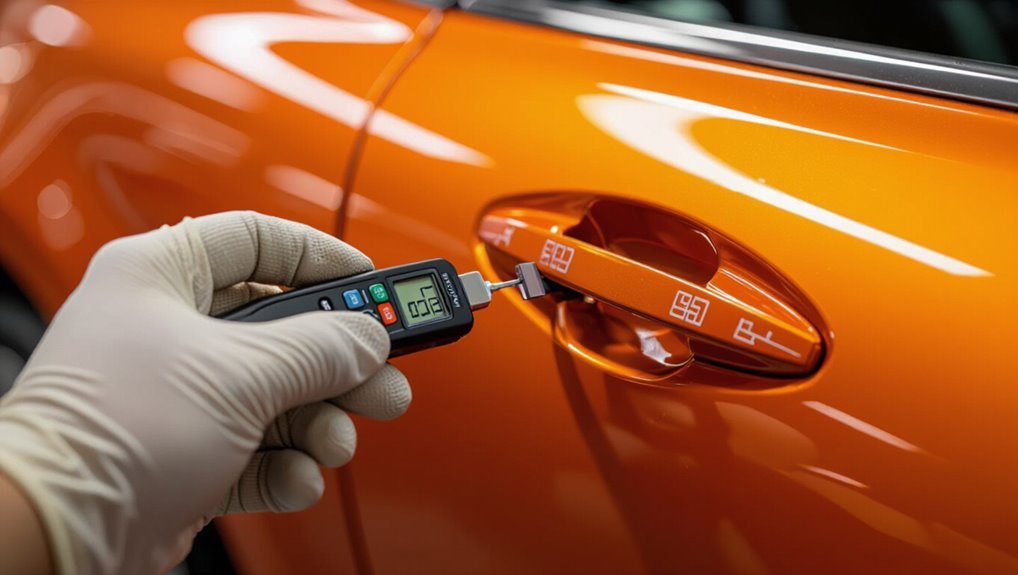
Although you’ve already identified orange peel visually, you’ll need to measure paint thickness and test adhesion to decide the right repair method.
Use a paint gauge to map thickness across affected and adjacent panels; note heavy buildup that may need sanding or feathering.
Perform a simple tape or pull test in an inconspicuous spot to confirm adhesion.
Record results to plan sanding depth and primer steps.
Surface cleaning and contaminant removal (degreasing, wax/polish)
After you’ve mapped thickness and checked adhesion, clean the surface so contaminants won’t compromise sanding, primer, or paint.
Use a degreaser, then a wax/polish remover, and dry with lint-free cloths. Focus on edges and crevices. Don’t skip any step.
- Use solvent-based degreaser
- Remove silicone/wax residues
- Dry and re-inspect before sanding
Masking and protecting surrounding areas
1 step you can’t skip: mask and protect the surrounding areas so your repair doesn’t create new problems.
Cover trim, glass, and panels with low-tack tape and quality paper or plastic. Seal edges tightly to prevent dust, overspray, or sanding grit.
Remove or shield emblems and delicate parts. Work methodically so protection stays secure throughout sanding, priming, and repainting.
Step-by-Step Fix: Wet Sanding and Polishing Method
Before you start, make sure the paint is fully cured and the temperature is within the recommended range so you don’t cause more damage.
You’ll work through a planned grit progression with proper wet sanding technique—pressure, strokes, and blend zones matter—rinsing and inspecting between grits.
Finish by compounding and polishing with the right products and pads to restore the gloss.
Step 1 When to start: curing time and temperature
You should only start wet sanding when the spray paint has fully cured to the touch and feels hard, not just dry.
Curing time depends on paint type, coat thickness, humidity, and temperature, so check the manufacturer’s recommended wait and do a gentle fingernail test in an inconspicuous spot—if it smears or dents, wait longer.
Aim for stable ambient temperature (ideally 60–75°F) and low humidity before sanding.
Step 2 Choosing grit progression and sandpaper technique
When tackling orange peel with wet sanding and polishing, pick a grit progression that removes texture efficiently without cutting through the paint—start with a fine-to-medium grit (typically 800–1000) to level peaks, move to 1500–2000 to refine the surface, and finish with 2500–3000 before polishing.
Use waterproof sandpaper, keep the pad flat, and sand with light, even pressure in overlapping passes to avoid creating dips or sanding marks.
- Use fresh sandpaper for each stage
- Rinse frequently to check progress
- Replace torn or clogged sheets immediately
Step 3 Wet sanding procedure (pressure, strokes, blend zones)
With your grit progression set and fresh waterproof sheets ready, it’s time to wet sand the panel carefully so you remove orange peel without cutting through the paint.
Use light, even pressure, keep the surface lubricated, and sand with overlapping straight strokes.
Blend edges into surrounding panels, reduce pressure as you approach edges, and switch to finer grits until texture smooths uniformly.
Step 4 Rinsing and inspection between grits
Although it’s tempting to rush, rinse and inspect the panel thoroughly between each grit so you can spot low spots, scratches, or remaining orange peel before moving on.
Use clean water and a soft microfiber, wipe gently, then dry and view under angled light.
Mark defects, rework those areas with the current grit, and only progress when the surface is uniformly smooth.
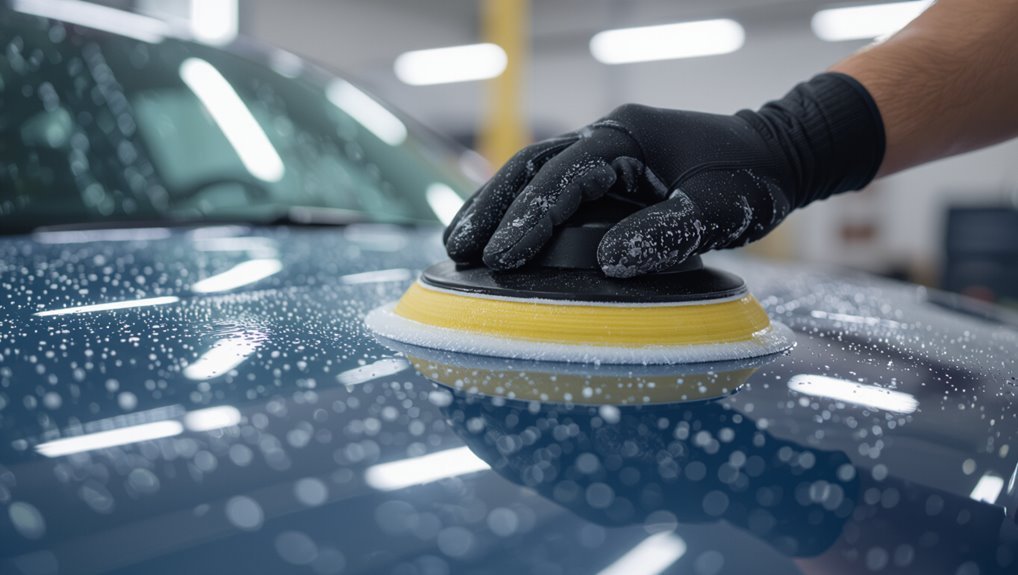
Step 5 Compounding and polishing to restore gloss (products and pads)
Begin compounding and polishing by choosing the right products and pads for your paint type and the level of correction needed; using a medium-cut compound with a dense foam pad tackles remaining orange peel and light sanding marks, while a fine polish and a soft finishing pad bring back deep gloss and clarity.
- Use medium-cut compound + dense pad for texture removal.
- Follow with fine polish + soft pad.
- Work slowly, low speed, overlapping passes until uniform shine.
Step 6 Applying glaze or sealing coat for final finish
Apply a glaze or sealing coat now to lock in the correction and protect the freshly polished surface.
Choose a high-quality glaze for fill and depth or a durable sealer for protection. Work in thin, even passes, following product flash times.
Allow full cure, then inspect for missed spots. Finish with light buffing if needed to blend and enhance uniform gloss.
Alternative Fixes for Different Severity Levels
If the orange peel is light you can usually fix it with a quick polish-only approach that saves time and material.
For moderate peel you’ll scuff the area, apply primer, and do a spot respray to blend the finish.
When the peel is severe or the substrate is textured, plan for a full respray to restore a smooth surface.
Light orange peel: fast polish-only approaches
When the orange peel is light and the texture’s shallow, you can often smooth it out with just polishing—no wet-sanding or repainting needed.
Start with a clean, dry surface, then use a fine-cut polish and a soft foam pad on a DA polisher at low speed.
Work in small sections, inspect frequently, and finish with a fine polish or glaze to restore gloss and clarity.
Moderate orange peel: scuff, primer, and spot-respray workflow
Start by scuffing the affected area with a fine abrasive to give primer something to bite into.
Then clean thoroughly so debris and oils won’t lift the new coats.
Feather edges, apply a thin, compatible primer coat, sand smooth when dry, then spot-spray matching topcoat in light passes.
Blend shifts, cure, and finish with a fine polish for uniform sheen and texture.
Severe orange peel or textured substrate: full respray steps
Tackle severe orange peel or a heavily textured substrate by planning a complete respray—this gives you the control needed to remove deep texture, correct color and sheen, and guarantee a durable, even finish.
Strip or sand to bare substrate, apply appropriate primer, and finish with controlled, thin coats of paint. Follow these steps:
- Assess and strip to sound surface
- Prime for adhesion and fill
- Spray thin, even coats and clearcoat
Spray Technique Adjustments to Prevent Orange Peel
To prevent orange peel, you’ll want to set your spray gun correctly—adjust air pressure, pick the right nozzle size and fan pattern, and match paint viscosity with proper thinning ratios.
Use a steady trigger speed and consistent overlapping passes (about 50%) so each coat lays down smoothly. Small tweaks to these variables will make a big difference in finish quality.
Optimal spray gun settings: air pressure, nozzle size, fan pattern
Although tweaking technique matters, the spray gun’s settings are what most directly control orange peel—get the air pressure, nozzle size, and fan pattern wrong and the finish will texture instead of level. You should match pressure to paint, choose a nozzle for viscosity, and set a tight, even fan for overlap.
| Air Pressure | Nozzle Size | Fan Pattern |
|---|---|---|
| PSI range | mm tip | Narrow/Wide |
| Adjust small | Higher for thick | Even spray |
Recommended trigger speed and overlapping passes
Aim for a consistent, steady trigger speed and you’ll cut down on orange peel before it forms: move the gun smoothly at a pace that deposits a wet, even coat without puddling.
Overlap each pass by about 50% for uniform coverage, maintain the same distance, and keep motion parallel to the surface.
Practice steady starts and stops to avoid heavy edges.
Choosing the right paint viscosity and thinning ratios
When your paint’s viscosity matches your spray gun and technique, you’ll get a smooth, level film instead of textured orange peel. Thinning lets you control that flow so droplets break into fine, even particles.
Test recommended reducer ratios on scrap, adjust by 5–10% for temperature and humidity, and aim for consistent atomization.
Keep records so you can repeat successful mixes.
Environmental and Material Best Practices
You’ll want to work within the right temperature and humidity ranges so paint flashes and levels correctly. You should know when to use fast or slow reducers and how multi-stage systems affect drying.
Prep the substrate carefully and pick primers that fill and smooth rather than amplify texture. These choices together will cut down on orange peel and make any corrective steps much easier.
Ideal temperature and humidity ranges for spraying
Because temperature and humidity directly affect how paint flows and dries, you should spray within specific environmental ranges to avoid orange peel.
Aim for stable conditions and adjust technique if needed.
- Temperature: 60–75°F (15–24°C)
- Relative humidity: 40–60%
- Avoid spraying below 50°F or above 85°F, or when humidity exceeds 70%
Handling fast/slow reducers and multi-stage systems
Although reducers might seem like minor additives, choosing the right fast or slow reducer and sequencing your stages correctly is critical to preventing orange peel and ensuring smooth flow-out.
You’ll match reducer speed to temperature and coat thickness: use faster reducers in warm conditions or thin coats, slower reducers for cooler temps or heavy builds.
For multi-stage systems, blend compatible reducers and allow proper flash times.
Substrate prep and primer choices to minimize texture
Preparation matters: you should clean, degrease, and smooth the substrate thoroughly before priming to give paint the best chance to level without trapping texture.
Sand high spots, fill imperfections, and remove contaminants. Choose a high-build, sandable primer compatible with your topcoat and environment.
Apply thin, even primer coats, sand between coats, and control temperature and humidity to reduce orange peel risk.
Common Mistakes That Worsen Orange Peel and How to Avoid Them
You can make orange peel worse with a few common mistakes, so watch your thinning ratio, gun distance and speed, and flash times between coats.
Don’t skip sanding between coats or rush the recommended flash time, and avoid over- or under-thinning the paint.
Fixing these errors early will save you time and give a smoother finish.
Over-thinning or under-thinning paint
If you thin paint too much, it runs and sags; if you don’t thin it enough, it sprays like sandpaper—both make orange peel worse.
Match thinner type and ratio to the paint, follow manufacturer specs, and test on scrap. Adjust viscosity for your gun and conditions; aim for a smooth, even atomization.
Re-mix before spraying to keep consistency.
Incorrect gun distance and movement speed
When you hold the spray gun too close or too far, or move it at the wrong speed, the finish won’t lay out smoothly and orange peel gets worse; practice keeping a consistent 6–10 inch distance, use steady overlapping passes, and adjust your pace for proper atomization.
If droplets dry before leveling, speed up; if runs form, slow down and maintain even motion.
Inadequate flash time between coats
Because each coat needs time to tack up, rushing the next pass can trap solvents and prevent proper leveling, which makes orange peel worse.
Wait the manufacturer’s recommended flash time, considering temperature and humidity.
Use light, even coats and test tack with a fingertip on an inconspicuous area. If paint still feels wet, extend drying intervals to guarantee smooth, uniform film formation before recoating.
Skipping sanding between coats
Rushing through coats and letting solvents get trapped is one common cause of orange peel, but skipping sanding between coats is another mistake that will amplify the problem.
You need to lightly scuff between layers to remove dust nibs, promote adhesion, and level texture. Use fine grit (400–600) and clean thoroughly before the next coat.
Don’t skip this step if you want a smooth finish.
When to Call a Professional
If the orange peel covers a large area, the texture is through the primer, or your fixes keep failing, it’s time to call a pro.
They’ll assess whether spot-sanding, respraying, or a full panel repaint is needed and explain labor, materials, and paint-matching costs.
Expect higher charges for color-matching, blended panels, and fast turnaround.
Signs that DIY repair isn’t sufficient
When orange peel keeps returning after you sand and respray, or the texture covers a large area, it’s a clear sign to call a pro—what started as a minor fix can hide deeper issues like improper curing, solvent trapping, or underlying surface contamination that DIY methods won’t fully resolve.
Also call a pro if paint blisters, adhesion fails, color mismatch is severe, or structural damage exists.
What to expect from a professional repair (process and cost factors)
If you decide to call a professional, expect a systematic inspection followed by several controlled steps: technicians will assess surface prep needs, strip or feather damaged areas, block-sand for evenness, apply primer or sealer to address contamination or solvent issues, and then respray in a controlled booth to match texture and color.
- turnaround time varies (hours–days)
- cost factors: size, color match, labor
- warranty and touch-up policy matter
Preventive Maintenance and Aftercare
Once your finish’s smooth, you’ll keep it that way by following a regular wash, wax, and sealant schedule tailored to the paint and exposure.
When you need to touch up chips or scratches, use thin coats, proper surface prep, and the same spray technique to avoid reintroducing orange peel.
Stick to gentle cleaning and timely sealant reapplies so small fixes stay invisible.
Washing, waxing, and sealant schedules to keep finish smooth
Though a flawless spray-job starts in the booth, keeping that smooth finish depends on a simple maintenance routine you can stick to: regular washing, timely waxing, and periodic sealant reapplication.
Wash biweekly with pH-neutral soap, dry thoroughly, and remove contaminants.
Wax every 2–3 months for protection and gloss.
Reapply a durable sealant or ceramic coating annually or per manufacturer guidance to preserve smoothness.
Touch-up practices that won’t reintroduce orange peel
Keeping up with washing, waxing, and sealants will preserve your smooth spray finish, but small chips and scratches still happen — and how you touch them up determines whether orange peel returns.
Clean and scuff repair areas, use matching primer and thin coats, keep spray distance steady, let layers flash between passes, and wet-sand light imperfections before clearcoat to blend without texture.
FAQ
Got questions about fixing orange peel? You’ll find quick answers on whether polish alone helps, when wet sanding is safe, if sanding through clear coat will affect color, whether cheap paints can be salvaged, and if heat or infrared curing can reduce texture.
Read on for practical, straight-to-the-point guidance.
Can I fix orange peel with only a polish?
Can you fix orange peel with only a polish? You can reduce mild orange peel using a quality polish and a proper pad, but polish only levels surface texture—it won’t remove deep peaks or thick clear coat imperfections.
For moderate to severe orange peel you’ll need sanding or recoat steps. Always test a small area, use correct technique, and finish with a fine polish for shine.
Will sanding through clear coat ruin the color?
If polishing alone won’t remove the orange peel, you may need to sand — but that raises the common worry: will sanding through the clear coat ruin the color?
You won’t automatically damage base color if you stop at clear. Sanding into or through the basecoat will alter appearance.
Sand carefully, use proper grits, and touch up or re-clear any exposed base to restore uniform gloss and color.
How long should I wait before wet sanding new spray paint?
You should wait until the spray paint has cured enough that it won’t gum up the sandpaper—typically 24 to 48 hours for most enamel or acrylic sprays at room temperature, but up to 7 days for fuller cure in cooler or humid conditions.
If the paint still feels tacky or soft, give it more time before wet sanding.
Start with 800–1000 grit, progress finer, and rinse often.
Is orange peel permanent on cheap spray paints?
With cheap spray paints, orange peel isn’t necessarily permanent—you can often reduce or remove it, but it takes more work and may not reach a perfect factory finish.
You’ll need careful wet sanding, progressive grits, and polishing compounds. Expect thinner coverage, less leveling, and potential color variation.
Sometimes repainting with higher-quality paint or applying a clear coat gives the best, long-lasting improvement.
Can heat guns or infrared cure systems help reduce orange peel?
Curious whether a heat gun or infrared lamp can smooth orange peel? Yes—applied carefully, heat can soften paint skin, allowing it to level slightly.
You’ll need even, controlled passes to avoid runs, bubbling, or burning. Infrared systems cure coatings more uniformly, reducing future peel.
Use low settings, keep distance, and test on a scrap panel before treating the actual finish.