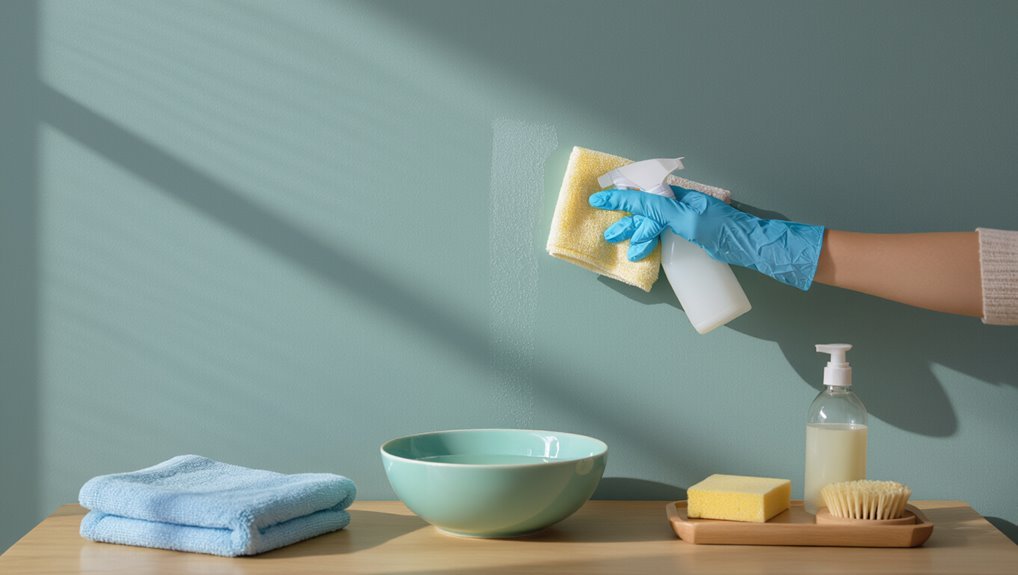
How Do You Clean Painted Walls: Best Safe Cleaning Methods
You can safely clean painted walls by gathering a soft sponge or microfiber cloth, mild dish soap, warm water, and a towel, then testing an inconspicuous spot first. Work top to bottom, dampen and wring the cloth, blot stains instead of scrubbing, rinse often, and dry quickly to avoid water spots. Match pressure and cleaner to the paint sheen—flat is gentle, gloss tolerates scrubbing—and spot-treat stubborn marks cautiously; keep going for tips on tougher stains and maintenance.
Quick Step-by-Step: Clean Painted Walls Safely
Start by gathering your supplies—soft sponge or microfiber cloth, mild dish soap, a bucket of warm water, and a clean towel—and test a hidden spot to verify the paint won’t lift.
Work top to bottom, dampen cloth, gently wipe stains, rinse sponge often, and dry promptly.
These wall cleaning techniques offer paint preservation tips to prevent abrasion and fading while keeping walls spotless.
How Paint Finish Changes Cleaning Approach
Because different paint finishes resist dirt and abrasion in different ways, you should adjust your cleaning method to match the sheen.
Match your cleaning method to the paint sheen—glosses can handle scrubbing, flats need gentler care.
Know that glossier finishes offer greater paint durability and tolerate scrubbing, while flat finishes need gentler care and more frequent spot cleaning.
Consider cleaning frequency and technique:
- Flat: gentle sponge, low frequency
- Eggshell: mild detergent, moderate frequency
- Semi-gloss/gloss: stronger cleaner, higher frequency
Choose the Right Tools for Painted Walls
1 good set of tools makes cleaning painted walls faster and safer for your finish.
Choose soft microfiber cloths, nonabrasive sponges, and a gentle-bristle brush to avoid scratching. Use extendable poles and buckets to reduce strain.
Match tools to wall materials and specific cleaning techniques—drier cloths for matte paint, damp for satin.
Inspect tools for grit before use to protect the surface.
Pick Mild Cleaners That Won’t Harm Paint
Before you start scrubbing, pick a mild cleaner and test it on a scrap piece of painted material or an inconspicuous corner to make sure it won’t strip color or finish.
Choose gentle, pH-balanced formulas that cut grime without breaking down paint binders.
And skip abrasive tools—use soft cloths or sponges to protect the surface.
Test Cleaner On Scrap
Want to be sure a cleaner won’t damage your paint? Test it first on scrap materials before tackling the wall.
Perform simple cleaning tests to check colorfastness and finish. Follow steps:
- Apply cleaner to a small scrap area and wait.
- Rub gently with a soft cloth.
- Inspect for fading, tackiness, or finish change; discard cleaners that alter the sample.
Use Gentle pH Formulas
After you’ve confirmed a cleaner won’t harm your paint on scrap, pick a mild, pH-balanced formula for the actual job.
You’ll choose cleaners labeled neutral or pH balance to avoid stripping finish or causing discoloration.
Apply gently with a soft cloth, rinse with clean water, and dry.
That cautious approach preserves color, finish, and wall longevity without risking damage.
Avoid Abrasive Tools
When you clean painted walls, skip scouring pads, wire brushes, and rough sponges—these abrasive tools can scratch paint, dull the finish, or strip off thin topcoats.
You’ll want mild cleaners and soft microfiber cloths to preserve color and sheen. Debunk cleaning myths: gentle methods work best for wall maintenance.
- Test in a hidden spot
- Use gentle cleaners
- Rinse and dry promptly
When to Use Stronger Cleaners: Safely
If stains won’t lift with mild soap and water, it’s okay to try a stronger cleaner.
Before you treat the whole wall, test the product in an inconspicuous spot to make sure it won’t damage the paint.
Only proceed with gentle scrubbing and rinsing if the test area looks unchanged.
When Stains Resist Gentle Cleaners
Although gentle cleaners solve most problems, some stubborn stains demand stronger solutions you can use safely.
You’ll proceed cautiously: choose milder commercial cleaning solutions first, wear gloves, and ventilate the room.
Follow these steps:
- Spot-treat with a stronger cleaner briefly.
- Rinse the area thoroughly.
- Repeat only if paint and finish show no damage.
Test Cleaner Inconspicuous Area
Before you apply a stronger cleaner to the whole wall, test it first in an inconspicuous spot—behind a piece of furniture, inside a closet, or near a baseboard—so you can spot any color fading, finish dulling, or paint lifting without risking visible damage.
Try different test cleaner brands on small areas, use proven spot test methods, wait, then compare results before proceeding.
Test a Cleaner Safely: A 3-Step Patch Test
Start with one small, discreet spot to avoid surprises: pick an inconspicuous area, mix your cleaner as directed, apply a tiny amount, and watch for fading, blistering, or peeling over 10–15 minutes.
- Choose a test spot based on wall materials and likely grime.
- Use recommended cleaning products and a soft cloth.
- Rinse, dry, then inspect after 24 hours before broader cleaning.
Clean Flat and Matte Paint Without Sheen Loss
When you clean flat or matte paint, use a gentle touch and the mildest cleaner that works so you don’t brighten the finish or leave shiny spots.
Dab stains with a soft cloth and mild detergent solution, rinse lightly, and dry.
Use minimal pressure, test invisible areas first, and rotate cleaning techniques to protect texture and guarantee paint preservation without abrading or altering sheen.
Clean Eggshell and Low-Sheen Finishes Safely
For eggshell and low-sheen finishes, you’ll want to use the gentlest methods first to avoid changing the paint’s look.
Start with a soft sponge and mild soap, working small areas in circular motions, and rinse with plain water.
For stubborn stains, treat spots carefully with a dampened magic eraser or a diluted vinegar solution, testing an inconspicuous area first.
Gentle Cleaning Techniques
Although eggshell and low-sheen paints hide imperfections better than flat finishes, they’re more delicate.
So you’ll want to clean them gently to avoid dulling the finish or leaving streaks. Use soft cloths, mild solutions, and eco-friendly options for responsible wall care.
- Dust with microfiber.
- Spot-clean with diluted soap.
- Rinse and pat dry.
Stain Spot Treatment
Anyone can remove spots from eggshell or low-sheen walls without damaging the finish by acting promptly and using the right cleaners and tools.
You’ll test cleaners on a hidden area, dab a soft cloth or sponge with mild detergent or diluted vinegar, then blot stains gently.
For stubborn marks, use a magic eraser lightly.
Follow spot-by-spot stain removal and cleaning techniques to avoid sheen loss.
Clean Satin and Mid-Sheen Paint Without Streaks
Satin and mid‑sheen finishes resist scuffs but reveal streaks easily, so you’ll want a gentle method that lifts dirt without leaving marks.
Use satin finish care and mid sheen techniques:
- Dust with a microfiber cloth.
- Wipe with a damp sponge and mild detergent, rinsing frequently.
- Dry immediately with a clean microfiber to prevent streaks and water spots.
Clean Semi-Gloss and High-Gloss Paint Effectively
1. You’ll treat semi-gloss and high-gloss differently: use gentle cleaners, soft cloths, and rinse thoroughly to avoid streaks. Apply semi gloss techniques for edges; polish high gloss maintenance with microfiber. Avoid abrasive scrubbing.
| Surface | Best Tool |
|---|---|
| Semi-gloss | Soft sponge |
| High-gloss | Microfiber cloth |
| Trim | Mild detergent |
Remove Scuffs and Shoe Marks From Painted Walls
Lift scuffs and shoe marks gently with the right tools so you don’t damage the paint finish.
Use gentle cleaners and test a hidden spot first.
Try:
- Soft cloth + mild soap for light marks.
- Melamine sponges or scuff removers for stubborn spots.
- Apply wall protectors or chair rails to prevent repeat damage.
Wipe dry and avoid abrasive scrubbing to preserve the finish.
Lift Crayon, Marker, and Ink Stains Safely
Before you start, test a small, hidden spot to make sure the paint won’t react.
Use gentle cleaners first—soap and water or a magic eraser on low pressure—so you don’t strip the finish.
For stubborn crayon, marker, or ink, try targeted options like rubbing alcohol or a paste of baking soda and water, working lightly until the stain lifts.
Test Spot First
Wondering whether that cleaning trick will harm your paint? You should always test spot first to check paint durability and how different wall textures react.
Try a small, hidden area and observe before treating stains.
- Pick an inconspicuous patch.
- Apply cleaner briefly.
- Rinse and dry, then wait for full results before proceeding.
Use Gentle Cleaners
If crayons, markers, or ink have found their way onto your painted walls, you can remove them without harsh chemicals by using gentle cleaners and careful technique. Try eco friendly options like mild dish soap, baking soda paste, or rubbing alcohol applied sparingly. Test first. Homemade solutions work well for fresh marks; blot, don’t scrub, and dry promptly.
| Cleaner | Use | Notes |
|---|---|---|
| Dish soap | Dilute | Gentle |
| Baking soda | Paste | Abrasive |
| Rubbing alcohol | Spot | Quick |
| Vinegar | Dilute | Mild |
| Baby wipes | Wipe | Convenient |
Stubborn Marks Strategies
When a simple wipe won’t budge crayon, marker, or ink, you can still lift the stain without damaging the paint by choosing the right method for the mark and testing it first.
Use targeted stubborn stain remedies and effective scrubbing techniques:
- Rub gently with a magic eraser, testing first.
- Dab rubbing alcohol for marker, blot don’t scrub.
- Try baking soda paste for crayon, rinse promptly.
Remove Grease, Food Splatters, and Fingerprints
Start by tackling grease, food splatters, and fingerprints with a gentle cleaning solution so you don’t damage the paint finish.
Use mild detergent and warm water for grease removal and food splatter spot-cleaning; blot, don’t rub.
Use a mild detergent and warm water to spot-clean grease and food splatters—blot gently, don’t rub.
Choose soft cleaning tools for fingerprint elimination on each wall surface.
Maintain regular cleaning frequency to aid stain prevention and protect the paint finish.
Remove Water Stains and Mildew From Painted Walls
First, identify whether the mark is a simple water stain or mildew so you use the right treatment.
Use gentle cleaners—mild detergent or a diluted bleach solution for mildew—and test a small spot first.
Finally, stop recurrence by fixing leaks, improving ventilation, and keeping surfaces dry.
Identify Stain Type
Water spots and mildew on painted walls look similar at a glance, but you can tell them apart by texture, color, and smell.
For stain identification and safe stain removal, inspect closely and compare.
- Water spots: soft, brownish, no odor.
- Mildew: fuzzy, gray/black, musty smell.
- Test a small area to confirm before treating.
Gentle Cleaning Solutions
1 simple, safe mixture can remove most water stains and mild mildew without harming your paint: combine warm water with a few drops of dish soap for general cleaning, and use a diluted solution of one part white vinegar to three parts water for light mildew. Use eco friendly solutions and homemade cleaners; test a spot first, blot gently, and air dry.
| Solution | Use |
|---|---|
| Dish soap mix | General stains |
| Vinegar mix | Light mildew |
| Soft cloth | Blot only |
| Test spot | Prevent damage |
Prevent Future Mildew
If you want to stop mildew from coming back, control moisture and improve airflow around painted walls: fix leaks, direct condensation away from surfaces, run exhaust fans when cooking or showering, and keep indoor humidity below about 50%.
Use these mildew prevention tips to protect finishes:
- Ventilate regularly.
- Dehumidify problem rooms.
- Inspect and seal exterior leaks promptly.
Remove Smoke and Nicotine Stains From Walls
Because smoke and nicotine leave sticky, yellow residues that cling to paint, you’ll need a slightly different approach than with regular dirt—one that cuts grease without harming the finish. Mix mild detergent or trisodium phosphate substitute with warm water, test first, wipe gently, then rinse. Address smoke damage and nicotine residue promptly to prevent staining.
| Step | Action |
|---|---|
| 1 | Test area |
| 2 | Mild cleaner |
| 3 | Rinse |
| 4 | Dry |
Spot-Cleaning: When to Rub, Blot, or Rinse
After you’ve tackled smoke or nicotine residue and rinsed the wall, you’ll often face small spots that need different handling.
Use quick stain assessment to decide action.
Apply spot cleaning techniques gently:
- Blot liquid spills inward with a microfiber cloth.
- Rub stubborn dry marks using a gentle, circular motion.
- Rinse and pat dry to avoid haloing.
Make Safe DIY Cleaners for Painted Walls
When you want a quick, effective cleaner without harsh chemicals, you can make simple DIY solutions from ingredients you likely already have; they’re gentle on most painted finishes when used correctly.
Mix mild dish soap with warm water, or combine vinegar and water for eco friendly options. Test a small area first.
Use soft cloths, gentle pressure, and try these homemade recipes sparingly.
Use Melamine (Magic) Sponges Without Damage
If you’re careful, a melamine (magic) sponge can lift scuffs and marks that other cleaners miss without harming most painted walls.
You should test an inconspicuous spot first. Follow melamine sponge precautions for fragile finishes and avoid vigorous scrubbing.
Numeric tips:
- Dampen lightly.
- Test paint compatibility.
- Use gentle pressure to preserve finish and confirm magic sponge effectiveness.
Avoid Damaging Painted Trim and Baseboards
While cleaning walls, pay extra attention to trim and baseboards so you don’t chip paint or leave streaks; use gentle cleaners, soft cloths, and minimal water to avoid swelling.
For trim protection, tape sensitive edges and work from top down.
For good baseboard care, clean regularly with a damp microfiber, dry immediately, and touch up chips promptly to prevent further damage.
Deep-Clean a Room: Step-by-Step Plan
Now that you’ve protected trim and baseboards, plan a room-wide deep clean so you work efficiently and avoid redoing spots.
Now that trim and baseboards are protected, plan a room-wide deep clean to work efficiently and avoid redoing spots.
Set a cleaning frequency, gather mild cleaner, soft cloths, ladder, and test a hidden area.
Follow steps:
- Dust ceilings, corners, and light fixtures.
- Wipe top-to-bottom, rinsing cloths often for wall protection.
- Inspect and dry, noting stubborn stains.
Touch Up Paint After Heavy Cleaning
Touch up paint right after your walls are fully dry so you can accurately match texture and color; this prevents watermarks and shows where small blemishes still need attention.
Inspect for stains or scuffs, then use paint color matching and gentle touch up techniques—dabbing thin layers, feathering edges, and letting each coat dry—to blend repairs invisibly and avoid overworking surrounding finish.
Preventive Care to Keep Painted Walls Fresh
After you’ve finished any touch-ups and the paint’s fully cured, keep your walls looking fresh with a few simple habits. You’ll extend finish life using these wall protection tips and routine care:
- Use mats, felt pads, and splash guards near high‑traffic or wet areas.
- Wipe marks gently with mild detergent; dry immediately.
- Schedule regular inspections to catch scuffs, moisture, or fading early.
When to Call a Pro or Repaint Instead
If you spot extensive structural damage, persistent stains or odors, or you’re short on time or budget, it’s worth weighing whether cleaning will cut it or if you should call a pro or repaint.
You can handle small scuffs and spot-cleaning yourself, but major issues often need professional assessment to avoid hidden problems.
If repairs or a full repaint are quicker and cheaper than endless cleaning, choose the fix that saves you time and money.
Extensive Structural Damage
When damage goes beyond surface flaws and starts affecting drywall, trim, or studs, you’ll need to weigh whether a simple repaint will do or if a professional repair is required.
Structural issues like large cracks, sagging, mold infiltration, or water-compromised framing call for expert assessment and repair before any cosmetic work.
- Prioritize wall integrity and thorough damage assessment.
- Hire pros for framing, mold, or load concerns.
- Repaint only after repairs and moisture checks.
Persistent Stains Or Odors
Structural repairs and mold remediation fix the big problems, but persistent stains or odors can still undermine your paint job and indoor air quality.
If repeated stain removal methods fail or smells persist after cleaning and ventilation, call a professional to assess hidden damage, microbial growth, or insulation issues.
Sometimes repainting with odor-sealing primer is the practical solution to restore scent and appearance.
Time Or Budget Constraints
3 things to weigh before you decide: your schedule, your budget, and the scope of the job.
If stains need pro tools or repainting, choose accordingly.
Consider:
- Time saving tips: hire pros for large or urgent jobs.
- Budget friendly options: DIY spot-cleaning or touch-up paint.
- Repaint if surface damage’s extensive.
You’ll save time or money by matching effort to need.
Routine Maintenance Checklist for Painted Walls
A simple monthly checklist will keep your painted walls looking fresh and prevent small issues from becoming big repairs.
You’ll inspect for scuffs, chips, and stains; dust baseboards and corners; spot-clean with mild soap; touch up paint where needed; check for moisture or mold; and verify trim and caulk.
This routine cleaning and wall maintenance saves time and repainting costs.
Frequently Asked Questions
Can I Use a Pressure Washer on Exterior Painted Walls?
You can, but you should be careful: pressure washer safety matters, and high pressure can damage paint finish effects. Use low pressure, wide nozzle, keep distance, test a small area, and avoid flaking or softened paint.
Will Cleaning Remove Lead-Based Paint Hazards?
No — cleaning alone won’t remove lead-based paint hazards; you’ll need lead testing first, then abatement or encapsulation by trained pros for paint safety. Don’t sand or pressure-wash, you’ll spread toxic dust and chips.
How Soon After Painting Can I Clean New Paint?
Wait a bit: you can gently clean new paint after 24–48 hours for light dusting, but full washing is best after paint curing — typically 2–4 weeks — to avoid damage and guarantee durability.
Can Scented Cleaners Affect Indoor Air Quality?
Yes — scented cleaners can worsen indoor air quality; they release volatile organic compounds and other indoor pollutants that you’ll inhale, so use unscented or low-VOC products, ventilate well, and limit aerosol sprays.
How to Clean Textured or Popcorn-Finish Painted Walls?
Sure — because you clearly love dust, you’ll gently vacuum textured surfaces with a soft brush, then spot-clean with a damp sponge and mild detergent; use appropriate cleaning tools, blot rather than scrub, and dry gently to avoid damage.
Conclusion
You’ll keep painted walls looking great by using gentle cleaners, the right tools, and spot-touching instead of aggressive scrubbing. For example, imagine you gently cleaned scuff marks on a high-traffic hallway with a microfiber cloth and diluted dish soap, then retouched a tiny matte patch with spare paint — the corridor looked fresh without damage. Follow the routine checklist and call a pro for major stains or old finishes, and you’ll avoid unnecessary repainting.