How to Paint a Faux Rock Wall for Realistic Texture
You can turn a flat wall into convincing stone by priming, sculpting texture, and layering paint. Prep the substrate, apply primer, then spread joint compound or texture medium in sections, shaping seams and boulders while it’s wet. Use washes, dry-brushing, and stippling for depth, add thin shadow glazes and sparse moss accents, then seal with a low‑sheen, UV‑resistant finish. Follow simple step‑by‑step techniques and tips ahead to get convincing results and avoid common pitfalls.
What You’ll Achieve and Who This Is For
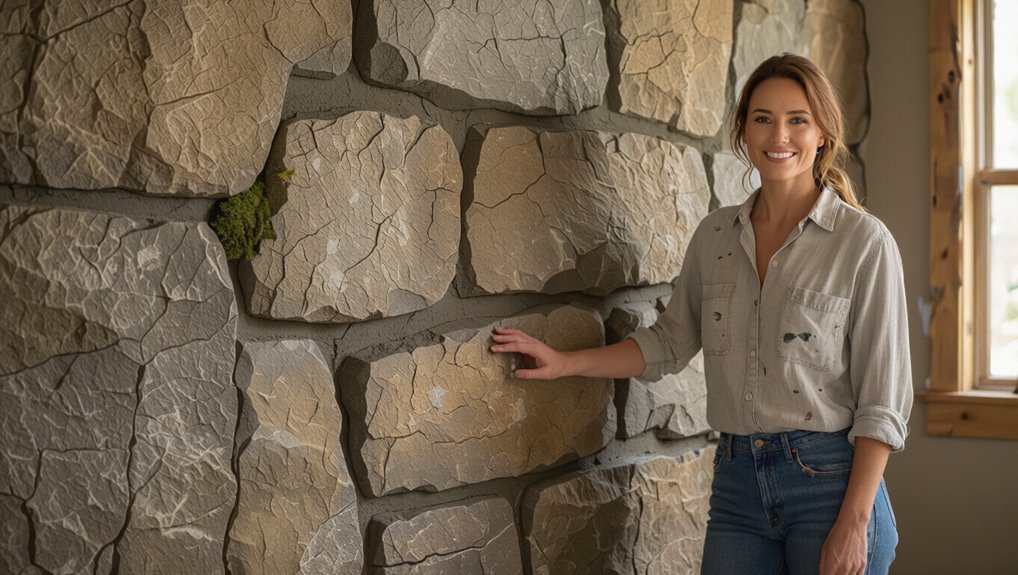
You’ll turn a flat wall into a convincing stone surface that adds texture, depth, and character to any room or exterior.
You’ll learn techniques that create believable shadows and highlights while setting realistic expectations about time and finish.
This guide suits DIY homeowners, decorators, and renters aiming for dramatic impact without structural change; know your target audience and match style and effort accordingly.
Materials & Tools Checklist for a Faux Rock Wall
Tools and materials you’ll need are straightforward: primer, base and accent paints, brushes (angled and round), rollers, a tray, painter’s tape, drop cloths, sponges or sea sponge, texture medium or joint compound, a hawk or trowel if applying compound, mixing sticks, a spray bottle for blending, sandpaper, and a respirator and gloves for safety.
You’ll choose color selection wisely and plan texture techniques for realism.
- Paint samples
- Sponges and rags
- Safety gear
Choosing & Prepping the Substrate
Start by choosing a substrate that’s sound, smooth enough for paint adhesion, and compatible with the faux texture you want to create.
You’ll need to clean the surface thoroughly—remove dust, grease, and loose material—so primers stick properly.
Finally, apply the right primer for your substrate type to seal and unify the surface before you paint.
Surface Selection Criteria
Although the final effect depends on texture and paint adhesion, choose a substrate that’s clean, stable, and suitable for the material you’ll emulate.
You’ll consider load, adhesion, and compatibility with texture finishes and color schemes. Pick a surface that you can sand or key for bonding, won’t flex, and matches the environment.
- Solid drywall or cement board
- Exterior-grade plywood
- Stucco or masonry with sound surface
Cleaning And Priming
Before you apply texture or paint, give the substrate a thorough cleaning and proper priming so finishes will stick and look consistent. You should do surface cleaning to remove dust, oils, and loose material, then assess primer selection based on porosity and exposure. Apply primer evenly and let dry fully before texturing.
| Step | Focus |
|---|---|
| 1 | Clean |
| 2 | Repair |
| 3 | Prime |
| 4 | Inspect |
Best Primers and Base Coats for Rock Texture
1 key decision you’ll make for realistic faux rock is choosing the right primer and base coat, because they determine adhesion, texture clarity, and how subsequent layers show up; pick primer types and a compatible base coat to suit substrate and finish.
You’ll want durability, breathability, and proper tinting:
- Masonry or acrylic primer
- Bonding primer for slick surfaces
- Tinted base coat
Building Realistic Texture: Overview and Workflow
When you’re ready to build texture, work from a clear workflow: plan zones, choose tools, and sequence steps.
You’ll map high and low areas, test texture techniques on scrap, and decide drying times.
Follow workflow strategies that prioritize adhesion, layering, and cleanup.
This keeps results consistent, realistic, and efficient while avoiding rushed mistakes that ruin the faux rock effect.
Using Joint Compound, Stucco & Textured Paints
Before you start, make sure the surface is clean, primed, and you’ve got the right joint compound, stucco mix, and textured paints on hand.
You’ll learn simple techniques for spreading and sculpting joint compound or stucco to create realistic rock relief.
Finally, we’ll cover priming, layering paints, and sealing the finish so your faux rock holds up and looks natural.
Preparing Surface And Materials
Although a good-looking faux rock wall starts with design, getting the surface and materials right is what makes the effect believable and long-lasting.
You’ll prep the wall, clean loose paint, and prime for adhesion. Focus on surface texture and material selection to match your rock style. Gather tools and mix media carefully.
- Clean, sand, prime
- Choose joint compound or stucco
- Select textured paint and tools
Applying Joint Compound Textures
Start by spreading joint compound or stucco in small, manageable sections so you can shape texture before it skins over; you’ll work with a taping knife, hawk, and variety of trowels to build the basic rock forms and mortar lines.
Use varied texture techniques—stomping, stippling, and dragging—blend edges, carve seams while damp, and control compound application thickness for realistic depth without overbuilding.
Painting And Sealing Finishes
When your textured surface has cured, you’ll begin painting and sealing to bring out the rock detail and protect it from wear; choose breathable masonry or acrylic paints and a compatible sealer so the joint compound, stucco, or textured paint can expand and dry without trapping moisture.
Use layered painting techniques and pick sealing options that allow vapor transmission.
- Base coat depth control
- Dry-brushing highlights
- Breathable clear sealer
Shaping Boulders, Seams, and Crevices
Carve and press your base layer into rounded forms and sharp offsets so the wall reads like natural stone: work the mortar or foam while it’s still pliable, build up bulges for boulders, and press seams and crevices with a trowel, spatula, or sculpting tool to create believable shadow lines and separation.
Shape boulder shapes with varied texture techniques, guarantee seamless shifts, emphasize natural variations, light effects, color choices, pattern repetitions, and shadow play.
Blocking In Base Colors
Lay down broad washes of your main hues to establish the stone families before you get lost in detail: use large brushes or a sponge to apply mid-tone grays, browns, or warm tans across each boulder and ledge, keeping strokes loose so you can read mass and form at a glance.
Then block tones, refine edges, and plan highlights using color blending and texture techniques.
- Map major value areas
- Keep brushwork economical
- Reserve distinct tones for focal stones
Glazes & Washes for Depth and Color Variation
Next you’ll pick the right glazes—water-based for subtle shifts or oil-modified for richer tones—and test them on scrap.
Mix washes thin enough to see the base color but opaque enough to alter it, adjusting pigment and medium for control.
Then build thin layers, letting each dry so you can add contrast, warm or cool accents, and natural-looking depth.
Choosing Glaze Types
When you want to give a faux rock wall believable depth and subtle color shifts, choosing the right glazes and washes matters as much as your base tones.
You’ll pick glaze finishes that suit matte or satin looks and match application techniques to texture.
Consider pigments, translucency and drying time.
- Low-sheen glazes
- Transparent color washes
- Textured medium blends
Mixing Wash Consistency
After you’ve picked glazes and washes that suit your finish and pigments, you’ll need to get their consistency right so colors sit in crevices and blend across slopes without pooling or disappearing. You’ll test ratios, thin for translucence, or thicken for texture. Practice wash techniques to control flow and achieve subtle color variations.
| Thin | Medium | Thick |
|---|---|---|
| 50:50 | 70:30 | 90:10 |
| flow | balance | body |
Layering For Depth
Because depth comes from contrast and repetition, build your layers deliberately: lay down a translucent glaze to settle into crevices, follow with a slightly thicker wash to tint slopes, and repeat with varied hues and viscosities until shadows and highlights read naturally.
You’ll refine texture using texturing techniques that enhance depth perception and prevent flatness.
- Glaze thinly for subtle shifts
- Wash thicker for midtones
- Vary color temperature
Dry-Brushing and Stippling for Highlights
Grab a dry brush and lighter paint tones to start lifting the texture—dry-brushing and stippling let you add quick, controlled highlights that mimic sun-worn edges and surface irregularities. You’ll use dry brushing techniques for ridges and stippling methods for pitted areas. Practice gentle, layered passes and vary pressure.
| Tool | Use |
|---|---|
| Dry brush | Ridges |
| Stipple brush | Pits |
Painting Shadows and Seam Definition
When you deepen shadows and define seams, work with thin washes of darker paint and a fine brush to push depth without obscuring texture; you’ll control shadow placement and use seam blending to keep joins natural.
Apply sparingly, feather edges, and wipe excess to avoid harsh lines.
- Thin washes for subtle depth
- Feathered edges for realism
- Focused seam blending for cohesion
Adding Moss, Lichen, and Weathering Effects
Now you’ll add moss and lichen to give the wall a lived-in look.
Apply moss sparingly in crevices and damp spots so it reads natural instead of overgrown.
For lichen, use thin, translucent washes and stippling to build subtle patinas that suggest age and weathering.
Applying Moss Sparingly
Although a little moss goes a long way, adding small touches of lichen and weathering will make your faux rock look convincingly aged without overpowering the surface.
Use moss application techniques that emphasize sparsity and context; try natural moss alternatives if live material isn’t viable. Apply in crevices, around bases, and near moisture sources.
- Crevice accents
- Base smudges
- Moisture zones
Creating Lichen Patinas
5 subtle touches of lichen and faded algae can transform flat paint into a believable patina, and you’ll want to apply them with restraint and intent.
Choose a muted lichen color range—sage, pale yellow, gray-green—and thin washes for delicate edges.
Use stippling, sponging, and dry-brushing techniques for controlled lichen application, blending into crevices and varying density for authentic weathering.
Sealing an Indoor Faux Rock Wall
Before you call the job finished, seal the faux rock to protect your paint and texture from dust, fingerprints, and humidity.
Choose clear, low‑sheen sealers suitable for interior finishes; test small areas. Apply thin, even coats, letting each dry. Use sealing techniques that won’t darken pigments.
Maintain ventilation and avoid heavy odors while curing.
- Matte acrylic sealer
- Microfiber buffing
- Test patch protocol
Outdoor Weatherproofing & UV Protection
Now that you’ve sealed the indoor wall, you’ll need different steps for outdoor weatherproofing and UV protection.
Start by choosing a waterproof sealant rated for exterior use and picking UV-resistant paints that won’t fade.
Check the wall each season for chips or sun damage and reapply touch-ups and sealant as needed.
Sealant Selection Basics
When you’re protecting an outdoor faux rock wall, choosing the right sealant matters because it’s what defends your work from moisture, freeze-thaw cycles, and UV damage.
Pick a product rated for exterior use that specifically lists UV inhibitors and water resistance, and match it to the substrate and paint system you used.
You’ll compare sealant types and follow proper application techniques.
- Check compatibility with substrate
- Note cure time and recoat window
- Use correct tools and coverage rates
UV-Resistant Paints
Because sunlight breaks down pigments and binders over time, choosing UV-resistant paints is essential for outdoor faux rock walls if you want lasting color and protection.
You should pick formulations labeled UV-stable or exterior-grade acrylics to maximize color stability and paint durability.
Apply thin, even coats and follow manufacturer UV-exposure guidelines so your textured finish resists fading and surface breakdown.
Seasonal Maintenance Tips
Although weather and sun are relentless, you can keep your outdoor faux rock wall looking great by scheduling a few simple seasonal checks and treatments.
You’ll perform seasonal cleaning, apply protective coatings, and do targeted color touch ups to prevent fading. Stick to this weatherproof maintenance routine so small issues don’t become big repairs.
- Inspect for chips and cracks
- Wash and rinse gently
- Recoat UV-exposed areas
Touch-Ups and Repairs: Tools & Quick Techniques
Keep a small kit on hand so you can fix chips, scuffs, and faded spots before they become obvious.
For texture touch ups, pack small brushes, sponges, matching paints, thin fillers, and a mini stipple roller.
Use targeted repair techniques: blend edges, layer thin glazes, and mimic grain with dabbing motions.
Dry and inspect, then seal small repairs to protect your work.
Top Mistakes That Make Faux Rock Look Fake : and Fixes
When faux rock looks fake, it’s usually due to a few common slips you can fix without starting over.
You’ll spot issues from flat texture to harsh highlights; use correct texture techniques and avoid common pitfalls by adjusting depth, color layering, and edges.
Apply these fixes:
- Soften edges and blend highlights
- Add varied texture layers
- Use subtle color glazing to unify tones
Time, Cost, and Project Planning by Scale
Fixing texture and color issues is only part of the job—now plan how much time and money you’ll need for the whole faux rock project based on scale. You’ll use time management to schedule drying, layers, and touch-ups, and weigh budget considerations for supplies versus hire. Estimate labor, materials, and contingencies by project size:
| Scope | Estimate |
|---|---|
| Small | 1–2 days |
| Medium | 3–5 days |
| Large | 1–2 weeks |
| Contingency | +10–20% cost |
Style Variations: Rustic, Tropical, and Stage-Ready Looks
Although the same base techniques apply, you can tailor texture, color, and finishing touches to create rustic, tropical, or stage-ready faux rock looks that suit your space and purpose.
Although the same base techniques apply, tweak texture, color, and finishes for rustic, tropical, or stage-ready faux rock.
You’ll emphasize weathered layers for rustic charm, bright washes and moss for tropical vibes, or bold contrast and durable sealers for stage design.
- Weathered patinas and muted tones
- Lush greens and sunlit highlights
- High-contrast, hard-wearing finishes
Frequently Asked Questions
Can I Apply Faux Rock Over Wallpaper Without Removing It?
You can, but you shouldn’t unless the wallpaper’s secure and primed; faux rock application demands firm adhesion and wallpaper compatibility checks. You’ll need to repair seams, sand glossy surfaces, prime thoroughly, and use flexible adhesive to avoid failures.
Will Faux Rock Adhere to Metal or Plastic Surfaces?
Yes — it can, with effort: you’ll need to prep, scuff, and prime metal or plastic for faux rock adhesion; you’ll need to clean, degrease, and sand for surface preparation; you’ll need patience, persistence, and proper products.
How Do I Safely Heat Mold Joint Compound for Shaping?
You should avoid direct heating; use gentle mold warming techniques like warm water baths or a low-temp heat gun at arm’s length, monitor temperatures, ventilate well, and follow joint compound safety guidelines to prevent cracking, fumes, or burns.
Can Pets Damage the Faux Rock Finish, and How to Prevent It?
By golly, yes — pets can scratch or chew the finish, so you’ll use pet proofing techniques: trim nails, deter chewing, and apply durable protective coatings like polyurethane or marine varnish to keep your faux rock intact and easy to clean.
Is Faux Rock Reversible if I Want to Restore the Original Wall?
Yes — you can restore the wall, but faux rock maintenance matters: you’ll remove coatings, patch substrate, and use restoration techniques like grinding, chemical strippers, or skim coats; you’ll expect some repair and repainting afterward.
Conclusion
You’ve learned the steps, tools, and tricks to turn a flat wall into believable stone, and now it’s time to get your hands dirty. With patience and the right layers, your faux rock will hold up and fool even picky eyes. Treat each panel like a small landscape—build depth, weather selectively, and step back often. When you’re done, your wall will read like a weathered cliff, not a painted backdrop.