How to Paint Arches on Walls for Stylish Interior Design
You can create an architectural focal point without construction by painting a precise arch: measure and mark the center and dimensions, tape and protect surrounding surfaces, then use a high-quality angled brush and small roller to apply thin, even coats, feathering edges for a smooth curve. Pick a shape and color that match room scale and mood, allow proper drying, and touch up edges slowly after removing tape. Keep going to learn placement, finishes, and pro tips.
Why Painted Wall Arches Work (And When Not to Use One)
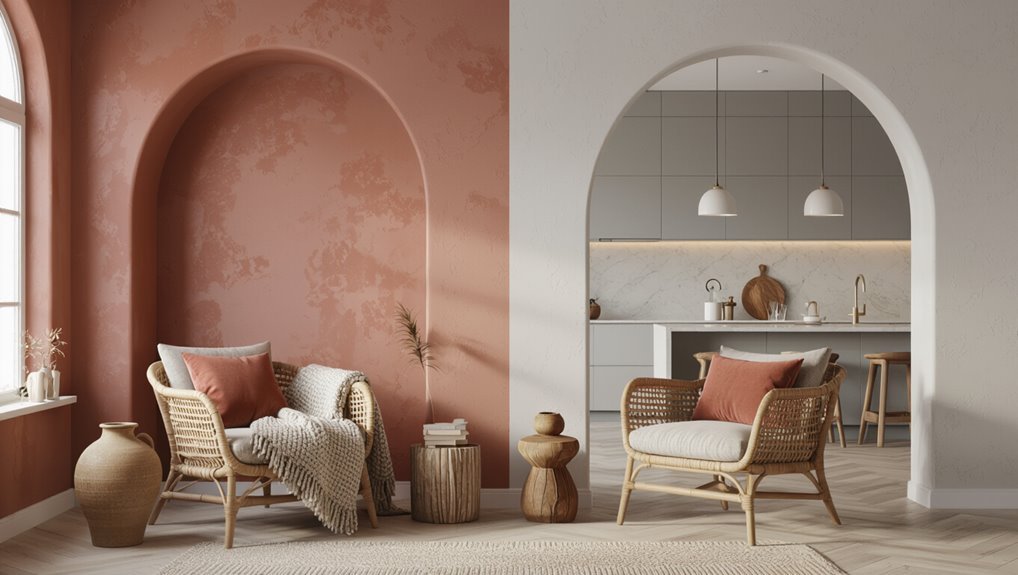
When you paint an arch on a wall, you create the illusion of architectural depth without the cost or disruption of building one, and that makes it a smart choice for renters, DIYers, and anyone wanting a quick style update.
You’ll apply arch design principles to suit scale and sightlines, balancing proportions and aesthetic considerations.
Avoid tiny rooms, busy patterns, or clashing trims.
Quick Step-by-Step: Paint an Arch in 6 Stages
You’ll start by measuring and marking the arch so your curve is precise and centered.
Next, tape off edges and protect surrounding surfaces to keep lines clean and avoid splatters.
Finally, paint the arch carefully and finish with touch-ups and sealant for a professional look.
Measure And Mark
1 simple set of accurate measurements makes painting an arch much easier and prevents costly mistakes later on.
You’ll measure height, width, and center, transfer the curve, and mark reference points so your arch design aligns with room proportions and improves wall aesthetics.
Follow this precise guide to feel confident and excited before you paint.
- Measure carefully
- Find center
- Mark curve
- Check symmetry
Tape And Protect
Now it’s time to tape and protect the area so paint stays exactly where you want it. Choose tape types—painter’s tape for curves, delicate-surface tape for freshly finished walls—and apply in short, overlapping strips following your marked arc.
Cover floors, trim, and adjacent walls with drop cloths or plastic for wall protection. Press edges firmly to prevent bleed-through before painting.
Paint And Finish
Start by loading a high-quality angled brush and a small roller with the chosen paint so you can work clean, fast, and precisely along the taped arc.
Apply thin coats, feather edges, and let each dry; choose paint types for durability.
Pick finish options that suit light and mood, then remove tape slowly.
- Joy
- Pride
- Calm
- Confidence
Choose an Arch Shape That Suits Scale and Style
Think about the room’s size when picking an arch so it doesn’t overpower or get lost in the space.
Match the arch style to your home’s architecture—traditional arches suit classic homes, while clean, geometric shapes fit modern interiors.
Balance the arch visually with furniture and openings so it feels intentional, not accidental.
Match Scale To Room
Scale makes or breaks an arch’s impact, so choose a shape that fits the room’s proportions and your style.
You’ll use scale considerations and room proportions to guide height, width, and curve. Pick an arch that feels balanced so it comforts or excites.
- Embrace gentle curves.
- Opt for bold height.
- Keep slim arches for intimacy.
- Match furniture scale.
Complement Architectural Style
Now that you’ve matched your arch to the room’s proportions, consider how its shape speaks to the home’s architecture and period. Choose curves that echo architectural themes and pick wall finishes that reinforce era-appropriate detail. Match ornate arches to traditional homes, simple semicircles to modern spaces, and gentle ogees to evolving designs.
| Style | Arch | Finish |
|---|---|---|
| Traditional | Ogee | Textured |
| Modern | Semicircle | Smooth |
| Evolving | Round | Matte |
Consider Visual Balance
Balance matters: pick an arch shape that feels right for the room’s size and furnishings so it doesn’t dominate or disappear.
You’ll aim for visual harmony and keep design symmetry in mind, matching curve height to ceiling and furniture scale.
Choose confidently to enhance mood and flow.
- Calm
- Bold
- Cozy
- Elegant
Pick the Best Spot for a Painted Arch
Where will the arch make the biggest impact? You’ll choose best wall locations that highlight sightlines, focal points, or empty expanses.
Think about ideal furniture arrangements so the arch frames seating, a bed, or a console without crowding.
Place arches where they enhance flow, balance scale, and draw the eye—hallways, above mantels, or behind sofas—avoiding cluttered or cramped walls.
Select Paint Colors to Complement Your Décor
Think about the colors already in the room and pick an arch shade that coordinates with that palette.
You can choose an accent color to make the arch pop or a neutral tone to blend it into the background.
Either way, test samples on the wall to see how they work with your lighting and furnishings.
Coordinate With Existing Palette
When coordinating arch colors with your room, start by sampling shades from your existing palette so the arch feels like an intentional extension of the space.
You’ll enhance color harmony and guarantee design cohesion while tapping mood. Choose tones that echo textiles, reflect light, and balance contrast to make the arch feel deliberate and emotionally resonant.
- Warm comfort
- Calm serenity
- Bold drama
- Subtle unity
Use Accent Or Neutral Shades
After sampling tones from your room, decide whether an accent or a neutral will best enhance the arch’s role: an accent color will draw the eye and create a focal point, while a neutral will blend the curve into the room for subtle sophistication.
Use color psychology to match mood, follow current design trends sparingly, and test swatches in different light before committing.
Choose Finishes and Paint Types for Durability
Durability starts with the right finish and paint formulation, so pick products that stand up to traffic, moisture, and cleaning.
You’ll choose durable finishes and smart paint selection to keep arches looking fresh, resist scuffs, and simplify upkeep.
Consider these emotional cues as you decide:
- Confidence in lasting beauty
- Pride in a clean, cared-for space
- Relief from frequent touch-ups
- Joy in low-maintenance style
Measure and Mark Precise Arch Dimensions
Start by measuring the wall height so your arch proportions fit the space.
Mark a precise centerline to anchor the design and keep both sides symmetrical.
Transfer the arch radius from your template or compass to the wall carefully before cutting or painting.
Measure Wall Height
Measure the wall height at several points along the span so you can mark the exact center and the top of the arch.
You’ll use a tape measure, level, and pencil to record the high, low, and midpoint measurements before transferring the arch pattern.
Use reliable wall height measurement techniques to guarantee symmetry and confidence.
Mark Centerline Accurately
Begin by locating and marking the exact center of the wall—this centerline will guide every arch measurement and keep both sides symmetric.
Use measuring tools like a tape, level, and laser to verify vertical and horizontal alignment.
Mark reference points at consistent heights, note midpoint distances for accurate arch placement, and double-check measurements before proceeding to guarantee symmetry and clean layout.
Transfer Arch Radius
With the centerline set, you’ll transfer the arch radius by tying a pencil to a string or using a compass so the pivot sits squarely on the marked center and the pencil reaches the exact radius; swing a steady arc on the wall to mark the curve, checking the string’s tension and pivot placement as you go.
Use arch design trends and arch painting techniques to inspire precision.
- Anticipate delight.
- Feel confidence.
- Embrace symmetry.
- Celebrate finish.
Make and Transfer a Paper or Cardboard Template
Before you cut, trace the arch onto stiff paper or cardboard to create a durable template you can reposition and reuse.
Choose template materials like poster board or corrugated cardboard for stability. Cut precisely with a sharp blade, label top and center, and test fit.
Use simple transfer techniques — align reference marks and temporarily tape the template before tracing or marking wall points for painting.
Transfer Template and Trace Arch Lines on Wall
Now that your template is cut, positioned, and labeled, you’re ready to transfer its outline onto the wall.
Use your chosen template materials, secure edges with low-tack tape, and check level.
With gentle tracing techniques, mark faint guide lines with a pencil.
Embrace the slow, confident motion—this is where your arch comes alive.
Embrace slow, confident motion—this is the moment your arch truly comes alive.
- Anticipation
- Pride
- Calm
- Joy
Gather the Right Tools: Brushes, Rollers, Cutters
1 good brush, a couple of rollers, and a sharp cutter will make cutting and painting arches far easier than winging it with random tools.
Choose brush types for edges, match roller sizes to curve radii, and practice cutting techniques for clean lines.
Consider paint finishes and color selection early, and guarantee thorough surface preparation so your tools perform reliably and results stay crisp.
Stencil or Freehand: When to Choose Which?
Decide whether you want the crisp, repeatable precision of a stencil or the organic, custom look of freehand arches.
Stencils save time and materials when you need identical shapes, while freehand lets you tailor curves and scale if you’ve got the skill.
Consider how much time, practice, and supplies you’re willing to invest before you start.
Stencil: Crisp, Repeatable Results
Stencils give you crisp, repeatable arches with less skill and time than freehand work, so they’re ideal when you need consistent shapes across a room or want clean edges without masking every curve.
You’ll love using stencil techniques for tidy arch designs that boost confidence and speed.
- Satisfaction
- Calm
- Pride
- Delight
Freehand: Organic, Custom Shapes
If you want arches that feel more personal and fluid, freehand lets you create organic, one-of-a-kind shapes that stencils can’t match.
You’ll sketch directly on the wall, adjusting curves until they read right in the room.
Freehand suits organic shapes and custom designs, letting you respond to furniture, sightlines, and imperfections for a relaxed, handcrafted look that feels uniquely yours.
Time, Skill And Materials
Choose your method based on how much time, steady hands, and specialized gear you’re willing to commit: stencils save hours and reduce mistakes but require precise placement and materials like spray adhesive or low-tack tape, while freehand demands more skill, patience, and good brushes or angled rollers to get clean curves.
Balance time management, skill assessment, material selection, project planning, budget considerations, design inspiration, color theory, tool usage, surface preparation, wall types.
- Fearless joy
- Calm confidence
- Creative pride
- Relaxed accomplishment
Masking for Crisp Arch Edges
Before you paint, mask the arch carefully to get a clean, professional-looking edge.
You’ll use precise masking techniques: painter’s tape cut to follow the curve, flexible edging for tight corners, and low-tack tape to protect surrounding walls.
Press tape firmly, seal seams with a thin bead of caulk or paint-on sealant, and remove tape while paint’s tacky for the crispiest edges.
Base Coat and Build Up Color (Step-by-Step)
Start by priming the wall evenly so the arch paint goes on smooth and true.
Apply your base coat in thin, consistent layers and let each one dry fully before the next.
Build up color gradually, checking coverage as you go to avoid drips and patchy spots.
Prime Wall Evenly
Roll a thin, even base coat across the arch area to seal the surface and give subsequent colors a consistent foundation.
You’ll address wall texture, guarantee adhesion, and set color selection expectations before adding tones.
Apply smoothly, feather edges, and let dry fully.
- Anticipation
- Confidence
- Calm
- Satisfaction
Layer Color Gradually
Now that the base coat’s sealed and dry, you’ll build color in thin, controlled layers to achieve depth and smooth blends. Use glazing and feathering layer techniques, work wet-on-wet for soft shifts, and step back to check color harmony. Finish with a light scumble for texture.
| Step | Tool | Tip |
|---|---|---|
| 1 | Brush | Thin glaze |
| 2 | Sponge | Soft blend |
| 3 | Rag | Light scumble |
Cut In the Arch With a Steady Hand or Tool
Grip your angled brush or edger firmly and work in short, controlled strokes to cut a clean line along the arch; steady pressure and a consistent brush angle keep paint from bleeding onto the ceiling or adjoining wall.
You’ll use a steady hand and reliable cutting tools to trace precise curves without hesitation.
- Pride
- Calm
- Confidence
- Satisfaction
Feather and Blend for a Soft-Edge Arch
After cutting a clean line along the arch, soften that edge by feathering the paint outward with a lightly loaded brush or a dry, soft-bristled blending brush so the color eases into the surrounding wall.
You’ll use feather techniques and subtle blending methods, tapping and brushing outward in short strokes.
Work quickly while paint is wet, step back often, and correct hard spots with light, precise strokes.
Layer Colors and Create Multi-Color Arch Designs
Start by planning a color sequence and working from the lightest to the darkest shade so each layer sits cleanly on the one beneath it; this makes blending easier and prevents dark pigments from muddying lighter ones.
Plan colors from lightest to darkest so each layer sits cleanly beneath the next for easy blending.
Use careful color blending and consider arch patterns to guide contrast and mood.
- Warm sunrise
- Calm teal
- Deep terracotta
- Soft cream
Paint a Series of Repeating Arches Evenly
Once you’ve layered your colors, plan the spacing and repeat pattern for a series of arches so each curve reads consistently across the wall.
Measure, mark guidelines, and use a template or laser level to replicate proportions.
Align with current arch design trends, vary scale for rhythm, and consider wall texture techniques so paint application stays uniform and the pattern feels intentional.
Fix Paint Bleed and Uneven Curves
If your arches show paint bleed or scalloped edges, don’t panic—grab the right tools and you can get crisp curves fast.
You’ll refine paint techniques and honor your arch styles by cleaning edges, sanding slight ridges, and using a flexible brush or razor for precision.
Feel proud as curves snap clean.
- Relief
- Control
- Confidence
- Pride
Touch-Ups: When to Re-Tape and How to Repair
When you notice small chips, ridges, or tape edges lifting, re-tape the area before repainting to keep your curves sharp and avoid fresh bleed. Use gentle sanding, feather edges, and matching paint. These touch up techniques and repair tips restore smooth arcs quickly.
| Step | Tool | Time |
|---|---|---|
| Sand | Sandpaper | 5m |
| Tape | Masking | 3m |
| Paint | Brush | 10m |
Seal and Maintain Your Painted Arch
Protect your freshly painted arch by sealing seams and setting up a simple maintenance routine that keeps the curve crisp and the finish durable.
Seal seams and keep a simple maintenance routine to preserve your freshly painted arch’s crisp curve and durable finish.
Use proper arch sealing techniques and follow paint maintenance tips so you’ll prevent chips and stains.
- Inspect monthly for cracks.
- Re-seal joints with flexible caulk.
- Gently clean with mild soap.
- Touch up chips promptly.
Style and Place Your Painted Arch in the Room
After you’ve sealed and set an upkeep routine, think about how the arch will work with the room’s style and traffic flow.
Choose arch placement that complements sightlines, furniture arrangements, and focal points. Match colors and trim to maintain room harmony, or use contrast for drama.
Position the arch where it enhances movement, framing views without blocking pathways or overpowering existing design elements.
Cost, Time Estimates, and When to Call a Pro
If you’re budgeting for a painted arch, expect most DIY projects to cost between $30 and $200 for paint, primer, tape, and basic supplies.
Higher-end finishes or specialty paints can push that toward $300–$600.
You’ll finish simple arches in a day; complex prep takes longer.
Consider budget considerations and seek professional advice when unsure.
- Relief
- Pride
- Frustration
- Joy
Frequently Asked Questions
Can Painted Arches Damage Wallpaper or Require Its Removal First?
Yes—you might avoid removal, but you’ll need thorough wall preparation to guarantee paint adhesion; damaged or loose wallpaper should be removed, seams sealed, and a suitable primer used so paint won’t peel or cause further harm.
How Do Painted Arches Affect Home Resale Value?
Right off the bat, they can help or hurt resale value depending on resale trends and buyer preferences; you’ll want neutral, tasteful arches to appeal broadly—don’t count your chickens, but tasteful updates often attract more interested buyers.
Can I Paint an Arch Over Textured or Popcorn Ceilings?
Yes — you can paint an arch over textured or popcorn ceilings; you’ll use arch ceiling techniques like careful cutting-in and flexible brushes, plus ceiling preparation tips such as cleaning, priming, and patching for smoother paint adhesion.
Are There Eco-Friendly or Low-Voc Products for Arch Painting?
Looking for safer choices? You can use eco friendly options like plant-based primers and low VOC paints; they reduce odors and toxins, won’t sacrifice finish, and you’ll still achieve crisp, durable arch lines with proper prep and tools.
How Do Painted Arches Work With Built-In Shelving or Trim?
Painted arches complement built-in shelving and trim when you coordinate colors and finishes; you’ll use arch design to frame storage, match shelf coordination with trim tones, and create cohesive visual flow that highlights architecture and display.
Conclusion
You’ve learned how painted arches can transform a plain wall into a focal point, yet they’re simple enough to tackle yourself — or precise enough to hire a pro. Contrast the bold sweep of color with the quiet texture of your existing décor, and balance daring shapes against practical room function. Take your time with prep, trust your eye when choosing scale, and enjoy the small risk that yields a big, elegant payoff.