How to Remove a Painted Popcorn Ceiling: Complete Diy Guide
You can remove a painted popcorn ceiling yourself by first testing for asbestos and protecting the room, then wetting small sections and gently scraping with a wide drywall knife to avoid gouging the drywall. Wear a P100/N95 respirator, goggles, and coveralls, seal vents, and bag debris with care. Repair gouges with joint compound, prime with a stain-blocking primer, and repaint. Keep safety and waste rules in mind, and continue to learn the step-by-step tips and alternatives.
How to Remove Painted Popcorn Ceilings: Quick Overview
Start by testing whether water will soften the painted texture—spray a small patch, wait a few minutes, and scrape lightly; if the paint resists or the texture crumbles to dust, you’ll need a different approach.
You’ll assess condition, tools, and safety. Know popcorn ceiling history to understand materials, compare ceiling texture types, and decide whether wet-scraping, covering, or professional removal suits your situation.
Quick Answer: Wet-Scrape Painted Popcorn Ceilings Safely
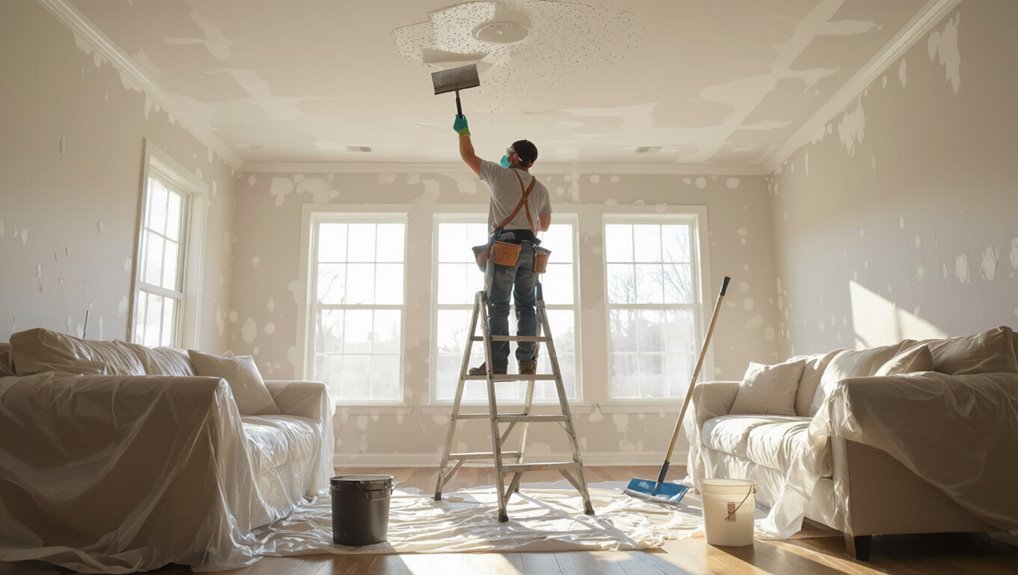
You’ll want to gear up with a respirator, goggles, gloves, and disposable coveralls before you start.
Keep a garden sprayer or pump bottle handy to mist small sections, let the texture soak for a few minutes, then scrape gently with a wide drywall knife.
Work in manageable areas, wiping up runoff and re-misting as needed to avoid tearing the underlying drywall.
Safety Gear Essentials
Anyone removing a painted popcorn ceiling should gear up properly—wet-scraping stirs up dust, debris, and slippery surfaces, so the right protection keeps you safe and efficient.
Wear safety gear: protective eyewear, a respirator mask, and heavy gloves.
Lay drop cloths, use knee pads for low work, run ventilation fans, and keep a first aid kit nearby.
Stay alert and proceed carefully.
Wet-Scraping Technique
Dampen the painted popcorn with a garden sprayer or misting bottle until it’s uniformly wet—this softens the texture and cuts down dust so you can scrape without gouging the drywall beneath.
Work in small sections, use a wide drywall knife at a shallow angle, and discard debris promptly.
Expect wet scraping challenges like longer drying times and soggy messes; balance wet scraping advantages: less dust, easier removal.
How to Test for Asbestos Before You Start
If your home was built before the 1980s or you’re unsure about the ceiling’s age, assume the popcorn texture might contain asbestos and take precautions.
You’ll need to collect small core or scrape samples from a few spots using gloves, a mask, and plastic sheeting to avoid spreading dust.
Send the sealed samples to an accredited lab for testing and wait for written results before doing any full-scale work.
When To Assume Asbestos
Because older popcorn ceilings can hide asbestos, treat any textured ceiling installed before the mid-1980s as potentially hazardous and don’t start scraping until you know for sure.
You’ll prioritize asbestos identification and consider health risks; assume contamination if provenance is unknown or surface was painted, damaged, or repaired.
- Unknown installation date
- Visible damage or crumbling
- Painted or sealed texture
- Renovation disturbance planned
How To Collect Samples
Now that you’ve treated the ceiling as potentially hazardous, you’ll need to collect proper samples for laboratory testing before any scraping or sanding.
Wear PPE, seal the area, wet the texture to minimize dust, and use clean tools and clear labeled containers.
Follow strict sampling techniques and safety protocols: limit sample size, avoid contamination, double-bag specimens, and document location and procedure for accurate testing.
Where To Send Tests
Where should you send the samples for reliable asbestos analysis?
You’ll use accredited testing services for accurate test submission; they’ll guide packaging, chain of custody, and reporting.
Choose labs certified by your state or NVLAP.
- Local accredited environmental lab
- State public health lab
- NVLAP-accredited private lab
- Licensed asbestos consultant firm
When to Hire a Pro for Asbestos Abatement
If your popcorn ceiling was painted before the 1980s or you don’t know its age, hire a licensed asbestos abatement pro rather than testing or disturbing it yourself; professionals have the equipment, training, and permits to confirm contamination and contain it safely.
You should call for a professional evaluation when asbestos risks exist, if damage is extensive, or if local rules require licensed removal to protect occupants.
What Tools and Materials You Need
Before you start, you’ll want the right safety gear—respirator, goggles, gloves, and disposable coveralls—to protect yourself from dust and any contaminants.
You’ll also need to prep and protect the room with plastic sheeting, tape, and drop cloths to keep debris contained.
Finally, gather the tools and materials like a spray bottle, scraper or drywall knife, sanding tools, joint compound, and a shop vacuum with a HEPA filter.
Safety Gear Essentials
Removing a painted popcorn ceiling demands the right safety gear, so don’t skip the essentials: a respirator with P100 filters (or N95 at minimum), safety goggles, disposable coveralls, heavy-duty gloves, and knee pads if you’ll be working on scaffolding or a ladder.
You’ll use proper protective equipment and safety gear to limit dust, debris, and chemical exposure.
- Respirator (P100/N95)
- Goggles
- Coveralls
- Gloves
Preparation And Protection
Once you’ve got your safety gear on, gather the right tools and materials so the job goes smoothly: plan tools organization, lay drop cloths, and seal vents and doorways.
Clear furniture, create a tidy workspace setup with good lighting, and position trash bins nearby. Label containers, keep a wet sponge and bucket handy, and map your workflow to minimize mess and interruptions.
Tools And Materials
With the room prepped and protected, gather the specific tools and materials you’ll use so you can work efficiently and safely.
You’ll need items for paint removal and ceiling restoration, plus safety gear. Keep supplies close and inspect for damage before starting.
- Scraper or joint knife, spray bottle, drop cloths
- Protective goggles, respirator, gloves
- Sandpaper, drywall patch compound
- Ladder, shop vacuum, tarp
Personal Protective Equipment You Must Use
You’ll need proper personal protective equipment (PPE) to protect yourself from hazardous dust, loose paint, and potential asbestos fibers when working on a painted popcorn ceiling.
Choose PPE types deliberately: Eye protection with sealed goggles, respiratory masks (P100 or N95 for non-asbestos jobs), full skin coverage like disposable coveralls, durable safety gloves, and hearing protection when using power tools.
How to Prepare the Room and Protect Surfaces
Start by sealing off the room to keep dust and debris contained; tape plastic sheeting over doorways and vents.
Lay heavy-duty drop cloths or plastic on the floors and wrap or remove light fixtures and ceiling fans.
You’ll also want to cover walls and any immovable fixtures to protect them from moisture and scraping.
Seal Off The Space
Before you start scraping, isolate the work area so dust and debris don’t spread through the house.
For ceiling preparation and space organization, tape plastic sheeting to doorways and vents, create a one-way entry, and remove small furniture.
Keep pathways clear and label covered items.
- Seal doors with plastic
- Cover vents tightly
- Build a simple airlock
- Remove or wrap small items
Protect Floors And Fixtures
With the work area sealed, turn your attention to protecting floors and fixtures so dust, water, and scraping debris don’t cause permanent damage.
Lay heavy-duty drop cloths or rosin paper for floor protection, tap seams, and overlap edges.
Cover lights, vents, and furniture with plastic fixture covers, secure with painter’s tape, and route tools to avoid scuffs.
Remove small items beforehand.
Shut Down HVAC and Seal Vents to Stop Contamination
Because airborne dust and loose popcorn bits will circulate through ductwork, you should shut off your HVAC and seal all vents before scraping.
Do this to prevent contamination, protect filters, and keep other rooms clean.
HVAC tips: turn power off, cover returns, use painter’s tape and plastic, and check seals after work.
- Turn system power off
- Cover supply vents
- Seal returns with plastic
- Inspect seals afterward
Score and Wet Painted Popcorn Without Damage
Before you wet the ceiling, test a small area to see how well the paint and texture absorb moisture so you don’t over-saturate.
Then score the surface in controlled, parallel lines to let water penetrate without gouging the drywall.
Use a gentle spray to apply water gradually and keep the ceiling damp, not dripping.
Test Moisture Absorption
Start by scoring a small, inconspicuous section of the painted popcorn and applying a little moisture to see how the texture reacts—you want to confirm the paint’s bond and the ceiling’s ability to absorb water without swelling or crumbling.
Use moisture testing to gauge absorption impact and proceed accordingly.
- Note surface softness
- Time water pickup
- Watch for paint lifting
- Record results before full wetting
Score In Controlled Lines
Score the ceiling in straight, controlled lines so your wetting stays confined and you can lift texture without damaging the drywall beneath.
Use scoring methods like a drywall rasp or utility blade with measured pressure, keeping cuts shallow.
You’ll employ controlled cutting to map removal sections, prevent over‑penetration, and make pulling softened popcorn predictable and tidy while protecting seams and fasteners.
Use Gentle Spraying
When you’ve scored the ceiling, mist the painted popcorn lightly so water soaks the texture without seeping into the drywall; use a fine‑mist spray bottle or low‑pressure garden sprayer held about 18–24 inches away and move steadily to avoid puddles.
You’ll rely on gentle misting and strict moisture control to loosen material without damage.
- Work in small sections
- Check drywall dampness
- Reapply lightly as needed
- Wait before scraping
Step-by-Step Wet-Scraping Technique for Painted Texture
You’ll want to prep the room, protect yourself, and gather the right tools before you wet-scrape painted popcorn—proper setup makes the work faster and cleaner. Wet, score, scrape gently with a wide blade, keep surfaces damp, and avoid gouging drywall. These removal techniques respect varied ceiling textures and minimize repair.
| Calm | Steady | Relief |
|---|---|---|
| Damp | Glide | Clean |
| Care | Patience | Smooth |
| Hope | Order | Bright |
| Finish | Pride | Renew |
What to Try When Wet-Scraping Fails (Chemical Softeners, Sanding)
If wet-scraping won’t budge the paint, you can try chemical softeners that break down the coating or carefully sand the texture down.
You’ll want to choose a product rated for painted surfaces and follow safety instructions, or use a pole sander with fine grit and dust capture.
Both methods require patience and proper PPE to avoid damaging drywall or breathing irritants.
Chemical Softener Options
Because painted popcorn can resist water, chemical softeners are often the next practical step when wet-scraping won’t budge the texture.
You’ll choose products, follow label safety, and test small areas. Learn proper chemical softeners selection and application techniques to minimize damage and cleanup.
- Pick a low-odor gel formula
- Test adhesion first
- Protect floors and vents
- Neutralize per instructions
Sanding Techniques And Tips
When chemical softeners don’t fully loosen painted popcorn, sanding can be the next effective option for smoothing stubborn areas.
Use pole sanders with 80–120 grit to avoid gouging, keep a light touch, and sand in small sections.
Wear a respirator, goggles, and drop cloths.
These sanding techniques and sanding tips help you control dust and prevent ceiling damage while finishing the surface.
How to Minimize Ceiling Damage While Removing Texture
Start by working systematically and patiently: you’ll reduce damage by testing a small area, softening the texture with moisture, and using the right tools and technique to scrape gently along the grain instead of gouging.
Use Ceiling preservation techniques and Texture removal tips to protect drywall and trim.
- Wet, small sections
- Use wide, flexible scrapers
- Support seams with tape
- Repair minor nicks promptly
Painted Popcorn Over Drywall Seams: What to Do
If your painted popcorn ceiling covers drywall seams, you’ll need to treat those areas carefully to avoid visible ridges or cracking after removal.
Score and remove texture gently, then inspect seams for tape or joint compound damage.
Perform drywall repair: re-tape, mud, and sand seams smooth.
Finish with careful texture matching before priming and painting to blend repaired areas seamlessly.
Removing Stubborn Patches and Adhesive Residue
Although peeling and scraping will remove most texture, you’ll still encounter stubborn patches and adhesive residue that need extra attention.
Use warm water, a gentle scraper, and a citrus-based adhesive removal product for spots. For damaged areas, plan quick patch repairs with joint compound and fine sanding. Take care not to overwork the drywall.
Use warm water, a gentle scraper, and citrus adhesive remover; patch with joint compound and sand lightly—don’t overwork the drywall.
- Test solvent first
- Work in small sections
- Feather edges smoothly
- Clean dust thoroughly
Handling Light Fixtures, Vents, and Electrical Boxes
Before you start scraping near lights or vents, turn off the power at the breaker and double-check with a tester so you don’t get shocked.
Remove or protect fixtures and vents carefully, labeling wires and using dust covers to keep components and bulbs clean.
After the ceiling’s stripped, seal any electrical boxes and patch openings to restore a safe, finished surface.
Turn Off Power
1. Turn off power at the breaker before touching fixtures—power safety is essential.
Follow electrical precautions: label circuits and use a tester to confirm power is dead. Don’t rely on switches alone.
- Shut off breaker for the room
- Lock or tag the panel
- Verify with a non-contact tester
- Keep children and pets away during work
Protect And Remove Fixtures
With the power off and confirmed, you can safely remove or protect ceiling fixtures so they don’t get damaged or wired incorrectly when you work on the texture. Unmount light fixtures, cover vents, and tuck wires; prioritize fixture safety and ceiling protection. Reattach or cap wiring per code when done.
| Item | Action | Tip |
|---|---|---|
| Light | Remove | Label wires |
| Vent | Cover | Tape edges |
| Box | Secure | Cap wires |
| Fan | Support | Two-person |
Seal And Patch Openings
Seal openings around fixtures and boxes to keep water and slurry out and to create a smooth surface for repair.
You’ll tape and gasket vents, cap electrical boxes, and seal gaps with appropriate caulk or foam during ceiling preparation, then use proper patching techniques to finish.
- Turn off power and remove trim
- Use foam gaskets for fixtures
- Caulk gaps tightly
- Skim and sand patches
How to Clean Up Debris and Dispose of Waste Safely
Start by wetting down the scraped material and surrounding area to minimize dust and keep loose particles from spreading. You’ll bag debris, seal containers, and label waste for proper debris containment. Follow local rules for waste recycling and hazardous disposal. Clean tools and vacuum with HEPA filter.
| Item | Action |
|---|---|
| Bags | Double-seal |
| Filter | HEPA |
| Tools | Clean |
| Label | Date |
| Drop-off | Local facility |
Inspect a Popcorn Ceiling After Removal for Damage
After you strip the popcorn texture, inspect the ceiling systematically for gouges, thin spots, water stains, and nail pops so you can plan repairs before priming and repainting.
You’ll perform a thorough ceiling inspection and damage assessment, noting locations and severity, photographing issues, and marking priorities for the next step.
- Note gouges and thin areas
- Mark water stains
- Record nail pops
- Photograph damage
Repairing Gouges, Nail Pops, and Damaged Drywall
Patch gouges, address nail pops, and repair any water- or impact-damaged drywall before you prime so the ceiling will be smooth and stable for paint.
Patch gouges, fix nail pops, and repair damaged drywall before priming for a smooth, stable ceiling finish.
For gouge repair, remove loose material, fill with appropriate compound, and sand flush.
Reset or replace popped nails or screws and use drywall patching for holes or soft spots.
Prime repaired areas to seal before finishing.
How to Apply Joint Compound: Tools, Layers, Drying Times
You’ll want the right tools and a clear plan before you spread joint compound: a 6–12 inch taping knife, a wider finishing knife for feathering, a mud pan, sanding block or pole sander, and a hawk or mixing bucket for smoother work.
Apply thin coats, watching layer thickness; let each dry fully (typically 24 hours) before next pass. Tools and timing guarantee clean joint compound application.
- Clean surface
- Mix to creamy consistency
- Apply thin, even layers
- Wait full drying between coats
Sanding and Prepping the Repaired Ceiling for Primer
Once your joint compound has dried and been smoothed with a finishing knife, sand the repair until it’s flush with the surrounding ceiling texture so primer will grab evenly. Use light pressure, fine-grit sandpaper, and a sanding pole; keep dust contained. Practice proper sanding techniques for effective ceiling prep.
| Tool | Grit | Motion |
|---|---|---|
| Pole sander | 120 | Long strokes |
| Hand block | 180 | Circular |
| Vacuum | N/A | Alongside sanding |
Best Primers and Paints for Newly Smoothed Popcorn Ceilings
Choosing the right primer and paint makes the difference between a seamless repair and a patchy finish, so start with a high-quality, stain-blocking primer formulated for textured ceilings or drywall.
Start with a quality, stain-blocking primer made for textured ceilings to ensure a seamless repair.
You’ll focus on primer selection and paint durability to hide repairs and resist stains. Pick low-VOC, bonding primer plus washable, matte ceiling paint.
- Bonding primer (acrylic)
- Stain-blocking oil primer
- High-hide latex primer
- Washable matte ceiling paint
Drying Times and When It’s Safe to Paint
Before you paint, make certain the repaired surface is completely dry—moisture trapped under primer or paint will cause bubbling, poor adhesion, and visible stains.
Check manufacturer drying times for primer and topcoat; typical recoat ranges from 2–24 hours depending on humidity and temp.
Use a moisture meter or touch test.
Waiting guarantees paint safety and long-lasting adhesion; don’t rush the process.
How to Estimate Time and Labor: One Room vs Whole House
Estimating time and labor depends on scale: stripping a single bedroom of painted popcorn ceiling might take a weekend for one person, while tackling an entire house will multiply hours, require extra helpers, and likely need equipment rental.
Stripping painted popcorn ceilings: a weekend for one bedroom, a full-house project needs more hands and rented gear
For clear time estimation and labor comparison, consider:
- Room size and ceiling height
- Number of helpers available
- Prep and cleanup time
- Equipment rental needs
Typical Cost Breakdown: DIY vs Hiring a Pro
A quick cost comparison shows that doing the job yourself will usually save on labor but add time, tool rentals, and potential rework.
On the other hand, hiring a pro raises upfront costs but reduces your time commitment and risk of mistakes.
You’ll weigh professional vs DIY: labor expenses, material costs, and time investment against potential savings, expertise benefits, and quality assurance when choosing.
Common DIY Mistakes and How to Avoid Them
When you try removing a painted popcorn ceiling, common mistakes—like skipping a proper wetting step, failing to test for asbestos, or using the wrong scraper angle—can quickly turn a weekend project into a costly repair.
You should address common pitfalls with prevention strategies: prepare correctly, pick proper tool selection, schedule project timing, and follow cleanup practices to avoid preparation errors and safety oversight.
- Test for asbestos first
- Wet evenly, don’t oversaturate
- Use correct scraper angle
- Protect floors and vents, then repaint using safe painting techniques
Alternatives to Smoothing Painted Popcorn Ceilings
If you’d rather skip sanding or scraping, several practical alternatives let you hide or transform a painted popcorn ceiling without the mess of full smoothing.
You can install drywall or beadboard over it, apply textured plaster skim coats, or use suspended grids with tiles.
Explore alternative ceiling treatments and acoustic ceiling options to improve aesthetics and sound control while avoiding full removal.
Final Safety Checklist: Air Clearance, PPE, and Waste Disposal
Because airborne dust and possible lead fibers can linger long after you finish, confirm air clearance, suit up in proper PPE, and plan waste disposal before you touch any tools—or you’ll risk contaminating the rest of the home.
Confirm air clearance, don proper PPE, and plan disposal first—dust and lead fibers can contaminate the whole home.
Check air quality, set a realistic project timeline, and follow disposal rules.
- Test air quality pre- and post-work
- Wear respirator, coveralls, gloves, goggles
- Seal and bag debris immediately
- Coordinate hazardous waste pickup
Frequently Asked Questions
Can Painted Popcorn Ceilings Be Skim-Coated Instead of Fully Removed?
Yes — you can skim-coat painted popcorn ceilings if adhesion’s good and asbestos-free. You’ll prep thoroughly: sanding, ceiling preparation, and using proper skimming techniques to embed joint compound smoothly, then prime and finish for a flat surface.
Will Removing Painted Texture Affect Room Acoustics or Insulation?
About 60% of homeowners notice changed echo after ceiling work; yes, removing painted popcorn can alter acoustic properties and may slightly reduce insulation impact unless you add new insulation or acoustic panels to compensate.
How to Prevent New Cracking After Smoothing and Repainting?
You’ll prevent new cracking by addressing cracking causes, using proper repair techniques: prep surfaces, apply flexible joint compound or acrylic patch, embed fiberglass tape, allow full cure, sand gently, prime with stain-blocking primer, then repaint.
Can I Remove Painted Popcorn Ceilings in Rental Properties Legally?
Like peeling wallpaper in a storm, you can’t just rip it down; you’ll need permission. Check rental regulations and honor tenant rights, get landlord approval, follow local asbestos rules, and document consent before removing.
What Warranty or Insurance Issues Arise After DIY Ceiling Removal?
You’ll face liability concerns if damage or injuries occur during DIY ceiling removal, and your homeowner insurance might not cover unpermitted work; check your policy, notify your insurer, and consider getting licensed help or permits beforehand.
Conclusion
So you’ve bravely tackled the ceiling jungle and learned to wet-scrape like a champ—congrats. If the popcorn’s painted, test for asbestos unless you enjoy free airborne surprises. Don’t be that DIY legend who skips PPE or thinks a shop vac is a respirator. Hire pros for asbestos, weigh costs, and consider alternatives if scraping feels medieval. Clean up, get air clearance, and toast your smooth ceiling with a well-earned, dust-free victory lap.