Is It Better to Stain or Paint Kitchen Cabinets? Full Comparison
If you want natural wood warmth, easier touch-ups, and a look that shows grain, pick stain; if you want full color control, a flawless modern surface, and easier coverage of flaws, pick paint. Stain suits solid wood and traditional styles and usually costs less up front but needs periodic refinishing; paint works well on MDF or for bold colors but needs careful prep and touch-ups. Keep going to see materials, costs, tools, and maintenance.
Quick Decision Guide: Stain vs Paint by Goal (Look, Budget, Durability)
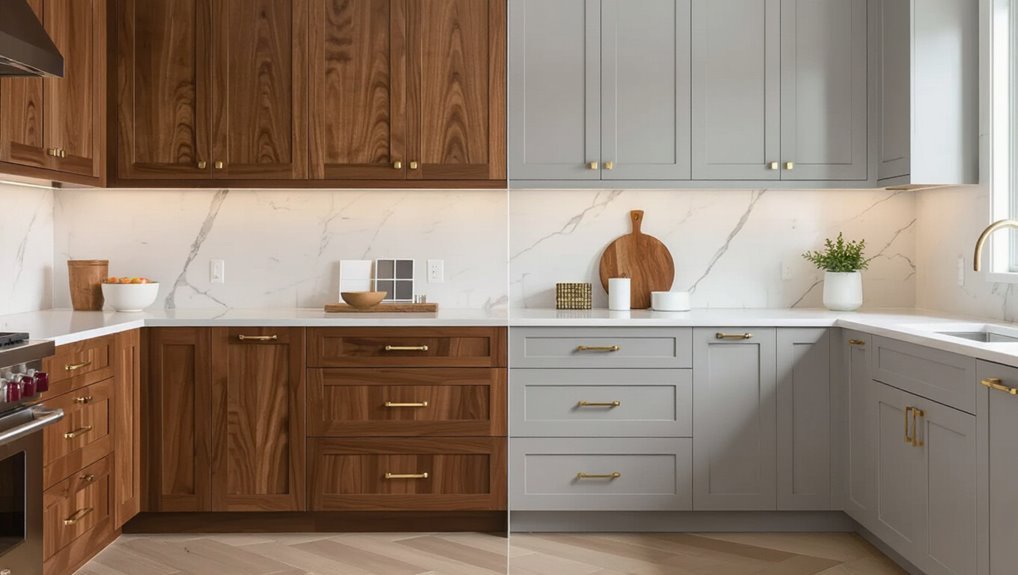
Style matters: if you want the wood’s natural grain to show, choose stain; if you want a uniform, modern look, pick paint.
You’ll weigh aesthetic appeal, color options, and longevity factors against maintenance requirements and environmental impact.
Consider preparation techniques, application methods, and finishing touches to match budget and durability goals so your choice suits daily use and design intent.
Quick Verdict: When to Choose Stain and When to Choose Paint
When you want the wood’s grain to remain the star—bringing warmth and a natural feel—choose stain; if you need solid, even color or a contemporary look that hides imperfections, go with paint.
You’ll balance aesthetics, color psychology, maintenance, and finish longevity when deciding.
Consider practical goals and room vibe before committing.
- Preserve natural texture
- Achieve bold hues
- Simplify repairs
- Maximize lifespan
- Match mood
Cabinet Materials: Solid Wood, Veneer, MDF and Which Finish Works
Although cabinet construction affects finish performance, you’ll usually choose stain for solid wood and paint for MDF—while veneer sits in the middle and can take either depending on its thickness and grain match.
You’ll pick finishing techniques that respect substrate: clear stains highlight grain, paints hide flaws, and thin veneers need careful prep.
Prioritize color matching to existing wood tones or room palette.
Cost Comparison: Stain vs Paint Per Cabinet and Per Door
One key factor in choosing stain or paint is cost, and you’ll find prices can vary a lot depending on materials, labor, and finish complexity.
You’ll compare per cabinet and per door costs, factoring stain longevity versus paint texture choices that affect price.
- Stain: lower material cost
- Paint: higher prep and paint cost
- Door hardware impact
- Finish coats add cost
- Surface type matters
Labor Time: Stain – DIY vs Professional
If you tackle staining yourself, you’ll spend considerably more hands-on hours than a pro because you’re doing every step—from stripping and sanding to applying multiple stain and seal coats—but you’ll save on labor costs; professionals typically finish faster thanks to experience, specialized tools, and efficient workflows.
Labor Time: Paint – DIY vs Professional
If you paint your cabinets yourself, expect a big time commitment for prep, multiple coats, and drying between steps.
Hiring a pro saves you hours or days because they work faster and bring efficient tools and techniques.
We’ll compare the typical DIY timeline to the professional schedule so you can decide which fits your life.
DIY Time Commitment
Although painting your kitchen cabinets can seem straightforward, it takes considerably more hours than a weekend afternoon—you’ll be sanding, priming, cutting in, and applying multiple coats with drying time in between.
You’ll need strict time management and project planning to avoid delays. Expect phased work, interruptions, and cleanup.
- Measure and inventory
- Sanding sessions
- Primer application
- Multiple paint coats
- Reassembly and touch-ups
Professional Time Savings
When you compare doing the painting yourself to hiring pros, the biggest difference is time: professionals can finish prep, painting, and cleanup in a fraction of the hours you’d spend, because they bring specialized tools, crew coordination, and proven workflows that cut idle and drying downtime.
You’ll benefit from professional techniques and clear efficiency benefits that trim labor without sacrificing finish.
| Task | Time saved |
|---|---|
| Prep | High |
| Painting | High |
| Drying | Medium |
| Cleanup | High |
Prep for Staining: Sanding, Stripping, and Repairs
Start by clearing, inspecting, and deciding which surfaces need sanding or stripping so you know exactly what prep work each cabinet requires.
You’ll apply sanding techniques, choose stripping methods, and follow repair tips as prep essentials to expose wood and fix dents before staining.
- Assess grain direction
- Remove hardware
- Use appropriate abrasives
- Strip finishes safely
- Fill and sand repairs
Prep for Painting: Deglossing, Priming, and Filling
Before you paint, you’ll need to degloss the surfaces so primer and paint will stick — I’ll explain the common methods and when to use each.
Then you’ll choose the right primer for your cabinet material and learn simple filling techniques to smooth dents and gaps.
Following these steps makes your paint job durable and professional-looking.
Deglossing Methods Explained
Although it may seem tedious, deglossing is the essential step that helps new paint adhere to shiny or smooth cabinet surfaces; you’ll choose between mechanical sanding, chemical deglossers, or a combination depending on the finish, material, and your tolerance for dust.
Use deglossing techniques for proper surface preparation, then clean thoroughly before painting.
- Sanding for bite
- Liquid deglossers
- Abrasive pads
- Combination approach
- Clean with solvent
Priming And Filling Techniques
Prime and fill carefully to turn a deglossed, dusty cabinet into a smooth, paint-ready surface—your primer seals tannins and prevents bleed-through, while fillers smooth gouges, nail holes, and seam gaps so the finish lays down evenly. Use proper priming techniques and filling methods: choose stain-blocking primer, sand between coats, and pick appropriate filler for wood or MDF.
| Step | Tool | Goal |
|---|---|---|
| 1 | Deglosser | Clean |
| 2 | Primer | Seal |
| 3 | Filler | Smooth |
| 4 | Sandpaper | Level |
| 5 | Inspect | Ready |
Stain Types: Penetrating, Gel, and Dye – Pros & Uses
When choosing a finish for your kitchen cabinets, you’ll want to understand how penetrating, gel, and dye stains behave and where each excels.
You’ll pick based on wood grain, stain application ease, color enhancement goals, finish durability, maintenance tips, stain compatibility, and environmental impact.
- Penetrating stains highlight grain and soak in.
- Gel stains sit on surface for control.
- Dye stains offer vivid color.
- Match stain to wood species.
- Consider VOCs and disposal.
Paint Types: Oil, Latex, Acrylic, and Lacquer – Pros & Uses
If you want durable, color-rich cabinet finishes, choose the paint type that matches your workflow and the cabinet material: oil-based paints give hard, smooth surfaces and level well but take longer to dry and need stronger solvents.
Latex (water-based) paints dry fast, clean up with soap and water, and resist yellowing.
Latex water‑based paints dry quickly, clean up with soap and water, and resist yellowing over time.
Acrylics—essentially higher-performance water-based paints—offer better adhesion and flexibility for trim and shaker doors.
Lacquer sprays produce ultra-smooth, fast-drying films ideal for professional spraying but require careful ventilation and prep.
Choose oil benefits for hardness, weigh latex drawbacks like lower toughness, use acrylic versatility for durability and trim, and consider lacquer finish when you want flawless, sprayed results.
Best Stains for Common Cabinet Woods
When choosing stains for cabinets, you’ll want options that suit each wood’s grain and tone.
For oak and maple, consider stains that highlight oak’s pronounced grain and even-toned maple without blotching.
For cherry and pine, pick colors that enhance cherry’s warm richness and tame pine’s knots for a cleaner look.
Oak And Maple Choices
Because oak and maple respond so differently to stain, choosing the right finish can make or break your cabinet project.
You’ll balance oak finishes with grain visibility and maple hues with subtle staining techniques to keep natural tones.
Prioritize wood preservation while achieving color depth and cabinet warmth through testing.
- Test samples
- Match natural tones
- Control grain visibility
- Use gentle staining techniques
- Seal for preservation
Cherry And Pine Options
Shifting from oak and maple, you’ll find cherry and pine demand different stain strategies: cherry takes stain unevenly and darkens with age, while pine soaks up stain and highlights knots.
You’ll choose cherry finishes for rich color variations and subtle grain patterns. Pick pine options for rustic style choices, use tailored application techniques, follow maintenance tips, and weigh durability factors carefully.
Best Paints and Sheens for Kitchen Cabinets
Although your cabinets can handle different formulas, choosing the right paint and sheen changes how durable and easy-to-clean they’ll be.
Choosing the right paint and sheen transforms cabinet durability and ease of cleaning for lasting, attractive results
You’ll want acrylic latex or alkyd for smooth coverage; satin or semi-gloss resists grime. Consider best color combinations and popular cabinet finishes to match style and function.
- Satin for warmth
- Semi-gloss for cleanability
- Matte for modern looks
- Eggshell for subtle sheen
- High-gloss for accents
Durability: Scratches, Water and Heat Resistance (Stain vs Paint)
When you weigh stain versus paint for kitchen cabinets, durability usually comes down to finish and maintenance: stains soak into wood and highlight grain but offer limited surface protection, while paint creates a sacrificial film that resists scratches, moisture, and heat better when paired with a durable topcoat.
You’ll find paint generally offers superior scratch resistance, water resistance, and heat resistance, boosting finish longevity.
Maintenance for Stained Cabinets: Cleaning & Upkeep
Having a stained cabinet finish doesn’t remove the need for regular care; because stain soaks into wood and relies on its topcoat for protection, you’ll want a routine that keeps wood healthy and the finish intact.
Use gentle cleaning solutions and proper cleaning techniques to preserve cabinet gloss and wear resistance. Follow these maintenance tips:
- Wipe spills promptly
- Dust weekly
- Reapply protective coatings as needed
- Check stain application edges
- Schedule upkeep frequency reviews
Maintenance for Painted Cabinets: Cleaning & Touch-Ups
Because painted cabinets wear differently than stained ones, you’ll need a slightly different maintenance approach focused on cleaning without abrading the paint and on quick touch-ups to hide chips and scuffs.
Use gentle cleaning methods and mild cleaning solutions suited to cabinet surfaces.
Follow a practical maintenance schedule, apply recommended product recommendations, and learn touch up techniques and repair strategies to improve longevity factors.
Refreshing Stained Cabinets Without Full Stripping
If your cabinets are stained rather than painted, you don’t need to strip them back to bare wood to give them new life.
You can revive finish, update tone, and protect surfaces with simple rejuvenating techniques and careful color matching.
Try these actions:
- Clean and degloss
- Apply tinted wood conditioner
- Use gel stain for touch areas
- Seal with satin topcoat
- Replace hardware for contrast
Repairing Chips & Scratches on Painted Cabinets
Start by evaluating the damage so you know whether you’re dealing with a shallow nick, a deep gouge, or just scuffed paint.
Begin by assessing the damage: determine if it’s a shallow nick, deep gouge, or simple scuff.
For chip repair and scratch touch up, clean and sand—surface preparation guarantees paint adhesion.
Fill gouges, match color precisely, and apply thin coats.
Finish restoration includes cabinet sealing to protect repairs and ongoing damage prevention through gentle cleaning and hardware checks.
How Stain Preserves Wood Color and Grain
When you choose stain, it soaks into the wood and enhances the natural grain rather than hiding it.
You’ll keep the wood’s original tone while gaining richer, more consistent color.
Because stain penetrates differently across the surface, it also lets subtle variations show through for a more natural look.
Enhances Natural Grain
Because stain soaks into the wood instead of sitting on top, it deepens and highlights the natural grain patterns rather than hiding them.
So you’ll retain the character and warmth of the original material while subtly shifting its tone. Use grain enhancement techniques and natural finish options to emphasize texture and depth.
- Reveals medullary rays and pores
- Enhances knot contrast
- Preserves tactile feel
- Accents wood movement
- Complements existing cabinetry
Maintains Wood Tone
Although it soaks into the wood rather than forming a surface layer, stain preserves the original color depth and grain pattern, so you keep the cabinet’s natural character while subtly shifting its tone.
You’ll appreciate how this wood preservation maintains warmth and authenticity, enhancing aesthetic appeal without hiding texture.
Stain lets you protect and showcase wood rather than mask it.
Allows Subtle Variation
If you want cabinets that feel alive with texture, stain lets the wood’s natural color and grain show through while adding gentle shifts in tone.
You’ll appreciate subtle variation from stain effects that highlight knots and pores, unlike paint longevity which masks them.
You’ll enjoy depth, easier touch-ups, and a more organic, lived-in look.
- Natural grain visibility
- Tone gradations
- Easier spot repairs
- Warmth and depth
- Authentic character
How Paint Changes Cabinet Color and Visual Weight
Paint dramatically shifts how your cabinets read in a room by altering both color and perceived weight: light, cool hues make them recede and widen the space, while deep or warm tones pull focus and add visual heft.
You’ll use color perception to guide mood and scale, balancing cabinetry against countertops and walls to achieve visual balance and a cohesive, intentional kitchen design.
When Stain Hides Defects : And When It Doesn’t
When you opt for a stain, remember it soaks into wood and highlights the grain, so it can mask small scratches and uneven sanding but won’t magically erase gouges, warped doors, or missing veneer; those flaws stay visible because stain doesn’t build surface thickness the way paint does.
You’ll rely on stain absorption, which affects defect visibility.
You’re counting on stain absorption — it reveals and conceals flaws depending on how the wood takes the color.
- Minor scratches blend
- Deep gouges remain
- Veneer gaps show
- Warping persists
- Sanding quality matters
When Paint Hides Defects : And When It Highlights Texture
Although it builds a thicker layer over wood, paint can both hide and call attention to flaws depending on surface prep and finish choice.
You’ll get strong defect concealment with primer, filler, and higher-build paints; matte finishes mask minor imperfections.
Conversely, glossy or thin coats increase texture visibility, showing wood grain, dents, or brush marks.
Prep determines whether paint hides or highlights.
Style Pairings for Stained Cabinets (Traditional to Modern)
Because stained cabinets celebrate wood’s natural color and grain, you can steer a kitchen’s look anywhere from classic to contemporary by pairing the stain with complementary materials, hardware, and finishes.
Stained cabinets showcase wood’s natural grain, letting you shape a kitchen’s style through stain, materials, and hardware choices.
You’ll use wood species, color variations, finish options, and texture contrasts to achieve design compatibility, visual harmony, architectural elements, and mood setting.
- Warm stains for traditional styles
- Tight grains for modern aesthetics
- Mixed textures for contrast
- Matte vs. gloss finish choices
- Hardware shaping architectural tone
Style Pairings for Painted Cabinets (Farmhouse to Contemporary)
Stained cabinets highlight wood’s natural character, while painted cabinets let you control color, mood, and style more directly—so shifting from stain to paint opens a different set of pairing possibilities.
You’ll mix farmhouse aesthetics with crisp color palettes or choose contemporary finishes; balance texture contrasts, hardware styles, and visual weight.
Consider design themes, space enhancements, lighting considerations, and straightforward maintenance tips.
Lighting Effects: How Light Changes Stain vs Paint Appearance
When you pick stain or paint, consider how natural light will shift the color and reveal wood grain throughout the day.
Also think about artificial lighting—warm bulbs can deepen stains and soften painted tones, while cool LEDs can make paints look sharper and stains flatter.
Pay attention to shadows and grain visibility, since texture shows more in raking light and paint can mask those details.
Natural Light Impact
Natural light can dramatically change how stain or paint reads on your cabinets, so consider the direction, intensity, and color temperature of light in the space.
You’ll notice natural light effects shift tones, reveal grain, and alter perceived cabinet color throughout the day.
- East light warms morning hues
- West light deepens late tones
- North light stays cool
- South light is brightest
- Shadows emphasize texture
Artificial Light Differences
Because artificial light has a narrower, steadier spectrum than daylight, it can make stains read richer and paints look flatter or more uniform depending on the bulb type.
You’ll notice artificial lighting shifts color perception and alters finish reflections; higher light intensity boosts visual contrast, while softer bulbs reduce it.
Consider how shadow effects interact with sheen when choosing stain or paint.
Shadow And Grain Visibility
Light direction and intensity change how wood grain and shadows read, so you’ll see stains emphasize texture while paint tends to mask it.
You’ll notice grain definition, shadow effects, texture contrast, and color depth shift with finish sheen and light reflection, altering style influence and overall visual impact.
- Grain definition reveals wood character
- Shadow effects deepen tone
- Texture contrast matters
- Finish sheen alters reflection
- Style influence guides choice
Choosing Hardware for Stained Cabinets
When you’re choosing hardware for stained cabinets, think about contrast, scale, and finish so the pulls complement the wood instead of competing with it.
Pick hardware finishes that highlight grain, mix knob styles and handle sizes for balance, and use color coordination to tie cabinets to fixtures.
Consider material durability and current design trends so selections age well and suit your kitchen’s character.
Choosing Hardware for Painted Cabinets
When choosing hardware for painted cabinets, consider how finishes like brushed nickel or matte black will sit against your paint color and wear over time.
Make sure the style and scale of pulls or knobs complement your cabinet lines and overall kitchen design.
Check installation requirements and pick hardware that’s easy to clean and replace if paint chips or trends change.
Finish Compatibility With Hardware
Pick hardware that complements your painted cabinets’ finish and you’ll avoid visual clashes and premature wear.
Consider hardware compatibility with paint sheen and substrate to protect finish aesthetics and longevity. Match corrosion resistance and clearances; test samples before installing.
- Choose non-reactive metals
- Verify mounting surface strength
- Match finish durability to use
- Test paint-to-metal contact
- Use protective washers
Style And Scale Match
Although you want hardware that works functionally, you also need pieces that reinforce your painted cabinets’ style and scale so the room feels balanced.
You’ll select pulls and knobs for color harmony and design cohesion, balancing visual weight and texture contrast.
Prioritize finish variation and style compatibility to guarantee aesthetic balance, while allowing subtle trend adaptation so choices stay current without overpowering cabinetry.
Installation And Maintenance Tips
Because proper installation sets the tone for long-term performance, you’ll want to mount hardware securely and check alignment before committing to paint touch-ups.
Choose pulls and hinges that fit your door style, use precise installation techniques, and plan simple maintenance routines to protect finish and function.
- Pre-drill holes for accuracy
- Use mounting templates
- Choose corrosion-resistant screws
- Test movement before finalizing
- Wipe regularly to prevent buildup
VOCs and Safe Stain Choices for Cabinets
When you’re refinishing cabinets, remember that stains and finishes can release volatile organic compounds (VOCs) that affect indoor air quality and your health, so choosing low-VOC or water-based products matters. You’ll want to weigh VOCs impact and pick safe stains, test samples, and ventilate during application.
| Product type | Benefit |
|---|---|
| Water-based stain | Low VOC |
| Oil-based stain | Durable finish |
VOCs and Low-VOC Paint Options for Cabinets
If you’re repainting cabinets, pick low‑VOC or water‑based paints to cut indoor air contaminants and speed drying times. You’ll reduce health impacts and meet VOCs regulations while choosing eco friendly choices and better odor control.
Choose low‑VOC or water‑based paints for cabinetry to reduce odors, dry faster, and limit indoor air pollutants.
- Compare product comparisons for low VOC options
- Follow safety measures and application techniques
- Note finish longevity tradeoffs
- Weigh environmental considerations
- Monitor indoor air after painting
Longevity: How Often to Refinish Stained vs Painted Cabinets
How often you’ll need to refinish cabinets depends on whether they’re stained or painted, since stains tend to hide wear while paint shows chips and discoloration sooner.
Expect stained cabinets to go longer between refinishes—often 8–15 years—while painted cabinets may need touch-ups or full refinishing every 5–10 years depending on use.
Factors like finish quality, kitchen traffic, cleaning habits, and sunlight exposure will shorten or extend those timelines.
Refinish Frequency Differences
Because stained cabinets show wear differently than painted ones, you’ll usually refinish painted cabinets more often.
Choose refinishing techniques and application methods that match aesthetic preferences and color variations.
Consider maintenance schedules, finish durability, surface protection, and long term effects on wood preservation and environmental impact.
- Practical refinishing techniques
- Regular maintenance schedules
- Aesthetic preferences vs durability
- Environmental impact choices
- Preserve wood: surface protection
Factors That Affect Longevity
While stain and paint both protect and beautify cabinets, several key factors determine how long each finish lasts before you need to refinish: the type and quality of the finish, the wood species and grain, kitchen traffic and cleaning habits, exposure to moisture and heat, and how well the surface was prepped and sealed initially.
You should weigh finish selection, application techniques, maintenance frequency, color retention, and environmental impact when planning refinishing.
Resale: What Buyers Prefer by Market and Style
When you’re prepping cabinets for sale, buyers’ tastes vary by market and style, so choose finishes that match local demand and the home’s overall look.
You’ll boost resale value by aligning with buyer preferences and market trends while respecting style influences.
Boost resale value by matching buyer preferences and market trends while honoring the home’s style influences.
- Neutral painted cabinets for broad appeal
- Warm stains in traditional areas
- Two-tone for trendy neighborhoods
- Durable finishes in family markets
- High-end materials for luxury listings
Stain vs Paint in Open-Concept Kitchens
Shifting from matching buyer expectations to how a space actually feels, open-concept kitchens change the rules for cabinet finishes because sightlines connect the kitchen to living areas.
You’ll weigh stain’s warmth against paint’s uniformity to support open concept aesthetics. Choose stain to blend with adjacent wood tones; pick paint to control kitchen color dynamics and create cohesive contrast across shared sightlines.
Stain vs Paint for Small Kitchens and Color Tricks
Because small kitchens feel cramped when they compete with bold finishes, you’ll want cabinet choices that open up the space: light-stained woods add warmth without heaviness, while pale paints (soft white, warm gray, or muted pastel) visually expand the room and reflect more light.
Use color psychology and small space solutions to enhance light reflection, visual cohesion, texture contrast, minimalist aesthetics, and functional design.
- Choose pale palettes from current color trends
- Prioritize light-reflective finishes
- Keep hardware simple for visual cohesion
- Add subtle texture contrast sparingly
- Plan layouts as functional design studies
Two-Tone Kitchens: Mixing Stain and Paint Successfully
If you want a kitchen that feels layered and intentional, mixing stained lower cabinets with painted uppers lets you balance warmth and brightness without overwhelming the room.
You’ll choose color combinations that create visual harmony, use finish contrasts and texture variation for depth, and focus on style integration and aesthetic balance.
Include maintenance tips and follow current design trends for cohesion.
When to Refinish Cabinets Instead of Replacing Them
When your cabinets are structurally sound but tired-looking, refinishing usually makes more sense than replacing them. You save money, reduce waste, and refresh style while preserving function.
When cabinets are sturdy but worn, refinishing refreshes style, saves money, and reduces waste.
Consider refinishing benefits, cost effectiveness analysis, aesthetic considerations, and long term value to decide.
- Visible wear but solid frames
- Limited budget
- Desire for quick update
- Preserve original wood grain
- Environmental impact
Step-by-Step DIY Staining for Cabinets
Ready to tackle your cabinets? You’ll strip hardware, clean surfaces, and sand smooth before applying conditioner.
Test staining techniques on scraps, apply stain with a cloth or brush, wipe excess, and let dry between coats.
Focus on color matching by comparing samples in varied light.
Finish with clear protective topcoat and reattach hardware for a refreshed, durable result.
Step-by-Step DIY Painting for Cabinets
First, you’ll prep the area and remove all hardware so surfaces are clean and accessible.
Then you’ll prime and sand to guarantee good adhesion and a smooth base.
Finally, you’ll use the right paint technique and finish coats for durable, professional-looking cabinets.
Prep And Remove Hardware
Clear your workspace and gather tools: screwdriver set, labels or masking tape, small bags, a marker, and a camera.
You’ll document hardware removal, protect floors for surface protection, and perform cabinet cleaning before painting.
Label parts for fixture compatibility and note placement for smooth finish application.
Remove knobs, hinges, and catches carefully, bag them, and store with labeled notes and photos.
- Photograph each door
- Label hinge sides
- Bag screws separately
- Wipe surfaces clean
- Protect nearby counters
Prime And Sand Surfaces
Start by lightly sanding all cabinet surfaces to scuff the finish and give primer something to grab onto, then wipe away dust with a tack cloth before applying primer. Use proper sanding techniques for even abrasion; this surface preparation guarantees adhesion. Sand between primer coats lightly.
| Step | Tool | Tip |
|---|---|---|
| Sand | 120–220 grit | Even strokes |
| Clean | Tack cloth | Remove dust |
| Prime | Brush/roller | Thin coats |
Paint Technique And Finish
With your surfaces sanded and primed, you’re ready to apply paint using techniques that give cabinets a smooth, durable finish.
You’ll use proper paint application—thin coats, brush then roll, and sanding between coats—and choose finish types that suit wear and style.
Follow steps below to guarantee longevity and a professional look:
- Thin, even coats
- Brush for crevices
- Roller for flat panels
- Light sanding between coats
- Choose satin or semi-gloss
Common Staining Mistakes and How to Avoid Them
Because staining cabinets brings out the wood’s character, it’s easy to make small mistakes that ruin the final look—you’ll want to avoid them. Focus on wood preparation, staining techniques, color matching, and surface compatibility. Control finish application, follow product recommendations, and use maintenance tips to preserve results. Watch for these common errors.
| Mistake | Cause | Fix |
|---|---|---|
| Blotching | Grain/tannin | Sand, conditioner |
| Drips | Overapply | Thin coats |
| Wrong sheen | Wrong product | Test sample |
| Poor match | Lighting | Swatch check |
Common Painting Mistakes and How to Avoid Them
When you paint cabinets, skipping surface prep or using the wrong paint ruins the finish fast.
You’ll need to clean, sand, and prime so the paint adheres and lasts.
Choose a durable cabinet-grade paint or a satin enamel rather than generic wall paint.
Surface Preparation Errors
If you skip proper surface prep, your paint won’t stick and the finish will fail sooner than you’d expect.
You must master surface preparation techniques to avoid common mistakes: clean, degrease, sand, and prime correctly so paint adheres and lasts.
Follow steps methodically; rushed prep causes peeling, blotches, and uneven texture.
- Skip cleaning
- Sand too little
- Use wrong primer
- Ignore repairs
- Paint on dust
Wrong Paint Choice
After you’ve cleaned, sanded, and primed properly, choosing the wrong paint can still ruin your cabinet project. You’ll face wrong color choices, finish issues from poor application techniques, and long term effects like color fading and durability concerns. Consider maintenance differences and aesthetic preferences before buying.
| Problem | Impact |
|---|---|
| Wrong color | Aesthetic mismatch |
| Finish issues | Durability concerns |
Questions to Ask a Cabinet Refinish Contractor
What do you need to ask a cabinet refinish contractor to make sure the job meets your expectations?
You’ll want clear questions to evaluate about process, materials, and warranty. Verify contractor qualifications, ask for references, and confirm surface prep, finish type, and cleanup.
Decide who handles hardware and repairs, timeline estimates, and payment terms before work starts.
- References and portfolio
- Prep and repair methods
- Finish products used
- Warranty and touch-ups
- Payment schedule
Project Timeline & Disruption: Stain vs Paint
1 key decision that shapes your kitchen refinish timeline is whether you choose stain or paint — each brings different steps, drying times, and disruption levels.
You’ll consider project duration, workflow impact, noise considerations and dust control.
Plan family adjustments and temporary solutions to protect kitchen usability.
Plan for family routines and set up temporary kitchen solutions to keep cooking and comfort uninterrupted.
Use clear scheduling tips to minimize disruption levels and keep daily routines moving.
Tools & Products Checklist for Staining Cabinets
You’ll want a concise kit before you strip or sand a cabinet — the right tools and products speed the job and give a consistent, professional stain.
Gather supplies, follow safety precautions, and choose compatible finish types for durability. Store samples and read labels.
- Sandpaper (various grits)
- Chemical stripper or prep cleaner
- Stain and brushes/rags
- Clear topcoat (poly or oil)
- Respirator, gloves, goggles
Tools & Products Checklist for Painting Cabinets
If you’re switching from staining to painting cabinets, swap some supplies and add a few specific tools to get smooth, durable results.
You’ll need sandpaper, degreaser, primer for paint adhesion, quality paint, brushes/roller, and topcoat for finish durability.
Follow preparation techniques to address texture differences and grain enhancement, consider color selection, maintenance requirements, environmental impact, stain application contrasts, and basic cost analysis.
Cost-Saving Tips and Alternatives to Full Refinishing
When budget’s tight, you can get a fresh look without stripping every cabinet or buying top-tier materials: focus on selective updates like repainting just the doors, replacing hardware, and revitalizing drawer fronts, and use high-quality semi-gloss paint only where wear shows.
Use cost effective alternatives, budget friendly solutions, temporary fixes, cabinet refinishing options, DIY methods, and professional insights.
Cost-effective cabinet updates: DIY fixes, temporary solutions, and pro refinishing tips for budget-friendly refreshes
- Repaint doors only
- Replace knobs/hinges
- Add trim or molding
- Reface or veneer panels
- Touch-up stained areas
Decision Checklist: Choose Stain or Paint for Your Kitchen
Choosing between stain and paint comes down to three practical factors: the wood’s condition and grain you want to show, the durability and maintenance you’re willing to commit to, and the look you want to live with long-term.
Assess grain visibility, stain longevity, paint finish, color consistency, maintenance frequency, surface compatibility, restoration techniques, visual impact, style trends, and eco friendly options to decide.
Frequently Asked Questions
Can I Stain or Paint Cabinets That Have Water Damage or Mold?
You can, but you shouldn’t until you address water damage solutions and mold treatment options first; you’ll need to dry, repair or replace compromised wood, treat mold with appropriate cleaners, then prime before staining or painting.
Will Staining or Painting Affect Cabinet Odor or Off-Gassing Long-Term?
Ironically, you won’t magically erase smells; staining or painting can reduce odor absorption but won’t always stop it. You’ll cut off off gassing duration with proper primers, sealers, and ventilation, though some smells may persist.
Can I Match New Cabinet Doors to Existing Stained Cabinets?
Yes — you can match new cabinet doors, but color matching depends on wood type, stain age, and finish; you’ll want sample pieces, adjust stain formulas, and possibly refinish both for the closest, consistent result.
How Do Animated/Contrasting Cabinet Finishes Affect Perceived Kitchen Size?
Contrasting finishes make kitchens feel larger or cozier: you’ll use animated accents to add visual depth and energy, while lighter, uniform tones expand space; color psychology guides whether contrast energizes or visually tightens your room.
Are There Salvage Options for Warped or Delaminated Cabinet Doors?
Yes — you can often salvage them: you’ll use cabinet repair and restoration techniques like reglue, clamp, veneer replacement, or splines, ensuring material compatibility to preserve finish longevity; sometimes full replacement’s still the better option.
Conclusion
You’ve weighed look, cost, durability and effort—now decide. If you want wood grain and depth, stain preserves character; if you want color flexibility and a uniform finish, paint wins. Match finish to cabinet material, budget, and how long you’ll keep the kitchen. Don’t forget time and tools: staining’s quicker for pros, painting gives DIY-friendly forgiveness. Like choosing a flavor, pick the finish that satisfies your style appetite and lifestyle needs.