How Paint Outside House: Exterior Painting Step-By-Step Guide
You’ll get a durable, professional exterior finish by inspecting and repairing siding, cleaning surfaces, and protecting landscaping and trim before you paint. Prime raw wood or patched spots and caulk gaps for a smooth seal. Use proper tools—brushes for trim, rollers or sprayers for broad areas—and work top to bottom in suitable weather, watching temperature and humidity for drying and recoats. Clean and store tools, dispose of leftover paint responsibly, and you’ll learn step-by-step tips if you keep going.
What This Exterior Painting Guide Covers
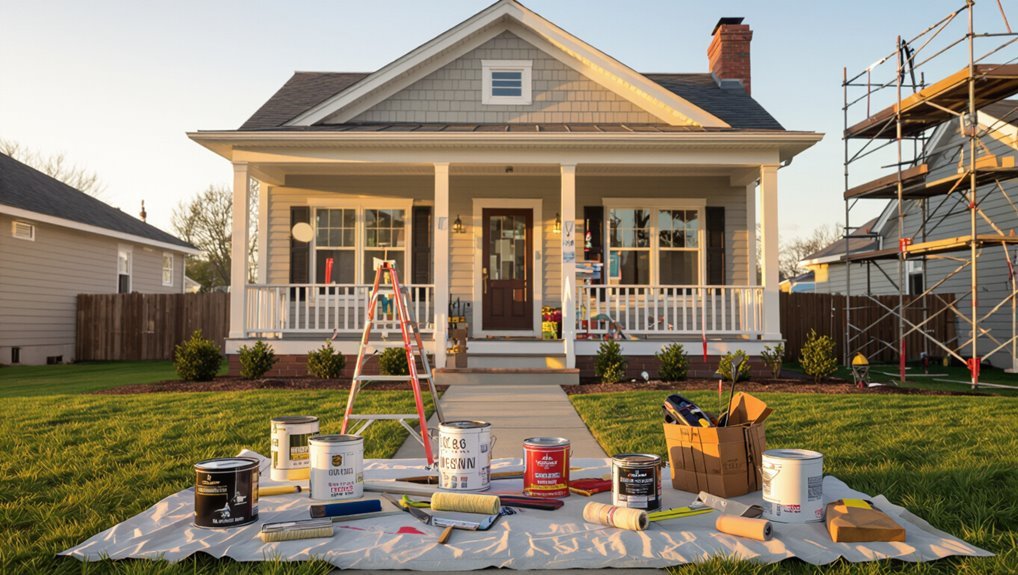
Before you pick up a brush, this guide will walk you through every step you need to paint your home’s exterior—from planning and surface prep to choosing paint, tools, and application techniques—so you can get professional-looking results.
You’ll learn to assess surfaces, follow safety basics, pick durable finishes, leverage exterior trends, apply proper techniques, and use color psychology to choose hues that boost curb appeal and match your home’s style.
Quick Start: Exterior Paint Workflow
Start by protecting landscaping, windows, and trim so you won’t have to fix mistakes later.
Then follow a clear sequence: prime any bare spots, cut in edges, and work from top to bottom with overlapping strokes.
Stick to that workflow and you’ll save time and get a more even finish.
Prep And Protection
Once you’ve cleared loose debris and fixed obvious damage, set up protection and prep zones so paint goes only where you want it.
Tape trim, cover plants and walkways with drop cloths, and seal vents.
Start surface cleaning—wash, rinse, and let dry.
Prime exposed wood or patched areas and apply protective coatings to metal and concrete before you begin painting.
Paint Application Sequence
Choose an efficient sequence and stick to it: work top-to-bottom and dry-side-to-wet-side so drips land on unpainted areas you’ll cover anyway.
Start with eaves and trim, then siding, finishing with doors and shutters.
Use proper paint roller techniques for broad areas, matching nap to surface texture.
Cut in edges first, roll large fields, blend wet edges, and maintain a steady pace for even coverage.
When to Paint Your House Exterior
You’ll get the best results if you paint when temperatures are steady and within the paint manufacturer’s recommended range.
Avoid painting in direct sun on very hot days or when rain or freezing temps are forecast within 24–48 hours.
Check humidity and wind too, since they affect drying time and finish.
When To Paint
If your paint is cracking, peeling, or chalking, it’s time to plan a repaint; otherwise, look for faded color, prolonged mildew, or water stains as clear signals that the exterior needs attention. Check siding, trim, and eaves regularly. Consider paint drying and humidity effects when scheduling.
| Area | Indicator |
|---|---|
| Siding | Fading |
| Trim | Peeling |
| Eaves | Mildew |
| Deck | Staining |
Weather And Temperature
After you’ve inspected for peeling, fading, and mildew, check the weather forecast and local temperature ranges before you set a painting date.
You should avoid extremes: high humidity slows curing and causes runs, while low humidity can lead to cracking.
Understand humidity effects and temperature impacts on drying times, tackiness, and adhesion so you pick consistent, moderate conditions for best results.
Set a Realistic Exterior Paint Budget (Materials + Labor)
Because exterior painting can vary widely in scope, you should start by mapping out every cost line—paint, primer, caulk, brushes/rollers, tape, scaffolding or ladder rental, and labor—so you’re not surprised mid-project.
Tally materials, factor contingencies, and get written quotes to compare labor costs.
Use budgeting tips: prioritize necessary prep, buy quality where it saves repainting, and plan payment schedules with contractors.
How Substrate and Climate Affect Paint Choice
When you pick paint, consider both the surface you’re covering and the local climate, since each determines the type, finish, and prep needed for a long-lasting job.
Assess substrate impact — wood, stucco, masonry, or vinyl demand different primers and textures.
Consider the substrate — wood, stucco, masonry or vinyl each need specific primers and textures for best results
Factor climate influence: humidity, sun, freeze-thaw cycles affect durability and drying.
Match prep and coating to those conditions.
Choosing Exterior Paint: Latex, Oil, or Elastomeric
When you pick exterior paint, weigh the pros and cons of latex, oil, and elastomeric for your surface and conditions.
Consider durability—how long the finish will last—and flexibility—whether it will crack or bridge hairline gaps as temperatures change.
Your choice should match the substrate and climate to minimize maintenance and protect your home.
Paint Type Pros/Cons
Picking the right exterior paint—latex, oil, or elastomeric—shapes how long your finish will last, how easy the job will be, and how well the surface handles weather and movement.
Choose latex for easy cleanup and breathability; oil for glossy durability and stain blocking; elastomeric for heavy sealing.
Consider eco friendly options and color psychology when matching finish, maintenance, and environmental goals.
Durability And Flexibility
Durability matters most where your home meets the weather, and flexibility keeps paint from cracking as wood, stucco, or trim expand and contract.
You should choose materials balancing paint longevity with flexible finishes so surfaces move without failure.
- Latex: good flexibility, easy cleanup.
- Oil: hard wearing, less give.
- Elastomeric: maximum elasticity, seals cracks.
Picking Finishes for Siding, Trim, and Doors
Choosing the right finishes for siding, trim, and doors sets the tone for your home’s curb appeal and its long-term protection.
Choose paint finish options based on exposure: satin or eggshell for siding, semi-gloss for trim and doors for durability and easy cleaning.
Factor in color coordination so contrasts highlight architectural details, and pick finishes that resist mildew and fading for your climate.
Selecting Exterior Paint Colors That Boost Curb Appeal
How do you pick exterior paint colors that actually lift curb appeal while fitting your neighborhood and style?
Use color psychology to match mood—warm neutrals for welcoming, cool tones for modern calm. Consider seasonal trends to guarantee year‑round appeal.
- Test samples on different walls.
- Coordinate trim and accent contrasts.
- Respect neighborhood context and HOA rules.
Calculate How Much Paint and Primer You’ll Need
Start by measuring the exterior surface area you’ll paint so you can calculate how many gallons of primer and paint you’ll actually need.
Divide total square footage by coverage per gallon on the can to get paint quantity, then add 10–15% for waste and texture.
Choose primer types (stain-blocking, bonding, or oil/latex) based on substrate to guarantee proper adhesion.
Safety Gear and Ladder Setup for Exterior Painting
Before you climb, gear up for protection and set your ladder right—this keeps you safe and lets you work efficiently.
Before climbing, gear up and position your ladder correctly — stay protected and work efficiently.
Wear PPE from a concise gear checklist, inspect ladder feet, and angle it 4:1. Follow ladder safety rules, secure the top, and avoid overreaching.
- Hard hat, gloves, eye protection
- Stable footing, level ground
- Tie-off or spotter for tall work
Tools and Equipment for Exterior Painting
You’ll need the right painting tools—brushes, rollers, sprayers—and quality paint to get a smooth, lasting finish.
Don’t forget safety and access gear like ladders, harnesses, and stable scaffolding to work confidently at height.
Prep supplies—scrapers, sandpaper, caulk, and cleaners—make the surface ready so your paint sticks and lasts.
Essential Painting Tools
Gather the right tools and you’ll save time, get a cleaner finish, and avoid frustrating mistakes when painting your home’s exterior.
Choose brushes and rollers that suit paint finishes and follow color trends for samples. You’ll also need quality primers, caulk, and trays.
Markdown list:
- Angled sash brush for trim and touch-ups
- 9″ roller and extension pole for broad coverage
- Primer, caulk, trays
Safety And Access Equipment
Now that you’ve got the right brushes, rollers, and primers, it’s time to focus on safety and access equipment so you can reach high areas and work securely.
Use stable extension ladders, scaffold systems, and harnesses; practice strict ladder safety and secure footing.
Perform a pre-use equipment inspection, replace damaged parts, wear gloves and eye protection, and keep tools tethered to prevent drops.
Surface Preparation Supplies
Before you start painting, get the right surface-prep tools so paint will adhere and last: You’ll need supplies for surface cleaning techniques and a careful substrate assessment to guarantee adhesion.
Use these essentials:
- Pressure washer, scrub brushes, and cleaners for removing dirt, mildew, and loose paint.
- Scrapers, sanding blocks, and power sanders for feathering edges and rough spots.
- Fillers, primers, and corrosion inhibitors matched to the substrate.
Inspect Siding for Rot, Cracks, and Peeling
Walk the perimeter of your house and scan the siding closely for soft spots, cracks, bubbling paint, or areas where boards have pulled away—these are signs of rot or moisture damage that you’ll need to address before painting.
Probe suspicious areas, note affected siding materials, and mark repairs. Fixing rot and sealing gaps preserves structural integrity and improves paint longevity, preventing premature failure.
Remove Loose Paint and Prepare Old Surfaces
Start by scraping away any loose paint with a sturdy scraper or wire brush so new coats will stick.
Then sand the edges smooth and wipe surfaces clean to remove dust and debris.
If mildew or dirt remains, wash the area and let it dry before priming.
Scrape Loose Paint
Tackle loose, flaking paint with a sturdy scraper or wire brush so new finish will adhere properly; you should remove all peeling areas, feather the edges to smooth changes, and sand glossy spots to dull them.
Use proper paint removal techniques and surface preparation tips to prevent future failures.
- Scrape to sound substrate.
- Chip out blisters fully.
- Clean debris before priming.
Sand And Clean
After you’ve removed loose paint and smoothed edges, sand the surface to remove remaining flakes and dull any glossy areas so new primer will bond.
Use appropriate sanding techniques—orbital for large areas, hand or detail pads for trim.
Follow with cleaning methods: brush off dust, then wash with mild detergent or TSP substitute and rinse.
Let dry completely before priming and painting.
Cleaning Siding: Pressure Washing and Mildew Removal
Before you paint, thoroughly clean the siding with a pressure washer and treat any mildew so the paint will adhere and last.
Before painting, pressure-wash and treat mildew on siding so the new paint will adhere and last.
You’ll inspect for mildew identification, use proper pressure techniques, and protect plants. Work top-to-bottom, rinsing thoroughly and letting surfaces dry before priming.
- Use low-pressure to avoid damage.
- Apply a mildew remover per label.
- Rinse and dry completely before painting.
Repairing Wood, Stucco, Vinyl, and Fiber Cement
When you find damaged siding, assess the material and repair it promptly to prevent moisture and pests from causing bigger problems.
For wood restoration, remove rot, treat and prime before painting.
Use stucco sealing to patch cracks and prevent water intrusion.
Follow vinyl maintenance: clean, secure loose panels, and replace warped sections.
For fiber cement, repair chips, fill joints, and prime before finishing.
Fix Trim, Caulk Gaps, and Replace Damaged Boards
1 clear, tight trim line makes your whole paint job look finished, so start by inspecting and fixing any loose or damaged trim, caulking gaps, and swapping out boards that won’t hold paint.
You’ll do trim repair and gap sealing before painting to guarantee durability and clean edges.
- Remove rotten boards cleanly.
- Use backer rod, then caulk.
- Secure trim with corrosion-resistant fasteners.
When to Prime and Which Primer to Use
You’ll want to prime whenever you’ve exposed bare wood, repaired siding, or are switching from oil- to latex-based paint.
Pick a primer formulated for the substrate—wood, metal, or masonry—and for the job, like stain-blocking or rust-inhibiting.
Using the right primer now will improve adhesion and extend the life of your topcoat.
When To Prime
Although painting might look straightforward, priming first can save you time and money by ensuring better adhesion, uniform color, and longer-lasting results.
You should prime when surfaces are bare, patched, or stained, and when switching between paint sheens or colors.
Primer types and priming benefits matter, but save specific selection for the next section.
- Bare wood
- Repairs/stains
- Sheen or color changes
Choosing The Right Primer
Now that you know when to prime, choosing the right primer comes down to matching the primer to the surface and the job.
You’ll pick primer types for wood, metal, masonry, or previously painted surfaces. Consider primer benefits like adhesion, stain blocking, and moisture resistance.
Use oil-based for tannin bleed, latex for ease and compatibility, and specialty primers for rust or efflorescence.
Masking, Covering Landscaping, and Protecting Windows
Before you start painting, take time to mask trim, cover plants, and protect windows so you don’t create extra work or cause damage later.
Use proper masking techniques and prioritize landscaping protection. Seal gaps, tape glass, and lay drop cloths.
Follow this checklist:
- Tape and plastic for windows.
- Drop cloths over shrubs and paths.
- Mask trim and vents securely.
Brush and Roller Techniques for Clean Cut‑Ins
Start by loading your brush correctly and working steadily along edges so you get a sharp line without smears.
Use brush techniques for corners and trim, keeping a slightly damp brush for smooth strokes.
For corners and trim, use brush techniques and keep the brush slightly damp for smooth, controlled strokes
Follow with roller techniques, feathering the roller toward the cut to blend.
For clean cut ins, pause to check edge precision and touch up any gaps before the paint skins.
Use a Paint Sprayer Outside: Setup and Technique
Once you’ve finished crisp cut‑ins with a brush and roller, a paint sprayer can speed up large flat areas while preserving those sharp edges if you mask carefully.
You’ll set PSI, choose nozzle, and test spray patterns; follow paint sprayer tips and regular sprayer maintenance to avoid clogs.
- Adjust pressure and overlap.
- Keep consistent distance.
- Clean immediately after use.
How to Paint Siding Step‑by‑Step
Before you grab paint, you’ll want to prep the siding and make any surface repairs so the finish sticks and looks smooth.
Then prime, caulk gaps, and choose the right mix of brushing, rolling, and spraying to match the siding profile.
I’ll walk you through each step so you can finish efficiently and cleanly.
Prep And Surface Repair
Gather the right tools and inspect your siding thoroughly so you can fix damage and create a clean, sound surface for paint.
You’ll tackle surface cleaning and use proven repair techniques to remove mildew, loose paint, and rot.
Follow steps to prepare edges, replace damaged boards, and sand for adhesion.
- Clean
- Repair
- Sand
Priming And Caulking
With the surface cleaned, repaired, and sanded, you’re ready to seal and prep for paint: priming fills minor imperfections and promotes adhesion, while caulking closes gaps to prevent moisture intrusion and give you sharp lines. Use proper Priming techniques and follow Caulking tips for durable results.
| Confidence | Calm |
|---|---|
| Secure | Relief |
| Pride | Finish |
Brush, Roll, Spray Techniques
Start by choosing the right tool for each surface: use a brush for trim and corners, a roller for broad, flat siding, and a sprayer for large, unobstructed areas.
You’ll use brush techniques for edges, roll application for even coverage, and spray advantages for speed while avoiding drips and controlling texture effects and blending colors.
- Prep
- Technique
- Finish
Painting Trim, Fascia, Gutters, and Doors Neatly
Focus on crisp edges and steady strokes when painting trim, fascia, gutters, and doors—you’ll make the whole house look sharper.
Use quality brushes for trim painting, cut in before rolling large panels, and apply fascia techniques to avoid drips. Clean and prime gutters for lasting gutter care.
For door finishing, sand, mask hardware, and paint in smooth, overlapping passes for an even coat.
Manage Drying, Recoats, and Paint Failures
If paint’s still tacky hours after you thought it was dry, don’t rush the next coat—humidity, temperature, and film thickness all change drying times, so check the can’s instructions and test a small area before you recoat.
Plan paint application, monitor drying time, and address failures quickly:
Plan paint application, monitor drying times closely, and address failures promptly to ensure a smooth, lasting finish.
- Sand and clean blisters before recoating.
- Wait full cure per label.
- Thin heavy coats to prevent runs.
Weatherproof Joints and Add Protective Topcoats
Once your coats are cured and any failures are fixed, make sure joints and seams are sealed so water can’t get behind the paint. You’ll use weatherproofing techniques like back-rolling caulk and flashing, then apply protective coatings on trim and exposed wood. Choose UV-resistant topcoats and recoat as manufacturer suggests.
| Item | Purpose |
|---|---|
| Caulk | Seal joints |
| Topcoat | Protect finish |
Cleanup, Tool Care, and Proper Paint Disposal
Before you put away your ladder, gather leftover paint, brushes, rollers, drop cloths, and any fast-drying spills so cleanup doesn’t turn into a bigger job later.
Use proper cleanup techniques, tool maintenance, and environmentally safe, proper disposal. Follow these steps:
- Rinse and reshape tools; store dry.
- Seal leftover paint; label and date.
- Dispose at hazardous-waste or paint-recycling sites.
When to Hire a Pro and Maintenance Schedule
When a job’s scope, height, or your schedule puts safety or finish quality at risk, hire a pro—you’ll save time and avoid costly mistakes.
Get a professional assessment for structural issues, siding damage, or complex prep.
After painting, create an ongoing maintenance plan: inspect annually, touch up chips, clean gutters, and repaint trim every 5–7 years to protect surfaces and preserve curb appeal.
Frequently Asked Questions
Can I Paint Over Lead-Based Exterior Paint Safely Myself?
You can’t safely paint over lead-based exterior paint without precautions; you’ll need lead paint safety measures and DIY precautions like testing, sealing intact paint, using HEPA containment, protective gear, and following local regulations or hiring certified pros.
How Do I Avoid Paint Fumes Affecting Indoor Air Quality?
Think of fresh air as a river washing fumes away: you’ll use fume reduction methods and ventilation techniques, seal gaps, run exhaust fans, open windows crosswise, schedule work on breezy days, and wear a respirator when needed.
What Permits Are Needed for Exterior Color Changes in Historic Districts?
You’ll need historic preservation review and a color approval permit from the local historic commission or preservation board; you’ll submit paint samples, application forms, and possibly attend a public hearing before getting formal approval to change exterior colors.
Can Exterior Paint Alter Home Energy Efficiency or Insulation?
Yes, it can: lighter color selection reflects heat, darker colors absorb warmth, and durable coatings improve longevity and seal gaps; you’ll reduce cooling loads, slow wear, and modestly affect energy efficiency while not replacing insulation entirely.
How Long Before I Can Park Vehicles Near Freshly Painted Siding?
You can park vehicles about 24–48 hours after painting, depending on drying time, temperature, and humidity; wait at least 48–72 hours for vehicle placement near freshly painted siding if conditions are cool or humid to avoid damage.
Conclusion
You’ve got the guidance to get going: pick proper products, plan patiently for paint-friendly weather, and prep surfaces with precision. Stick to sensible schedules, spend smartly on supplies or skilled help, and seal seams to sidestep seepage. Maintain tools, manage mess, and monitor for minor mishaps before they magnify. With steady seasonable upkeep and sound surface science, your sturdy, stylish siding will stay splash-resistant and smart for seasons to come.