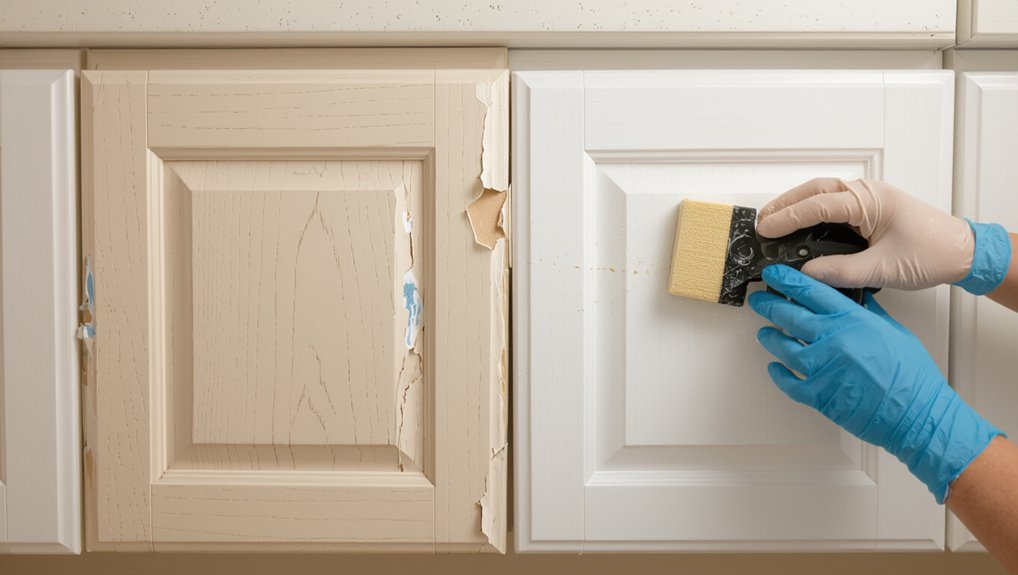
How to Paint Laminate Cabinets That Are Peeling Correctly
You can save peeling laminate cabinets by removing loose veneer, repairing the substrate, and using products that actually stick. Label and remove doors, heat and pry up loose laminate, fill gouges, sand smooth, then clean thoroughly. Prime with a high-bonding primer made for slick surfaces and finish with a durable enamel or two-part topcoat applied with a roller or sprayer. Let everything fully cure before rehanging, and keep going to learn step-by-step tips and troubleshooting.
Search Intent and Best Format
What’re people really looking for when they search “how to paint laminate cabinets”?
You want clear search intent: whether it’s a quick fix, step-by-step guide, or troubleshooting peeling edges.
Match content format to that intent—checklist, short video, or detailed tutorial—so readers get the practical steps, required materials, and time estimates they need to decide and act confidently.
Quick Answer: Can You Paint Peeling Laminate Cabinets?
Yes—you can, but first you need to assess the surface damage to see if the laminate is peeling, bubbled, or just scratched.
You’ll have to strip loose material, sand and clean thoroughly, and repair any edges so paint will adhere.
Finally, use a paint system made for laminate—bonding primer plus a durable topcoat—to get a long-lasting finish.
Assess Surface Damage
If your laminate is peeling, you can often still paint the cabinets—but first you need to assess how severe the damage is.
Check damage indicators and note laminate types to decide repairability.
Then evaluate:
- Peeling extent (small edge vs large panels)
- Surface adhesion (soft or brittle)
- Water or substrate damage
- Structural integrity of cabinet core
Decide repair or replacement from these findings.
Proper Surface Preparation
1 clear prep step will determine whether you can successfully paint peeling laminate cabinets: remove loose laminate, clean the surface, and sand or fill any damaged areas so paint can bond.
You’ll use proper sanding techniques to scuff glossy areas and feather edges.
Degrease, repair chips with filler, then choose primer options suited to laminate.
Let each stage dry fully before proceeding.
Use Suitable Paint System
Choose a paint system that matches the condition of your cabinets and the level of durability you need: for peeling laminate you’ll typically want to strip loose material, prime with a high-bonding primer made for slick surfaces, then use a durable topcoat like a water-based acrylic enamel or a two-part epoxy for heavy wear.
You should:
- Assess laminate types.
- Test paint adhesion.
- Select primer.
- Pick topcoat.
Repair vs. Replace Laminate Doors
When you’re deciding whether to repair or replace laminate doors, weigh the condition, cost, and your long-term goals: minor chips, loose edges, or worn hinges usually justify repairs, while severe warping, deep gouges, or outdated styles often call for replacement. Use repair strategies for small fixes; choose replacement options for structural or aesthetic overhaul.
| Visual | Task | Outcome |
|---|---|---|
| Chip | Fill | Smooth |
| Warp | Replace | Stable |
| Scratch | Sand | Invisible |
What Peeling Says About Adhesion Failures
When paint or laminate starts peeling, it tells you the surface bond has broken down and the coating isn’t sticking like it should.
You’ll want to check for moisture or temperature swings that weakened adhesion and for incompatible primers or paints that won’t bond to the substrate.
Understanding these causes helps you choose the right prep and coatings so peeling won’t come back.
Surface Bond Breakdown
Peeling paint is the clearest sign that the bond between your finish and the laminate’s surface has failed. It tells you exactly where adhesion was weakest—at edges, corners, or areas that weren’t properly cleaned or primed.
You need to assess surface adhesion, correct substrate issues, and focus on peeling prevention:
- Clean thoroughly
- Sand key areas
- Use proper primer
- Recoat correctly
Moisture And Temperature
High humidity and wide temperature swings are common culprits when paint lifts from laminate, and they tell you the finish couldn’t flex or breathe with the substrate. You should improve moisture control and limit temperature fluctuations before refinishing; stabilize conditions, repair peeled areas, and use proper primers for adhesion.
| Issue | Action |
|---|---|
| High humidity | Dehumidify |
| Cold snap | Stabilize |
| Rapid heat | Gradual change |
| Recurrent peeling | Investigate source |
Coating Compatibility Issues
Because different coatings interact chemically and mechanically, peeling often points to a compatibility problem rather than just surface prep or moisture.
You need to diagnose coating adhesion failures and address paint compatibility before recoating.
Check these steps:
- Identify previous finish type.
- Test adhesion with tape.
- Use compatible primer.
- Sand and clean for mechanical grip.
Tools and Materials Checklist
Before you begin, gather the right tools and materials so the job goes smoothly: sandpaper and a sanding block, a deglosser or TSP, quality primer for laminate, paint (acrylic enamel or water-based cabinet paint), brushes and foam rollers, tack cloths, painter’s tape, drop cloths, screwdrivers, and safety gear like gloves and a respirator. Use correct tool types and guarantee material quality.
| Tools | Materials |
|---|---|
| Sanding block | Primer |
| Foam roller | Paint |
| Respirator | Tack cloth |
Choosing the Right Primer for Laminate
Picking the right primer is the single most important step to getting paint to stick to laminate, so choose one formulated for nonporous surfaces or labeled for laminates, melamine, or PVC.
You’ll compare primer types, prep surfaces, and plan primer application. Follow this concise checklist:
- Bonding primer
- Shellac-based
- Oil-based
- Water-based adhesion
Best Paint Types for Durability and Washability
When you want cabinets that stand up to daily use and clean easily, choose paints formulated for durability and washability—semi-gloss or satin acrylic latex and water-based enamel are your best bets because they resist scuffs, wipe clean, and hold up to moisture.
Pick durable finishes labeled for trim or cabinets, consider washability factors like solvent resistance and abrasion ratings, and test a small area first.
Sandpaper Grits: Which to Use and Why
Start by picking the right grit for stripping—coarser papers (60–120) remove old finish faster, while finer grits reduce gouging.
Then follow a grit sequence when finishing, moving progressively from medium to fine (150→220→320) to create a smooth, paint-ready surface.
You’ll get better adhesion and a more professional result when you match grit to the task and don’t skip steps.
Choosing Grit For Stripping
Choosing the right sandpaper grit makes stripping laminate efficient and prevents damage to the substrate, so you’ll want to match grit coarseness to how much finish and glue you need to remove.
Use grit selection and proven stripping techniques:
- 40–60 for heavy adhesive
- 80–120 for surface finish
- 150+ only to clean edges
- Test first, adjust grit as needed
Grit Sequence For Finishing
Because a smooth, durable finish depends on progressively finer abrasives, you’ll follow a clear grit sequence to remove scratches left by coarser papers and prepare the surface for primer and paint. Use 120–150 to level, 220 to refine, 320–400 to finish. Balance grit selection with proper sanding techniques for adhesion and sheen control.
| Step | Grit | Purpose |
|---|---|---|
| 1 | 120–150 | Level |
| 2 | 220 | Refine |
| 3 | 320–400 | Finish |
How to Remove Doors, Hardware, and Hinges Safely
Carefully remove cabinet doors, hardware, and hinges to protect the finish and make painting easier: work one door at a time, unscrew hinges while supporting the door with one hand, place screws and small parts into labeled bags, and set doors on a padded surface to avoid scratches.
Follow these steps for door removal and hinge safety:
- Wear gloves.
- Use proper screwdriver.
- Support door weight.
- Store parts securely.
Labeling Doors and Hinges for Easy Reassembly
Label each door and its matching hinge with a number so you can reinstall them exactly where they came from.
Put the number on the back of the door and on the hinge plate, and keep loose screws in labeled bags.
This simple system saves time and prevents misaligned doors later.
Numbering Doors And Hinges
Before you remove a single hinge, mark each door and its corresponding cabinet opening so you can put everything back exactly where it came from.
Use clear labeling strategies and note hinge alignment. Number doors and hinge plates with matching codes so reassembly is fast.
- Door#
- Hinge#
- Orientation
- Mounting location
Match Hardware To Location
Match each hinge and screw to its exact door and cabinet opening as you remove them so reassembly takes seconds, not hours.
Label small bags or tape with numbers and brief notes about hardware styles and location factors like door size or corner placement.
Keep matching sketches or photos with each bag. This prevents mistakes, saves time, and preserves alignment when you reinstall doors.
Stripping Loose Laminate Without Damaging the Substrate
If the laminate is already lifting, you’ll want to remove it carefully so you don’t gouge or delaminate the wood beneath.
You’ll handle peeling laminate with patience, prioritizing substrate protection.
Follow steps:
- Score edge with utility blade.
- Heat adhesive lightly.
- Pry with thin putty knife.
- Sand remaining glue gently.
Check for damage and repair before priming.
Cleaning Grease, Grime, and Silicone Residues
Before you prime, you’ll need to remove surface grease with a degreasing cleaner so paint will stick.
Use a solvent or specialty silicone remover to dissolve any silicone residue left from seals or caulk.
Rinse the cabinets well and dry them thoroughly to prevent adhesion problems.
Remove Surface Grease
Scrub the cabinets with a degreasing cleaner to remove cooking oils, fingerprints, and old silicone residues so paint will adhere properly.
You’ll focus on grease removal and surface cleaning before sanding. Work methodically, then rinse and dry.
- Test cleaner on hidden spot
- Use microfiber cloths
- Apply moderate scrubbing pressure
- Rinse thoroughly and let dry
Dissolve Silicone Residue
Soften stubborn silicone residue by applying a solvent designed to break down silicone sealant—like mineral spirits, denatured alcohol, or a commercial silicone remover—and let it sit according to the product directions so the residue loosens for easy removal.
Use gentle scrubbing with a plastic scraper while testing silicone removal techniques; keep an adhesive breakdown analysis in mind to guarantee residue is gone before proceeding.
Rinse And Dry Thoroughly
Once the silicone residue’s gone, rinse the cabinets thoroughly to remove any solvent, loosened grime, and detergent residues that can interfere with paint adhesion.
Use proper rinse techniques and effective drying methods so paint bonds well.
- Flush with clean water
- Wipe with microfiber
- Air-dry in ventilated room
- Finish with low-heat fan
Chemical Deglossers vs. Sanding: When to Use Each
When you’re deciding between a chemical deglosser and sanding, think about the finish, time, and mess each method brings: deglossers dissolve the sheen quickly with minimal dust, while sanding gives stronger mechanical adhesion but takes more effort and creates grit.
You’ll weigh chemical reactions affecting primers and the desired surface finish; choose deglossers for speed, sand for durability and bonding.
Repairing Chips, Gouges, and Delamination Edges
Before you start painting, inspect each door and drawer to assess the extent of chips, gouges, and any delaminating edges so you know what needs repair.
Clean the damaged areas, scrape loose laminate, and sand just enough to roughen the surface for adhesion.
Fill gaps and gouges with a lightweight wood filler or two-part epoxy, sand smooth once cured, and feather the repair into the surrounding laminate.
Assess Damage Extent
Start by carefully inspecting each door and drawer face to identify chips, gouges, and any edges where the laminate is lifting. You’ll want to note size, location, and whether the substrate is exposed.
Then record damage types and match repair methods accordingly:
- Small chips
- Shallow gouges
- Delaminated edges
- Exposed substrate
Prioritize repairs by severity and frequency.
Prep And Fill Areas
Now that you’ve cataloged the damage, tackle each issue by prepping and filling the affected areas so the surface will accept paint evenly. Use cleaning techniques, assess damage assessment points, sand edges, and apply filler for filling gaps and laminate repair. Verify surface preparation, surface priming, and paint compatibility for proper adhesion.
| Task | Tip |
|---|---|
| Clean | Remove grease |
| Sand | Feather edges |
| Fill | Match depth |
| Prime | Use bonding primer |
| Check | Test compatibility |
Filling Gaps and Seams on Cabinet Faces
Gaps and seams on cabinet faces can trap paint and make your finish look unprofessional, so you’ll want to seal them before priming.
Use gap filling and seam sealing to create smooth faces.
Steps:
- Clean and dry surfaces.
- Backfill deep gaps.
- Apply paintable caulk for seams.
- Sand lightly after cure, then wipe clean and prime.
Feathering Edges for a Seamless Paint Transition
With seams filled and surfaces primed, you’ll want to blend the new paint into the old surfaces so brush or roller marks don’t show. Use light, overlapping strokes and taper pressure to create feathering techniques for seamless shifts. Smooth edges with a damp brush or fine sanding between coats; inspect and repeat until uniform.
| Action | Tip |
|---|---|
| Stroke | Overlap lightly |
| Finish | Sand/damp brush |
Brush vs. Roller vs. Sprayer: When to Use Each
Curious which tool will give you the smoothest, most durable finish? You’ll choose based on scale, detail, and desired finish quality.
Consider:
- Brush techniques — best for edges and trim.
- Roller application — fast for flat door fronts.
- Sprayer advantages — ultra-smooth, professional look.
- Combination — mix tools to balance speed, control, and durability.
Brush and Roller Techniques That Avoid Marks
When you want a smooth, professional-looking finish on laminate cabinets, choosing the right brush and roller techniques prevents visible strokes and lap marks.
You’ll use flowing brush techniques along edges, a high-density foam roller for smooth finishes, and work in wet edges for even paint application.
Focus on mark prevention, texture control, avoiding streaks, and respecting drying times to blend coats seamlessly.
Spraying Cabinets for a Factory-Like Finish
Spray your cabinets to get the smooth, factory-like finish that brushes and rollers can’t match: proper spraying lays down an even, thin coat that reduces brush marks, orange peel, and lap lines.
Spray your cabinets for a smooth, factory-like finish—thin, even coats reduce brush marks, orange peel, and lap lines.
Use correct spray techniques to control finish consistency and avoid runs.
- Clean
- Mask
- Thin
- Test spray
Applying Primer for Maximum Adhesion
Before you lay down any topcoat, apply a high-quality primer formulated for laminate so the paint will stick and resist peeling; this is the step that turns slick, nonporous surfaces into a reliably bondable base.
You’ll prep by cleaning, sanding lightly, and choosing primer types suited to laminate. Use adhesion techniques like tack cloths and light abrasion to guarantee consistent, lasting primer grip before painting.
How Many Primer Coats Do You Need?
Start by checking how well the existing finish and any sanding hold primer—if the primer beads up or flakes, you’ll need more attention.
For most well-prepped laminate, one to two coats of bonding primer are enough, but rough or stained surfaces may require an extra coat.
You’ll know to add layers when coverage is uneven or adhesion feels weak after drying.
Assess Surface Adhesion
If your laminate feels smooth and glossy, you’ll need a bonding primer to guarantee paint sticks. Dull or lightly textured laminate may only need one coat, but very slick or previously waxed surfaces often require two.
Do adhesion testing and surface evaluation before priming. Follow these steps:
- Clean thoroughly
- Sand light
- Tape 1″ test
- Wait 24 hours
Determine Primer Layers
Once your adhesion test and primer coat(s) have had time to set, decide how many primer layers you’ll need based on surface condition and the primer’s coverage.
If adhesion tests showed weak spots, add a full additional coat. For uniform, porous laminate, one or two coats of high-build primer types usually suffice.
Let each coat dry fully before light sanding and re-evaluating coverage.
Sanding Between Coats Without Ruining the Finish
When you’re sanding between coats, work gently and deliberately to knock down dust nibs and tiny imperfections without cutting through the new finish.
Sand gently and deliberately between coats to smooth dust nibs and tiny flaws without cutting through the finish.
Use light pressure and fine grit for sanding techniques that aid finish preservation.
Follow these steps:
- Wait full cure time.
- Use 220–320 grit.
- Sand with a block.
- Clean residue completely.
Choosing Paint Sheen to Hide Imperfections
After you’ve smoothed and cleaned each coat, pick a sheen that helps mask remaining flaws instead of spotlighting them.
You’ll favor lower sheens—eggshell or satin—for better imperfection concealment because they scatter light and hide texture.
Matte can hide even more but may mar easily.
Consider durability needs, surface traffic, and sheen selection to balance appearance and practicality without overemphasizing bumps.
Applying Topcoat for Long-Term Durability
To keep your painted laminate cabinets lasting for years, pick a hard-wearing topcoat like a water-based polyurethane or acrylic lacquer.
Apply it in thin, even coats with a high-quality brush or foam applicator, sanding lightly between coats for adhesion.
Aim for two to three coats and let each cure fully before regular use.
Choose Durable Topcoat
A durable topcoat is what protects your newly painted laminate cabinets from chips, stains, and everyday wear, so pick one that matches the finish and traffic level of the room.
Choose among durable finishes and topcoat options that fit use and look. Consider:
- Waterborne polyurethane
- Oil-based polyurethane
- Acrylic enamel
- Conversion varnish
Proper Application Technique
Begin by working in a clean, well-ventilated space and setting the cabinets on sawhorses or a protected work surface so you can reach every edge. Use proper brush techniques and thin, even passes; avoid overworking. Aim for ideal paint thickness. Let coats cure between light sandings.
| Step | Action |
|---|---|
| 1 | Brush thin coats |
| 2 | Sand between coats |
| 3 | Final cure time |
Curing Painted Laminate Before Reinstallation
Once your paint feels dry to the touch, don’t rush reinstallation—proper curing makes the finish durable and scratch-resistant.
Use recommended curing techniques and respect manufacturer drying times. Follow these steps before handling:
- Wait full curing period.
- Keep cabinets ventilated.
- Avoid humidity and contact.
- Test edges gently.
Curing guarantees adhesion and longevity; patience prevents damage.
Reinstalling Doors and Adjusting Hardware
Reattach the doors carefully, starting with hinges and working one cabinet at a time so you can fine-tune alignment as you go.
Use hinge adjustments to level each door, checking gaps and ensuring smooth swings.
Adjust each hinge to level doors, inspect gaps, and ensure smooth, snag-free swings for perfect alignment.
Tighten screws gradually, replace stripped hardware, and test latches.
Adjust strike plates or knobs as needed for perfect door alignment and consistent, snag-free operation.
Protecting Painted Laminate Edges From Chipping
1 simple step to extend the life of your newly painted laminate cabinets is to protect the exposed edges where chips most often start.
You’ll use edge protection and focused chipping prevention techniques:
- Sand edges smooth
- Apply bonding primer
- Seal with flexible topcoat
- Add clear edge trim
These steps reduce impact damage and keep paint intact.
Everyday Maintenance for Painted Laminate Cabinets
Daily care keeps your painted laminate cabinets looking sharp and prevents small issues from becoming big repairs.
Wipe spills immediately with a soft cloth and mild cleaner; avoid abrasive pads. Use recommended cleaning techniques and dry surfaces to protect finish.
Check hinges and hardware periodically, tighten loose screws, and apply simple maintenance tips like gentle cleaners and prompt touch-ups to extend lifespan.
Common Mistakes That Cause Peeling: And How to Avoid Them
If paint’s flaking off your laminate cabinets, it usually stems from skipped prep, wrong products, or rushed application — and you can prevent most of it by doing a few key things right.
- Clean and sand to fix surface issues and avoid adhesion problems.
- Use appropriate primers to reduce paint failures.
- Consider environmental factors when painting.
- Follow repair techniques, maintenance tips, and cost analysis.
Temperature and Humidity: Effects on Adhesion and Drying
Because paint chemistry and surface moisture interact, the temperature and humidity in the room play a big role in how well paint sticks and how fast it dries. You’ll monitor temperature impacts and humidity effects to prevent adhesion concerns and control drying times. Environmental factors determine ideal conditions; preparation importance guarantees predictable paint behavior.
| Factor | Tip |
|---|---|
| Temperature | 65–75°F |
| Humidity | 40–50% |
| Prep | Clean, sand, prime |
Troubleshooting Bubbling, Cracking, or Flaking
Even with proper temperature, humidity, and prep, you can still run into bubbling, cracking, or flaking—so you’ll want to spot and address these problems early.
- Inspect for adhesion problems and peeling causes affecting surface integrity.
- Sand and clean to prevent bubbling issues and limit paint failures.
- Use primers and flexible topcoats as cracking solutions.
- Follow flaking prevention steps for lasting laminate restoration.
Fixing Small Chips and Touch-Ups
Before you grab a brush, assess the damage to see whether you’re dealing with tiny surface nicks or deeper chips that need filler.
For hairline scratches and small chips, you’ll want seamless touch-up techniques like matching paint or stain with a fine brush or color-matched marker.
Work in thin layers and feather the edges so repairs blend into the surrounding finish.
Assess Damage First
Start by walking the cabinets and inspecting every surface and edge for chips, scratches, and peeling laminate so you know exactly what needs repair.
You’ll do a damage assessment, note peeling causes, and prioritize fixes.
- Map damaged areas
- Separate loose laminate
- Measure chip sizes
- List required materials and timing
Seamless Touch-Up Techniques
Small chips and worn edges can make freshly painted laminate look unfinished, but you can fix them quickly with a few precise moves.
Lightly sand the flaw, clean debris, then apply thin filler or primer as needed.
Feather paint from the chip outward with a fine brush for seamless blending.
Let dry, then glaze or clear coat.
These touch up techniques restore a uniform finish.
Handling Widespread Delamination Mid-Project
If you notice widespread delamination mid-project, don’t panic—assess the extent quickly and decide whether to repair, strip, or replace the affected doors and drawer fronts.
Consider delamination causes and choose repair techniques suited to adhesive failure or substrate damage.
Determine why the laminate failed, then match your repair method to adhesive separation or core deterioration.
Then:
- Prioritize salvageable pieces.
- Strip loose laminate.
- Rebond or fill damaged areas.
- Replace beyond repair.
Expected Lifespan After Proper Prep and Painting
With proper prep and quality paint, your laminate cabinets can last roughly 7 to 12 years before showing major wear.
Factors like heavy use, moisture, heat, and skipping primer will shorten that lifespan, while chips, peeling, or yellowing are common signs.
You can extend durability by using gentle cleaners, avoiding abrasive tools, and touching up or resealing high‑traffic areas as needed.
Typical Lifespan Range
How long will a properly prepped and painted laminate cabinet last?
You can expect a solid cabinet lifespan depending on laminate quality and care.
Typical ranges:
- 5–7 years with budget laminate.
- 8–12 years with mid-range laminate.
- 12–20 years with high-quality laminate.
- 20+ years when you maintain finishes and avoid heavy abuse.
Factors That Shorten Life
Because even the best prep and paint can’t overcome every risk, several common factors can shave years off a laminate cabinet’s lifespan.
You’ll face peeling causes like trapped moisture, poor surface integrity, heat exposure, and abrasion.
Humidity effects accelerate glue breakdown and undermine paint adhesion.
Heavy use, chemical cleaners, and improper installation also reduce laminate longevity despite correct painting.
Maintenance To Extend Life
Keep up a simple maintenance routine and your freshly painted laminate cabinets can last many years—often 8–15 years depending on use and environment.
You should follow cabinet maintenance tips and laminate care techniques to preserve finish and prevent peeling:
- Clean gently with mild detergent.
- Wipe spills immediately.
- Use felt pads on hardware.
- Reapply touch-up paint yearly as needed.
Cost: Repainting vs. Full Cabinet Replacement
When you compare expenses, repainting laminate cabinets usually costs a fraction of full replacement, letting you refresh your kitchen for a few hundred to a couple thousand dollars instead of the several thousand replacement often demands.
Labor, materials, and cabinet condition all push the final price. You’ll weigh cost comparison, time, and disruption against durability and resale impact when considering replacement options or a refresh.
Choosing Lower-VOC Primers and Paints
Saving money on repainting makes the project appealing, but you’ll also want to limit fumes and long-term health risks—especially in a kitchen.
Choose low VOC options and eco friendly paints that bond to laminate. Prep well, then pick a primer and paint designed for slick surfaces.
Consider:
- Shellac or bonding primer
- Waterborne alkyd
- Durable acrylic latex
- Quick-cure topcoat
Matching or Updating Cabinet Colors on a Budget
If you’re on a tight budget, pick timeless, neutral hues like soft grays, warm whites, or muted blues that hide wear and pair easily with many styles.
Test small swatches against your countertops and flooring to make sure the undertones work in your light.
Sticking to a limited palette helps you coordinate with existing decor without overspending.
Budget-Friendly Color Choices
Although you might be working with a tight budget, you can still give laminate cabinets a fresh, coordinated look by choosing paint colors that either match existing tones or cleverly update them with minimal cost.
Use budget friendly palettes and cost effective finishes to refresh without overspending.
- Neutral base
- Accent door
- Two-tone contrast
- High-durability satin
Coordinating With Existing Decor
Now that you’ve picked a budget-friendly palette, you’ll want to make certain your new cabinet color works with the rest of the room.
Test swatches against fabrics, countertops, and fixtures to guarantee color palette balance.
Prioritize decor integration and style consistency—match undertones, repeat an accent hue, or choose neutrals for aesthetic harmony.
Small changes deliver big impact affordably.
Achieving Matte, Satin, and Semi-Gloss Finishes
Choosing between matte, satin, and semi-gloss comes down to how much light, durability, and surface texture you want; each sheen changes both the look and practical performance of painted laminate cabinets.
You should use matte finish techniques for low-reflective hides, satin finish tips for balance, semi-gloss applications for durability, and layering finishes to control sheen and protection:
- Matte
- Satin
- Semi-gloss
- Layering
Creating Two-Tone or Accent-Painted Laminate Cabinets
To create two-tone or accent-painted laminate cabinets, you’ll plan color placement to highlight doors, islands, or trim without overwhelming the room.
You’ll prep and prime both surfaces carefully so the paint adheres evenly and the colors stay true.
Finally, you’ll blend shifts smoothly and finish with the appropriate sheen for durability and a polished look.
Color Placement Strategy
Start by deciding whether you want a subtle contrast or a bold statement. Then map out which surfaces will carry each color—doors and drawers, island, upper cabinets, or open shelving.
Use color theory and color harmony to balance tones. Choose focal areas and keep trim neutral.
- Anchor
- Accent
- Shift
- Repeat
Prep And Priming
With your color zones mapped, shift focus to prepping the surfaces so paint will adhere and look professional. You’ll clean, sand, degloss, and prime targeted areas for two-tone or accent-painted laminate cabinets, matching primer choice to laminate types and planned paint finishes. Tape edges for crisp lines and let primer cure fully before painting.
| Task | Tip |
|---|---|
| Clean | TSP or degreaser |
| Sand | Fine-grit, scuff-sand |
| Degloss | Chemical if needed |
| Prime | Adhesion primer |
| Tape | Low-tack for edges |
Blending And Finishing
One smart way to make two-tone or accent-painted laminate cabinets pop is to balance contrast and cohesion so each color complements the room and other cabinet surfaces.
You’ll use blending techniques and careful finishing touches to unify surfaces.
Follow steps:
- Choose primary and accent colors.
- Test swatches together.
- Feather edges for smooth shifts.
- Seal with durable topcoat.
Painting Shaker-Style vs. Slab Laminate Doors
Although both door types can be transformed with paint, shaker-style and slab laminate doors require different prep and technique, and knowing which you have will save you time and give you a better finish.
You’ll sand and prime recessed Shaker design frames differently than flat Slab style panels.
Choose Paint techniques matched to Door textures and Surface patterns, pick Finish options and Color schemes, and adjust Hardware choices accordingly.
Working With Textured or Embossed Laminate
If your laminate doors have texture or an embossed pattern, you’ll need to treat them differently than smooth surfaces to get an even, lasting finish.
You’ll face adhesion challenges, so sand gently, clean thoroughly, and use primer suited for textured finishes.
For paint application, follow steps:
- Degrease
- Scuff sand
- Bonding primer
- Thin coats and brush into embossing
Working Around Appliances and Small Workspaces
When you’re painting laminate cabinets in a tight kitchen or near appliances, plan your workflow so you can keep surfaces protected and access clear; cover stove tops, remove knobs, and unplug small appliances before you start.
Keep appliance clearance in mind, move what you can, and use carts for parts.
Prioritize workspace organization: lay drop cloths, label pieces, and maintain a clear path for ventilation and drying.
Estimating Time and Project Stages by Kitchen Size
Scope matters: estimating time for painting laminate cabinets depends on kitchen size, number of cabinet faces, and whether you’re doing a full teardown or just doors and drawers.
You’ll use time estimation for project planning and scheduling.
Consider stages:
- Small: 1–3 days
- Medium: 3–7 days
- Large: 7–14 days
- Extra: 2+ weeks with teardown
When to Call a Pro: Warning Signs
Estimating time helps you plan, but some red flags mean you should call a pro instead of tackling the job yourself.
If extensive peeling signs cover large areas, warped doors, soft substrate, or lingering moisture, don’t gamble. A professional assessment can diagnose adhesive failure, structural issues, or hidden mold.
Call a pro when repairs exceed simple sanding and spot priming—safety and longevity matter.
Recommended Product Shortlist
Start with a handful of reliable products that’ll give you professional-looking results without headaches: a high-adhesion primer formulated for slick surfaces, a water- or oil-based cabinet paint rated for durability, a solvent-free degreaser, 220–320 grit sandpaper or abrasive pads, and quality brushes or a HVLP sprayer for smooth application.
Start with a few dependable products—high-adhesion primer, durable cabinet paint, solvent-free degreaser, fine sandpaper, and quality brushes or sprayer.
- Primer for surface adhesion
- Laminate paint
- Degreaser
- Finish coat tools
Project Timeline: Single Door to Full Kitchen
Now that you’ve gathered the right primer, paint, degreaser, sandpaper, and tools, plan the work from a single door to a full kitchen so you don’t get overwhelmed. Use basic project management and timeline estimation: start one door, scale to a drawer bank, then tackle all cabinets.
| Phase | Time |
|---|---|
| Single door | 1 day |
| Small section | 2–3 days |
| Full kitchen | 1–2 weeks |
Before-and-After Care to Preserve Your Finish
Before you finish the last coat, plan simple before-and-after care so your new finish stays smooth and durable:
Before applying the final coat, plan simple before-and-after care to keep the finish smooth and durable
- Clean surfaces thoroughly as before care, removing grease and dust.
- Sand lightly between coats to promote adhesion.
- Cure fully—avoid heavy use for days.
- For after care, clean gently with mild soap, avoid abrasives, and use felt pads to prevent scratches.
Troubleshooting Checklist and Key Takeaways
1 quick checklist will help you diagnose common problems fast: inspect adhesion, look for visible brush or roller marks, check for flaking or peeling at edges, and note any color inconsistency or texture issues so you can pick the right fix.
Use targeted troubleshooting techniques: sand, prime, and recoat correctly.
Watch for common pitfalls like inadequate prep, wrong primer, or rushing cure times.
Frequently Asked Questions
Can I Paint Laminate Cabinets Over Existing Paint, Not Bare Laminate?
Yes — you can paint laminate cabinets over existing paint if you follow prep tips: clean, sand, degloss, and prime. Choose paint types like durable acrylic or alkyd enamel for adhesion and lasting finish; don’t skip primer.
Will Painted Laminate Cabinets Off-Gas Harmful Chemicals After Curing?
Sure—no, they typically stop off-gassing after curing, but don’t get smug: off gassing concerns matter, so you should follow safety precautions like ventilating, using low-VOC products, and letting coatings fully cure before regular use.
How Do I Match Paint Color to Existing Kitchen Trim or Countertops?
You match paint color by sampling swatches under real light, testing small patches, and using color matching tools; prioritize trim compatibility by coordinating undertones, finishes, and contrast so your cabinets blend smoothly with trim and countertops.
Can I Paint Cabinet Interiors and Still Safely Store Food?
Yes — you can, but treat it like a handshake: choose low-VOC, food-safe interior paint and follow drying cures. Interior paint safety and food storage considerations mean sealing shelves, ventilating, and waiting full cure before storing edibles.
Are There Warranty or Insurance Implications After Repainting Cabinets?
Yes — repainting can affect warranty coverage and insurance claims; you should check manufacturer warranty terms and your home insurance policy, document the work, and save receipts so you can prove proper materials and professional repairs if needed.
Conclusion
You can save peeling laminate cabinets if you take the right steps: remove loose laminate, repair edges, sand, prime with a bonding primer, and finish with durable paint. Is it worth the effort versus replacing doors? Often yes—especially for one-off repairs or tighter budgets—but prioritize adhesion and prep to avoid repeat peeling. With proper products and care, your cabinets can look and hold up like new, saving money and time.