How to Paint High Ceilings Over Stairs Safely and Easily
You can paint high stairwell ceilings safely by planning access, clearing the area, and choosing the right equipment—an adjustable-leg ladder or mobile scaffold works best. Stabilize platforms with levelers, straps, or a wide non-slip board and always use PPE like goggles, a respirator, and non-slip shoes. Roll thin, even coats with a high-hide primer and maintain a wet edge to avoid drips. Follow step-by-step prep, measuring, and cleanup tips to lower risk and get professional results if you keep going.
What This Guide Helps You Achieve Painting Stairwell Ceilings
When you follow this guide, you’ll be able to paint stairwell ceilings safely and with a professional finish—minimizing falls, drips, and uneven coverage.
You’ll learn prep, safe ladder positioning, and tool choices that preserve stairwell aesthetics while letting you test and apply ceiling colors confidently.
Expect cleaner lines, consistent texture, and efficient workflow so results look intentional and last longer.
DIY Or Pro? When To Hire For Stairway Ceilings?
Now that you know how to prep, position ladders, and pick the right tools for stairwell ceilings, you’ll need to decide whether to tackle the job yourself or call a pro.
Weigh DIY considerations like experience, time, and comfort with heights against Professional insights on efficiency, insurance, and finish quality.
If risks or complexity exceed your skills, hire a pro.
Safety Risks Unique To Painting Over Stairs
When you paint over stairs you face unique ladder-placement challenges because uneven steps and railings can make supports unstable.
You’ll need clear fall-hazard controls like using scaffolding with guardrails or securing a spotter and harness.
Also plan for overhead debris—wear eye protection, cover the stairwell, and keep people clear below.
Ladder Placement Risks
Although you can’t set a standard ladder safely on uneven stair treads, you still have to reach those high spots—so planning placement is critical.
You’ll face ladder stability challenges, risk shifting on narrow steps, and contend with overhead safety hazards from fixtures and molding.
Assess tread widths, angle, and contact points, and don’t ignore obstruction clearance before ascending.
Fall Hazard Controls
Ladder placement is only part of the picture—painting over stairs adds unique fall hazards that you’ll need to control more aggressively.
Prioritize fall prevention with measures that secure footing and reduce trip zones, and always wear proper safety gear.
- Anchor ladders and use platforms.
- Mark edges and clear pathways.
- Use harnesses or spotters for steep runs.
Overhead Debris Safety
Because you’re working above a stairwell, bits of paint, old plaster, and tools can fall farther and hit harder than on flat floors, so you need controls that stop debris before it becomes a hazard.
Use mesh barriers, temporary tarps, and tool lanyards to contain overhead debris.
Follow safety precautions: clear the area below, post warnings, wear eye and head protection, and secure work zones.
Inspect Your Stairwell Before You Start
Before you set up your equipment, walk the stairwell top to bottom and note any trip hazards, loose railings, or uneven steps that could make working overhead risky.
Check stairwell dimensions for scaffold fit and clearances, and pick paint types suited for ceilings.
Then:
- Clear debris and tape loose edges.
- Tighten railings and fix loose treads.
- Mark no-go zones for helpers.
Measuring Angles And Clearances For Ladders And Scaffolding
Measure the stairwell angle so you know how a ladder will sit and where toe- and heel-clearances fall.
Check ladder clearances against doorways, landings, and handrails to guarantee safe setup.
If you’re using scaffolding, plan reach and platform placement so you can work without overreaching or blocking traffic.
Measure Stairwell Angle
Anytime you’ll be working near a stairwell, you need to check the angle and clearances so ladders or scaffolding sit safely and don’t block the stairs.
Measure incline with a digital angle finder, note stairwell design and ceiling height, and verify headroom.
Follow these steps:
- Record angle at multiple points.
- Compare to scaffold specs.
- Mark obstruction zones.
Determine Ladder Clearances
When you set up a ladder or scaffold, confirm clearances and angles so equipment sits securely and walkways stay unobstructed; measure from stair edges, overhead fixtures, and railings to verify safe spacing.
Use a level and angle gauge for proper ladder stability, note side-to-side clearances, and document clearance measurement.
Adjust feet, bases, or barriers to eliminate pinch points and trip hazards before climbing.
Plan Scaffolding Reach
Before you set up scaffolding or lean a ladder, calculate reach and angles so every platform and rung puts you within safe working distance without overreaching.
Measure stair pitch, ceiling height, and work radius. Choose scaffold types that fit the stairwell and wear required safety gear.
- Measure angles
- Verify clearances
- Lock platforms and test stability
Choosing The Right Ladder For Stairs
Picking the right ladder for stairs matters because a standard straight ladder won’t sit level on uneven steps, creating a dangerous wobble; you’ll want a model designed for stair use or one with adjustable legs and secure locking mechanisms to keep each foot stable. Consider ladder types and prioritize stair safety when choosing height, weight rating, and slip-resistant feet.
| Feature | Benefit | Tip |
|---|---|---|
| Adjustable legs | Level on steps | Lock before climbing |
| Slip feet | Better grip | Clean before use |
| Weight rating | Support painters | Match gear weight |
| Height | Reach safely | Avoid overextending |
Offset And Specialty Ladders Explained
You’ll learn how offset ladders let you work around obstructions by shifting the ladder’s upper rails so the feet stay on level ground.
We’ll also cover common specialty types—like articulating and platform ladders—and when each is the safer choice.
Finally, you’ll get concise tips for setting these ladders up securely before you climb.
Offset Ladder Basics
Offset ladders—also called articulating or combination ladders—give you safer, more stable access to high ceilings by shifting the ladder’s hinge and rung sections so one side extends higher than the other.
You’ll appreciate offset ladder benefits and understand offset ladder limitations for staircases.
Use one to:
- Reach uneven heights safely
- Stabilize on steps
- Adjust angle for comfort
Specialty Ladder Types
1 type of ladder won’t fit every ceiling job, so you should know how specialty designs—like articulating, platform, extension, and tripod ladders—differ and when to use them.
You’ll choose offset ladders for awkward stair runs, articulating ladders for tight angles, platform ladders for stability, and tripod or extension models as scaffold alternatives when space or access demands a nontraditional setup.
Safe Ladder Setup
Now that you know which specialty ladder suits tricky runs and tight angles, you need to set them up so they won’t slip, bind, or overload.
Check ladder stability and perform safety inspections before climbing.
- Level feet, use pads or wedges.
- Secure top to a solid anchor.
- Don’t exceed weight rating; position for comfortable reach.
When To Use Adjustable Scaffolds On Stairs
When your ceiling work spans a staircase or uneven landing, use an adjustable scaffold so you can level your platform and keep both feet and tools steady.
Adjustable scaffolds let you maintain a safe, ergonomic working height without constantly climbing up and down ladders. You’ll choose them for scaffold advantages like stability and payload, especially after evaluating stairwell considerations, load capacity, and secure footing before starting.
Safer Alternatives: Scaffold Towers, Platform Ladders, Ladder Jacks
If stairs or uneven landings make a standard ladder unsafe or awkward, consider other work platforms that give you more stability and room to move: scaffold towers, platform ladders, and ladder jacks each suit different ceiling heights and job scopes.
- Scaffold towers — you’ll get excellent scaffold safety and workspace.
- Platform ladders — compact, improved ladder stability.
- Ladder jacks — flexible for short sections and stair runs.
How To Stabilize Ladders And Platforms On Uneven Treads
When your ladder sits on uneven treads, start by leveling the feet with adjustable bases or sturdy shims so the frame doesn’t wobble.
Then lock or tie off your work platform and use non-slip pads or ratchet straps to keep it from shifting underfoot.
Check each contact point again before you climb or move to make sure everything stays secure.
Leveling Ladder Feet
Because even a slight wobble can turn a steady ladder into a hazard, you should always level the feet before climbing: use adjustable leg extensions, ladder levelers, or sturdy wooden wedges to guarantee all four points sit firmly on the same plane.
Check that the ladder isn’t rocking by applying downward pressure, and reposition or add support until it stays stable.
- Use leg extensions for ladder stability.
- Make precise footing adjustments with wedges.
- Test by applying weight and recheck.
Securing Work Platforms
Although uneven treads can turn a sturdy ladder or platform into a tipping hazard, you can stabilize your setup with a few simple measures: use adjustable leg extensions or ladder levelers, place a wide, non-slip board across steps, and secure the work platform stability with straps or brackets.
Check platform height before starting, lock all fittings, and test firmness under weight to guarantee safe painting.
Essential PPE For High-Ceiling Stairwells
If you’re painting a stairwell with a high ceiling, gear up with PPE that protects your head, lungs, eyes, hands, and footing.
You’ll want personal protective and safety gear that fits well and stays put on stairs.
- Hard hat and respirator
- Safety goggles and hearing protection
- Non-slip gloves and shoe traction
Poles, Rollers, Grips: Tools To Reduce Overhead Strain
Reach up without strain by choosing the right extension poles, lightweight rollers, and ergonomic grips—these tools let you paint high ceilings from the floor or a low step instead of overreaching.
Pick painter’s tools that balance weight and reach, use ergonomic grips to reduce wrist fatigue, and attach rollers securely.
Practice controlled, short strokes to maintain control and prevent shoulder overuse.
Choosing Roller Nap, Brush, And Extension Poles For Ceilings
For high ceilings you’ll want the right roller nap and a sturdy extension pole so you can cover texture without overworking your arms.
Choose a longer nap (3/4″–1″ or more) for textured surfaces and a shorter nap for smooth ceilings, and pick a pole that locks firmly and extends comfortably to your reach.
Also match brush size and quality to trim areas so you don’t need to stretch or make extra passes.
Roller Nap Length
Choosing the right roller nap makes a big difference in how smoothly paint goes on high ceilings and how much texture you leave behind.
Pick nap based on surface: smooth, semi-rough, or textured. Consider roller texture and roller selection for even coverage.
- 3/16″ for smooth
- 3/8–1/2″ for semi-rough
- 3/4″–1″ for textured
Extension Pole Selection
After you’ve picked the right nap and roller head, you’ll need an extension pole that gives you steady control without straining your arms.
Consider extension pole types: threaded, quick-lock, and telescoping. Match pole lengths to ceiling height and stair angles—longer for vaulted areas, shorter for tight stairwells.
Choose lightweight aluminum or carbon-fiber for balance, and test grip and stability before painting.
Best Paints And Primers For Stairwell Ceilings
When you’re picking paints and primers for a stairwell ceiling, focus on durability, light reflectance, and ease of touch-up; stairwells see more scuffs, moisture, and fluctuating light than typical ceilings.
- Use a mildew-resistant primer and high-hide latex topcoat for durability.
- Consider eco friendly options with low VOCs to protect indoor air.
- Think about color psychology when selecting tones that calm traffic areas.
Color And Sheen Choices That Hide Flaws And Boost Light
Choose a matte finish when you want to minimize bumps and imperfections on high ceilings, since it won’t reflect light and will hide blemishes.
Pair that with light neutral colors to amplify daylight and make the space feel taller and brighter.
Together they cut down on visible flaws while boosting overall light without calling attention to the ceiling.
Matte Finishes Minimize Blemishes
Want to hide cracks, roller marks, and uneven texture up high? You’ll prefer matte finishes for blemish concealment; they diffuse glare and mask flaws.
When prepping and painting, follow steps:
- Inspect and fill imperfections.
- Use quality matte primer and roller.
- Apply thin, even coats for consistent coverage.
This approach keeps ceilings looking smooth without drawing attention to surface defects.
Light Neutrals Amplify Brightness
Because light neutrals reflect more light, they make high ceilings feel brighter and help mask minor imperfections, so you’ll get an airier, cleaner look without spotlighting flaws.
Choose neutral color schemes with warm or cool undertones to suit stairs’ lighting.
Use light reflection techniques—satin or eggshell sheens—to bounce more light, minimize texture visibility, and create consistent, forgiving surfaces up high.
Protecting Stairs, Banisters, And Fixtures From Paint
When you’re painting high ceilings, don’t overlook the stairwell and its fixtures—covering banisters, treads, and light fittings up front prevents drips and scuffs that are a pain to fix later.
Use simple paint protection and fixture coverage strategies:
- Lay drop cloths on treads.
- Wrap banisters with plastic.
- Shield fixtures with removable covers and secure edges.
Taping And Masking Techniques For Tricky Features
1 simple, precise strip of painter’s tape can save you hours of cleanup when you’re working around tricky edges and fixtures. Use taping techniques that follow profiles, press edges, and overlap for protection. Masking edges with plastic sheeting protects stairs and banisters. Practice clean removals to avoid damage.
| Item | Tool | Tip |
|---|---|---|
| Corners | Tape | Press firmly |
| Fixtures | Plastic | Overlap seams |
| Railings | Cloth | Secure ends |
Preparing Ceilings: Cleaning, Sanding, And Patching
Before you paint, you’ll want to clean the ceiling to remove dust, grease, and cobwebs so the new paint sticks properly.
Patch cracks and dents with a lightweight spackling compound, let it dry, then sand smooth to feather the repair into the surrounding surface.
Doing these steps carefully will save you time and give you a professional-looking finish.
Surface Cleaning Techniques
Start by removing dust, cobwebs, and grease so paint will adhere evenly and your finish will last.
Use proper surface preparation techniques and mild cleaning solutions to avoid damage.
Then:
- Vacuum with brush attachment to lift loose debris.
- Wipe with a sponge and diluted cleaner, rinsing promptly.
- Allow full drying before primer or paint; check for stains to treat separately.
Patching And Sanding
Once the ceiling’s clean and dry, you’ll move on to patching and sanding to create a smooth, paint-ready surface.
Inspect for cracks and holes, apply appropriate patching materials—spackle for small dings, joint compound for larger areas—let dry, then sand.
Use progressive sanding techniques: start coarse, finish fine.
Wipe dust, repeat where needed, and guarantee evenness before priming.
Patching Cracks, Stains, And Water Damage On Stairway Ceilings
Stairway ceilings demand careful attention because cracks, stains, and water damage can spread quickly and compromise both appearance and safety.
You’ll do thorough ceiling prep: identify damage, contain area, and remove loose material.
Then follow steps:
- Inspect and document crack repair needs.
- Treat stains with appropriate cleaners.
- Address water damage source before patching and sanding.
Priming Porous Or Stained Stairwell Ceilings
Before you prime, make certain the surface is clean, dry, and free of loose material—porous or stained ceilings will soak up primer unevenly if you don’t.
Address stains with appropriate stain treatment and allow full cure.
For primer selection, pick a high-coverage, stain-blocking primer labeled for porous surfaces.
Apply thin, even coats and check absorption before finishing to guarantee uniform topcoat performance.
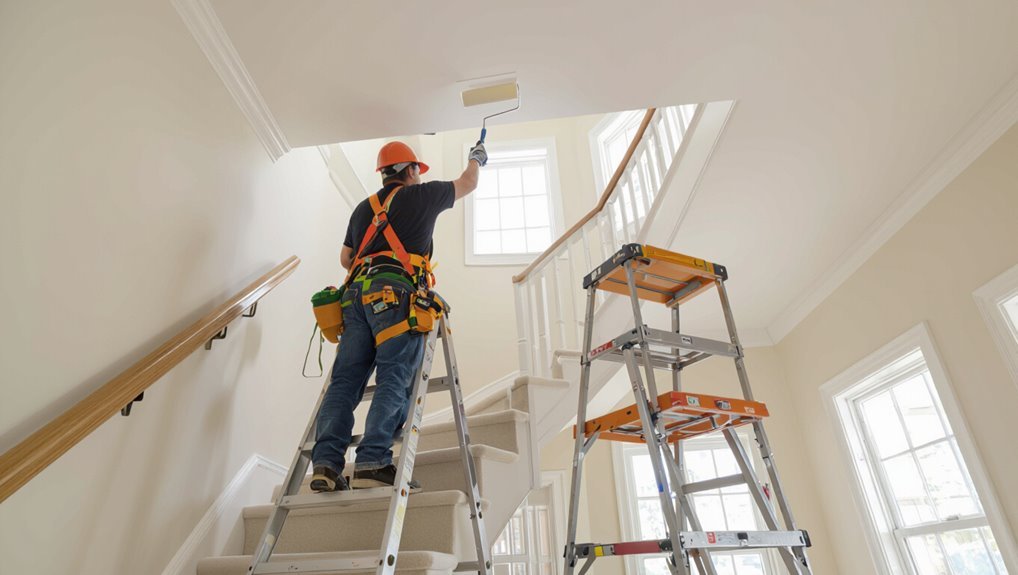
Step-by-Step: Brushing And Rolling Ceilings Over Stairs
When you’re working over stairs, set your ladder so it’s centered and stable on the steps and always lock any spreaders or braces.
Use a brush for cutting in along edges and switch to a roller with an extended pole to cover large areas without overreaching.
Move the ladder as needed rather than stretching, and keep one hand free to steady yourself while you paint.
Proper Ladder Positioning
Position your ladder so its base sits on a stable, level surface and the top rests firmly against a solid railing or wall section—never a thin baluster or loose trim—so you can reach the ceiling above the stairs without leaning or overreaching.
- Check ladder stability: secure feet and use anti-slip pads.
- Verify ladder angles: follow 4:1 rule.
- Have a spotter hold the base and hand tools on a belt.
Safe Brush And Roll Techniques
Start by brushing a clean, well-taped edge along the ceiling above the stairs.
Then switch to rolling with an extension pole to cover larger areas without overreaching.
Use brush techniques for crisp corners and cut-ins, keeping short, controlled strokes.
Employ roll techniques with a ¾-inch nap, overlap each pass, maintain a wet edge, and step carefully to avoid stretching or leaning.
How To Cut In Safely Around Walls And Fixtures On Stairs
Because you’re working on stairs, cutting in around walls and fixtures takes extra care to avoid slips and drips; set up secure footing and cover railings and steps before you open a can.
Use steady cutting techniques and prioritize wall protection. Follow this quick routine:
- Tape edges, shield fixtures.
- Hold brush at a consistent angle.
- Work slowly from top to bottom, wiping drips immediately.
Working In Sections: Sequence For Painting Above Stairs
After you’ve cut in safely on the stairs, work in manageable sections so you’re always steady and never painting over wet edges.
Start at the top of the stair run, paint a single panel length, roll toward you, then back away to inspect. Move methodically down the stairs, overlapping minimally to blend edges.
Prioritize stair safety and proven paint techniques for consistent coverage.
Managing Drips And Splatter Over Landings
When you’re working over a landing, control drips and splatter by minimizing paint on your brush and roller, keeping strokes light, and working from the far edge toward the handrail so gravity carries stray drops away from your shoes and the tread.
Use drip management and splatter protection:
- Lay tarp and tape seams.
- Wring rollers, tap brushes.
- Wipe edges immediately.
Drying Times And Ventilating Your Stairwell
Managing drips and splatter correctly helps prevent rework, but you also need to think about how long the paint will take to dry and how you’ll ventilate the stairwell.
Use drying techniques like thin coats and controlled airflow; set fans to move air toward open windows or doors.
Follow ventilating tips: keep circulation steady, avoid drafts that blow dust, and monitor humidity until surfaces feel dry.
When And How To Apply A Second Coat Safely
A light touch test tells you when it’s safe to apply a second coat: gently press a clean fingertip to an inconspicuous spot—if paint doesn’t tack or transfer and the surface feels dry to the touch, you can proceed.
- Check evenness and tack; wait longer if needed.
- Use steady, overlapping painting techniques and thin layers.
- Work from farthest point toward exit, keeping ventilation steady.
Troubleshooting Texture Issues, Laps, And Roller Marks
If your ceiling shows uneven texture, visible laps, or roller marks after painting, act quickly to pinpoint the cause and fix it before the paint fully cures.
Use texture troubleshooting: check surface preparation tips, primer application, and paint drying conditions.
Troubleshoot texture: verify surface prep, primer coverage, and proper drying conditions for a smooth, even ceiling finish.
Adjust paint application techniques, brush selection, and roller mark solutions for finish consistency.
Employ lap prevention and cleanup strategies to restore an even coat.
Common Mistakes To Avoid On Stairwell Ceiling Projects
Stairwell ceilings demand extra care because tight angles, limited access, and variable lighting amplify minor mistakes; avoid rushing, using the wrong ladder, or skipping prep so you don’t end up with drips, missed spots, or safety hazards.
- Use correct gear to dodge common pitfalls and instability.
- Prep surfaces thoroughly to prevent adhesion and texture issues.
- Work with a partner to manage stairwell challenges and sightlines.
Cleanup And Safe Ladder/Scaffold Dismantling On Stairs
When you’re finishing up, clear paint trays, brushes, and drop cloths from the stairs before taking down ladders or scaffolds so nothing gets knocked over or becomes a trip hazard.
Use simple cleanup techniques: bag rags, seal cans, and wipe drips.
Dismantle scaffolds step-by-step, keeping one person steadying equipment.
Follow ladder safety—lock joints, lower slowly, and store gear securely to prevent slips.
Cost Vs. Time: Estimate Your Project And Decide On Help
Start by estimating how long each step will take and what it’ll cost so you can decide whether to DIY or hire help.
Balance budget considerations and time management to avoid surprises. Consider:
Balance budget and timing to avoid surprises—weigh supplies, rentals, and labor before deciding DIY or hire.
- Supplies vs. rental/equipment costs.
- Labor hours if hiring pros.
- Project timeline vs. your availability.
Use estimates to choose the safest, most efficient option.
Final Checklist To Finish A Stairwell Ceiling Painting Project Safely
Before you wrap up, run through a focused checklist to confirm the job’s safe and complete:
| Item | Action |
|---|---|
| Inspect paint | Look for missed spots, drips |
| Clean area | Remove drop cloths, vacuum |
| Tools | Secure and store ladders, brushes |
| Safety reminders | Turn off lights, test rail stability |
Do final touches: touch up edges, verify ventilation, and document completion before clearing the area.
Frequently Asked Questions
Can I Paint Stairwell Ceilings While Stairs Are in Daily Use?
Yes — you can, but you’ll need strict stair safety and paint preparation. Block off sections, use drop cloths and non-slip tape, work with a partner, ventilate, and schedule short sessions when traffic’s minimal.
How Do I Paint Ceilings Near Delicate Wallpaper or Murals?
You’ll protect wallpaper or murals with gentle masking and drop cloths, use color matching for touch-ups, test paints nearby, work from the top down, and use soft brushes or low-tack tape so you won’t damage delicate surfaces.
Are Voc-Free Paints Effective for High, Poorly Ventilated Stairwells?
Think of a lighthouse guiding you: yes, VOC-free paints can work in high, poorly ventilated stairwells. You’ll meet VOC regulations and still get reasonable paint durability, though expect longer drying and occasional touch-ups.
Can Heating Ducts or Recessed Lights Be Temporarily Removed Safely?
Yes — you can temporarily remove duct removal panels and a recessed light fixture, but you should shut HVAC power, cap ducts, turn off electrical breakers, label wiring, and follow safety codes or hire a pro if you’re unsure.
How to Transport Large Ladders or Scaffolds Through Narrow Staircases?
Think of threading a needle: you’ll maneuver collapsible scaffolds or multi-section ladders, measuring stair width first, angling sections carefully, using spotters, protective padding on railings, and prioritizing ladder safety while choosing scaffold options that fit.
Conclusion
You’ve learned the safety, measuring, and setup steps to tackle that stairwell ceiling without risking a fall. If the job feels too big, hire a pro—better safe than sorry. Tidy up as you go, check clearances twice, and break the task into manageable stages so it won’t swallow your weekend. Like climbing a ladder one rung at a time, steady, careful work gets you to the top with paint and pride intact.